
Most search results for cutting roof trusses for skylight start from the wrong premise. They treat a truss like an oversized rafter and the opening like a carpentry problem. On site, that mindset gets builders, owners and certifiers into trouble fast.
A trussed roof is an engineered system. Once you understand that, the job changes completely. The safest skylight is the one that fits the roof you already have. If the opening must cross trusses, the work stops being a simple install and becomes an engineered structural alteration with documentation, liability and weatherproofing to sort out before a saw touches the roof.
Table of Contents
Why You Never Just Cut a Roof Truss
A lot of bad advice starts with a sentence like, “Just cut the truss and box it out.” That might sound simple on a forum. It's not how responsible roof work is done.
In Australian residential construction, a roof truss isn't just framing timber laid out in a convenient pattern. It's a pre-engineered structural member designed to carry load through a specific arrangement of top chords, bottom chords and webs. Guidance on retrofitting skylights into trussed roofs makes the point plainly. Trusses should not be field-cut or notched without engineering redesign, and skylight openings typically require adjacent members to be reworked with headers so load is redistributed into neighbouring trusses, not lost by removing part of a chord, as outlined in this retrofit guidance on truss-roof skylights.

A truss is a system, not a spare piece of timber
That distinction matters because installers often borrow methods from stick-built roofs. In a conventional rafter roof, there's more room to frame an opening by trimming and heading off rafters using known carpentry methods. In a trussed roof, every member works with the others. Change one member and you change the load path.
The failures aren't always dramatic on day one. More often, the roof starts telling on you later. You see movement, lining cracks, ceiling distortion, doors going out of square, or uneven load ending up where it was never meant to go.
Practical rule: If someone says they can cut a truss “just a little” for a skylight without engineering, they're asking you to accept structural risk they probably won't carry once the job is signed off.
That's why the better question isn't whether cutting roof trusses for skylight openings is possible in some abstract sense. The primary question is whether the opening can be achieved without truss alteration. If not, who is designing the repair, and who is accepting liability for the modified roof?
What actually works in practice
On real jobs, the smartest approach is usually one of these two:
Fit the skylight between trusses. That keeps the existing structural system intact and usually makes the approval path cleaner.
Obtain a site-specific structural design. If the required opening crosses a truss line, the repair detail needs to be engineered for that roof, not copied from a generic sketch.
Builders also need to think beyond the saw cut. Councils, certifiers and insurers care about documentation. Owners care about leaks and cracks. If the truss has been altered without the right design and sign-off, everyone starts pointing at each other later.
For anyone dealing with approvals, product selection and permit pathways, the practical side of that process is covered in these building permit requirements for skylights. It's worth checking early, before the skylight size gets locked into drawings that the roof framing won't sensibly accept.
Assessing the Roof and Planning Your Opening
The cleanest skylight job is planned from the roof structure outward. Not from a brochure photo. Not from the owner's first sketch. Not from how bright they want the room to feel.

Where trusses are laid out at regular centres, the practical width of the opening is usually set by that geometry first. Manufacturer guidance notes that with 600mm on-centre trusses, cutting one truss can produce an inside rough opening of about 1130mm, while 900mm centre roofs may yield about 1730mm for one cut truss. Skylights are often sized at about 5% of floor area for rooms with many windows and up to 15% for rooms with few windows. That's why multiple smaller units often make more sense than one oversized opening. See the sizing guidance in this skylight rough-opening reference.
Start with the framing, not the wish list
On site, the first job is to confirm what you're dealing with:
Check the roof type. Trussed roof or stick-built roof. Don't assume from ceiling lines alone.
Measure the spacing. Get into the roof space where possible and confirm actual centres.
Find obstructions. Services, bracing, solar wiring, ducting and plumbing vents can kill a neat install.
Check roof pitch and cladding. The skylight has to suit the roof it's going into.
Confirm shaft conditions. A cathedral ceiling and a flat ceiling with roof space above are two very different jobs.
A lot of avoidable cost comes from choosing the unit first and forcing the structure to comply later. Good builders reverse that process. They map the frame, identify the realistic opening, then choose the skylight.
For pitch planning before the product is specified, use a proper roof pitch calculator for skylight planning. It helps eliminate guesswork when you're checking suitability against roof form.
A practical site checklist
When I assess a trussed roof for a skylight opening, the decision tree is pretty simple:
Can the unit fit between trusses cleanly? If yes, that's the front-runner.
Will the shaft deliver light where it's needed? Sometimes the roof opening works, but the ceiling below makes the result poor.
Does the room need one opening or several smaller ones? Smaller, well-positioned units often spread light better than one oversized hole.
Is access realistic for safe install and flashing work? A workable design still has to be buildable.
If the owner insists on a larger span, is engineering being engaged early? Not after demolition. Before it.
This walkthrough shows the kind of planning mindset that separates a neat installation from a problem job:
The roof structure usually decides the opening. The skylight selection follows from that, not the other way around.
The Engineered Approach to Truss Modification
Sometimes the design brief doesn't fit between existing trusses. The room might need a wider opening, the layout might demand a centred unit, or the architect may have locked in a detail that crosses the framing pattern. When that happens, the job moves out of standard installation and into skylight installation engineering.
When the opening must cross a truss line
The biggest mistake is treating that as a carpenter's upgrade. It isn't. Once a truss is altered, the original engineering assumptions no longer apply in the same way.
A common gap in online advice is that it talks about how to cut and reinforce, but skips the part that matters most on a real build. Who designed the repair. Fine Homebuilding's forum puts it bluntly. The only real way to do it properly is to have the truss company's engineers design a repair specific to that house and trusses, and it notes that adjacent trusses may need redesign because they can become overstressed. That issue is discussed in this truss-cutting forum thread on engineered repair.
In practice, that engineered repair may involve:
Headers at the opening ends to transfer interrupted loads.
Reinforcement to adjacent trusses because they often pick up redistributed load.
Modified webs or crippled framing to maintain stability around the opening.
Connection details that are specific to the actual truss profile and roof loads.
None of that should be guessed on site.
The paperwork matters as much as the timber
A lot of builders hear “engineering” and think only about structural adequacy. That's only half the story. The other half is compliance and liability.
If you're working in Australia, the practical question is usually, what documentation does the council, certifier or builder need before any roof member is altered? That's the point many DIY articles miss. The installation may still be physically possible, but without drawings, sign-off and a clear responsibility trail, you've created exposure for everyone on the job.
A truss modification is not just a framing detail. It's a design responsibility.
That's also why broad references to AS 4285 compliance should be handled carefully. On site, compliance isn't achieved by saying the standard name out loud. It comes from a full installation approach that respects structural design, roof weatherproofing, product suitability and certifier requirements together. If the skylight opening needs structural alteration, the standard roof details and product instructions aren't a substitute for engineer-designed repair.
For builders who need an outside perspective on risk before works begin, a structural assessment focused on ensuring property structural integrity is a useful reminder of where liability sits. It's not with the person who searched for a shortcut. It lands on the people who approved, built or certified the alteration.
Constructing and Weatherproofing the Skylight Frame
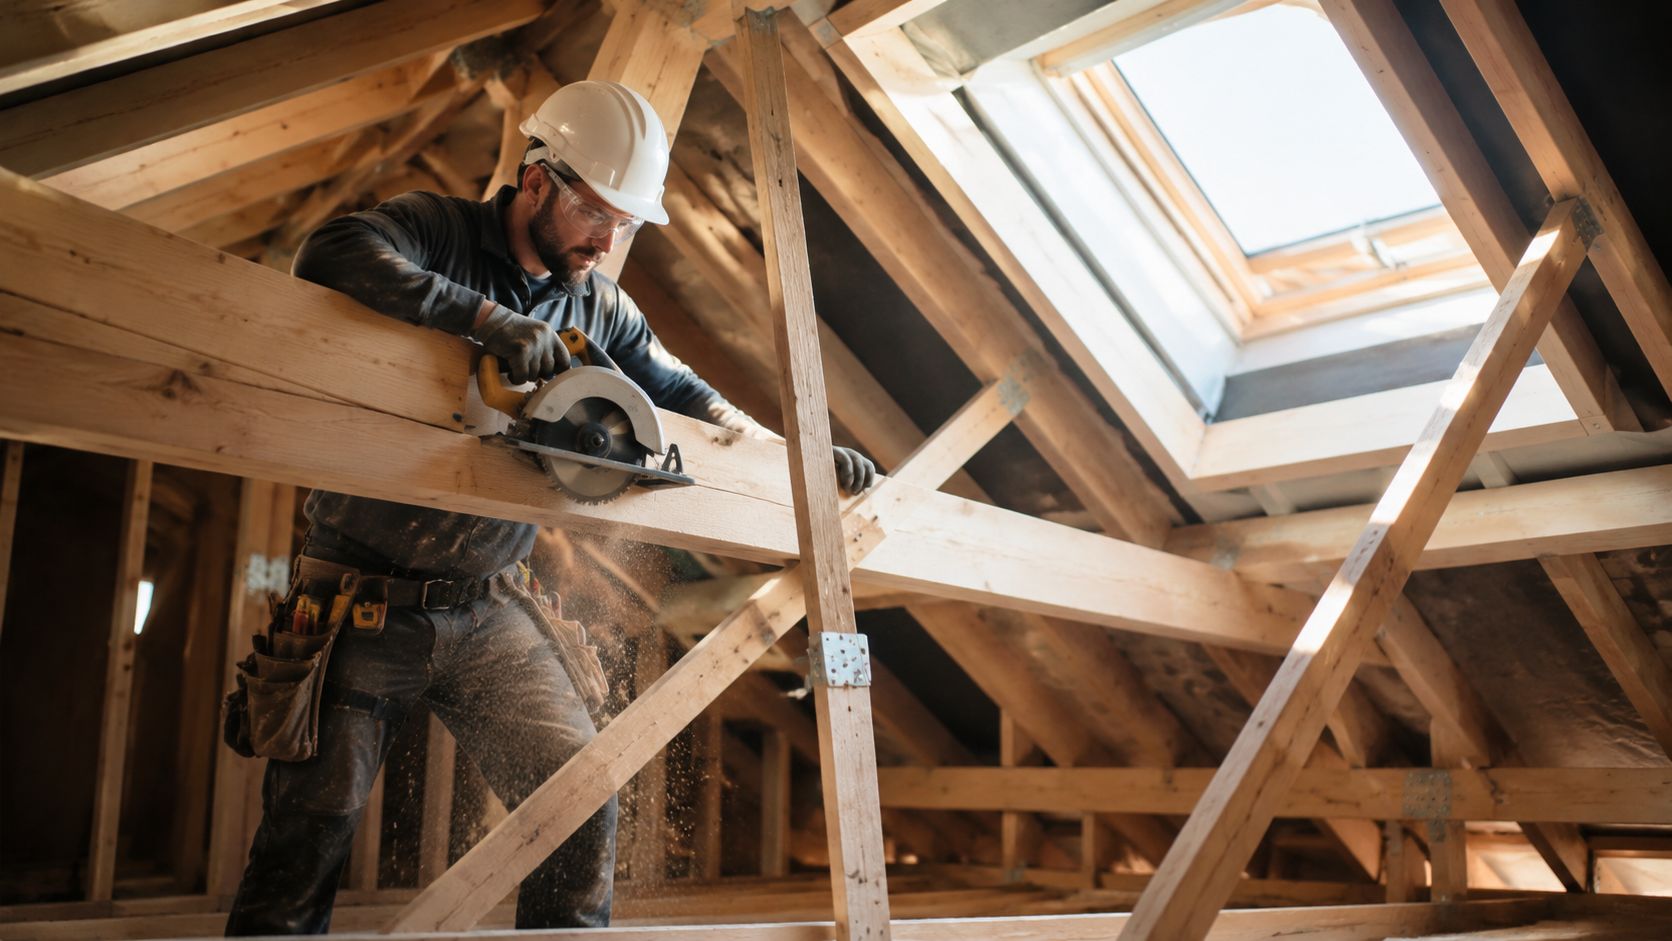
Once the opening is properly located and any structural design is in hand, the work has to be executed with discipline. Most failures come from one of two causes. Someone damages structural members during cutting, or someone rushes the waterproofing sequence.
Temporary support before any cutting
Before roof sheeting, decking or framing is opened up, the roof needs to be stabilised. Practical retrofit guidance says the circular saw depth should be set to match only the roofing or sheathing thickness so the blade doesn't cut into structural members below. The same guidance says the roof should be temporarily shored with 90x45mm spanning at least two rafters or trusses on each side of the opening before structural work proceeds. That workflow is outlined in this skylight installation method guide.
That detail sounds basic, but it separates careful work from sloppy work. If the saw is too deep, you can damage the very members you're trying to preserve. If the roof isn't shored, movement starts while you're still framing the opening.

A tidy sequence usually looks like this:
Set up access and fall protection. Don't start roof penetrations without safe access, stable platforms and a rescue plan.
Mark from inside and outside. Confirm alignment before any external cut is made.
Cut cladding and deck only. Keep blade depth shallow and deliberate.
Install temporary shoring. Support the roof before framing changes happen.
Build the opening square. A crooked rough opening creates problems all the way through flashing and internal finishes.
Framing the opening and sealing it properly
Once the opening is ready, framing has to match the design intent exactly. If the opening sits between trusses, the surrounding members still need to be neat, square and capable of taking fixings without distortion. If an engineered truss modification has been specified, every header, support and connection should follow that design rather than site improvisation.
The waterproofing side deserves the same care. A skylight is a roof penetration. That means the underlay, membrane, flashing sequence and cladding integration all need to shed water in layers.
A reliable install usually includes these checks:
| Item | What to verify |
|---|---|
| Opening geometry | Square, level, and to manufacturer dimensions |
| Frame support | Full bearing where required, no twisted members |
| Membrane laps | Installed to drain water outward, not trap it |
| Flashing order | Bottom, sides, then head flashing in a proper sequence |
| Final test | Controlled water check before interior close-up |
If you’re reviewing fixings and hardware choices for timber framing, flashing attachment and corrosion resistance, this guide to fasteners and fittings is a practical reference. The exact fastener schedule still needs to suit the product instructions and roof environment, but poor hardware selection is one of those quiet errors that shows up later.
Site note: A skylight rarely leaks because glass is glass. It leaks because someone got the laps, levels, fixings or flashing sequence wrong.
For framing details around the opening and shaft, this skylight frame installation resource is worth reviewing alongside the product instructions before the roof is opened.
Smart Alternatives When Structural Work Is Not an Option
Not every roof should be altered. Some jobs become messy once the truss layout, services, access limitations and approval pathway are all taken into account. That doesn’t mean the room has to stay dark.
Smaller units often solve the problem better
One of the best alternatives to cutting roof trusses for skylight openings is to stop chasing a single oversized unit. Two smaller skylights placed between trusses can be easier to document, easier to flash and often better balanced across the room.
That approach also gives you flexibility with room layout. You can spread daylight along a kitchen run, over a hallway, or across an open-plan space without pushing the structure into a complicated redesign. On difficult roofs, restraint is usually the smarter move.
If you’re still in the planning phase, alternatives to traditional skylights can help compare options before the structure gets touched.
When a roof opening isn’t possible at all
Some spaces will not accept a conventional skylight. Ground-floor rooms below another storey, areas blocked by services, or locations where roof access is impractical all need a different answer.
That’s where non-structural daylight-style solutions come into their own. Vivid Skylights’ AuraGlow LED skylight range is designed for places where a traditional skylight can’t be installed. It projects the visual effect of a skylight and changes colour through the day to mimic the changing sky, which makes it a strong design option for interiors that need light presence without roof penetration.
If you are making cuts in associated lining, trim or fitout work around these alternatives, choosing the right blade matters as much as technique. This advice from Neasden Hardware is a useful refresher on matching the blade to the material rather than forcing one setup through every cut.
Your Partner for Compliant Skylight Solutions in Australia
The safest builder’s guide to cutting roof trusses for skylight work is simple. Don’t start with cutting the truss. Start with the roof structure, the opening that fits it, and the compliance pathway that keeps the job defensible.
If the skylight can fit between existing trusses, that’s usually the best outcome. If the design must cross trusses, treat it as an engineered structural alteration with proper documentation, framing details and sign-off. After that, the success of the install comes down to disciplined execution, especially the flashing and waterproofing sequence.
For Australian builders, draftsmen and serious renovators, Vivid Skylights is a strong supply partner when the project calls for quality products and reliable logistics. The range includes double glazed fixed skylights, electric operable skylights and solar powered operable skylights, with nationwide delivery across Australia. For spaces where a conventional roof opening isn’t viable, the AuraGlow LED skylight range gives you a design-led alternative that still creates the feel of overhead daylight.
You can browse the full Vivid Skylights range here. It’s a practical place to compare compliant skylight options before locking in framing decisions on site.
Need a skylight supplier that understands both product performance and the practical aspects of Australian roof construction? Vivid Skylights offers double glazed fixed and operable skylights, including electric and solar powered models, plus Australia-wide delivery for residential projects nationwide. If structural constraints rule out a traditional install, their AuraGlow LED skylight range gives you a smart alternative without compromising the look of natural overhead light.