

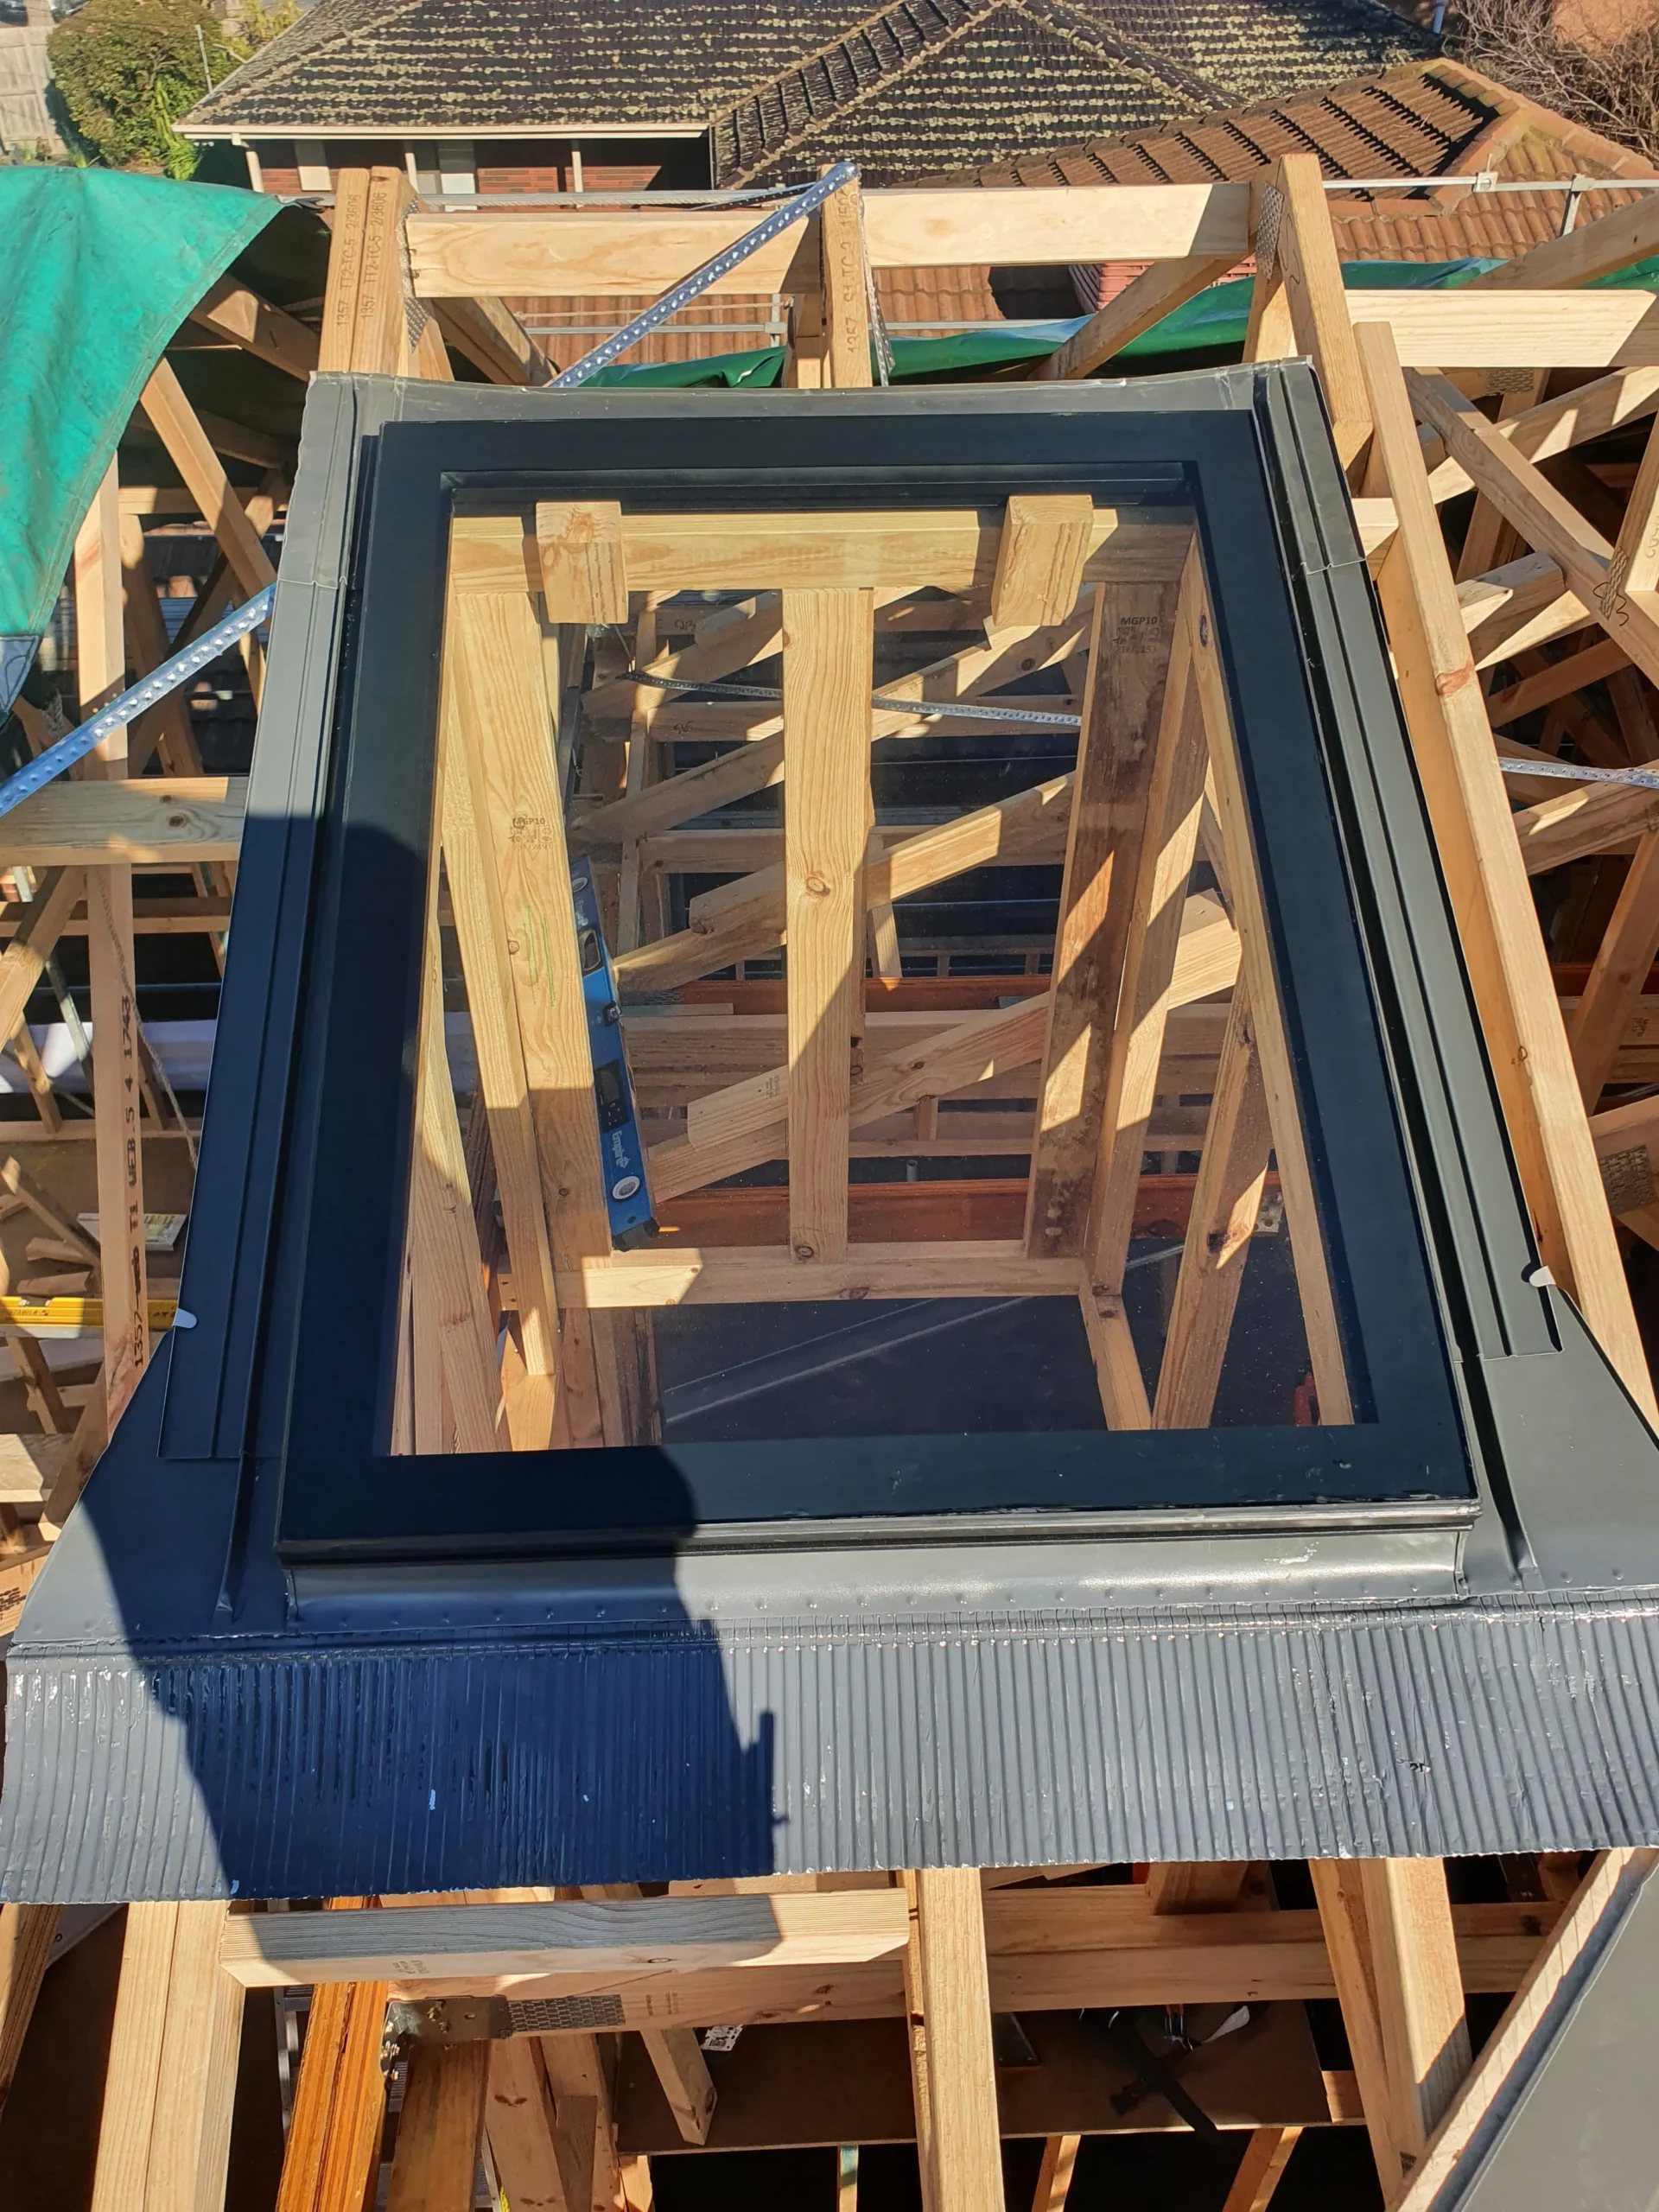
Most advice about skylights gets the cause of failure backwards. People blame skylight flashing when they see a stain on the ceiling, but the trouble often starts earlier, when the opening is cut in the wrong spot, the frame sits out of square, or the roof structure and shaft details aren't treated as one system.
A good skylight frame installation isn't just about fitting a product into a hole. It's about how the frame bears on the roof, how the opening is supported, how water is directed away from the unit, and how the inside shaft is insulated so the finished job doesn't end up dripping, staining, or cracking later. If the frame is twisted, oversized, undersized, or poorly integrated with the roof, the flashing has to compensate for bad geometry. Flashing rarely wins that fight for long.
Table of Contents
Why Most Skylight Leaks Start with the Frame Not the Flashing
The common myth is simple. If a skylight leaks, the flashing must be bad. That sounds logical, but it ignores what happens underneath. A skylight is only as watertight as the structure supporting it. If the opening is in the wrong place, if the frame racks when it's fastened, or if the roof build-up around it forces awkward laps, water gets a path before the flashing kit is even finished.
Independent roofing guidance points to poor placement and interference with structure as a cause of uneven lighting, overheating, and structural issues, while many troubleshooting articles stay focused on visible leaks and flashing instead of the framing decisions that create those failures in the first place, as noted in this discussion of common skylight installation mistakes. That's why a proper skylight frame installation has to be treated as a framing problem first and a product-install problem second.
The frame sets the conditions for everything after it
A square, properly supported opening does three jobs at once:
It holds shape: The skylight sits flat, centred, and flush instead of twisting under fasteners.
It protects drainage geometry: Flashing pieces can lap properly because the frame edges stay true.
It reduces stress later: Plaster joints, trim lines, and shaft linings are less likely to crack or show movement.
If any of that is off, the signs may not appear straight away. You might first notice paint bubbling, damp plaster, or a musty smell below the opening. If you're trying to tell whether a ceiling mark is a roof penetration issue or something broader, this guide for homeowners on ceiling water damage is a useful way to separate symptoms from likely causes.
Practical rule: A flashing kit sheds water. It does not fix a twisted frame, a poor opening location, or unsupported roof members.
Why consumers should care about framing details
Homeowners often shop skylights by glazing, ventilation, or appearance. Those matter, but they don't replace sound roof work. Before anyone gets excited about blinds, rain sensors, or operable options, the installer has to answer dull but decisive questions. Where does the opening sit in relation to rafters or trusses? What supports the cut edges? How will the roof covering return into the flashing without forcing reverse laps or awkward corners?
That's also why technical support matters. Product information such as this skylight frame guidance is valuable because it shifts the conversation from “which unit looks good” to “how does the whole roof assembly work once we cut into it”.
The strongest skylight jobs don't rely on luck or excess sealant. They rely on clean structure, correct geometry, and disciplined sequencing. Flashing is critical, but it's the second half of the answer, not the first.
Planning Your Skylight for Structural and Solar Success
Good skylight jobs are decided before the saw touches the roof. Placement, orientation, and framing layout determine whether the unit brings in useful light or creates glare, heat gain, and a difficult structural patch-up.

Placement comes before product choice
Homeowners often start with the catalogue. Installers should start with the room and the roof.
First, define the job the skylight needs to do. A hallway may only need daylight. A bathroom, laundry, or kitchen may need ventilation as well. A living room with a deep roof cavity needs careful shaft design, because shaft depth and angle can limit how much light reaches the space below.
Then check the roof structure above that room. Rafter spacing, truss layout, services, and roof pitch all affect where the opening can go and how much framing work is required. If the location cuts through key members, the job stops being a simple install and becomes structural alteration. That is where a lot of bad skylight work begins. Someone falls in love with a position on the ceiling plan, then forces the roof framing to suit it.
A practical decision guide looks like this:
| Issue | What to check | Why it matters |
|---|---|---|
| Room below | Light only or light plus ventilation | Helps determine fixed or operable unit |
| Roof type | Pitched or low-pitch roof | Affects drainage and flashing approach |
| Structure | Rafters, trusses, spacing, obstructions | Controls where the opening can go |
| Ceiling depth | Shallow or deep shaft | Changes light spread and finishing work |
If you're pricing early options and want a broad consumer reference for the variables that affect cost, you can get a skylight quote from Atomic Exteriors. Use it as a scope check, not a substitute for a site inspection.
Orientation matters too. North, east, west, and south-facing placements change the quality of light and the amount of heat entering the room. A skylight that looks perfect on a plan can become a source of afternoon glare if solar exposure is ignored. Planning for solar performance at this stage is easier than trying to correct it later with blinds, tinted glazing, or regret.
The opening has to work with the roof structure
A framed opening needs to be straight, properly supported, and sized to the manufacturer's tolerances. That sounds basic, but it is where many installations go off track.
On site, the usual problems are predictable. The opening is set too tight, so the frame gets forced in and racks out of square. Or it is cut too large, and the installer starts packing gaps, overdriving fasteners, and chasing alignment instead of building a clean opening. Neither approach gives the skylight a stable base. If the frame is carrying stress from day one, movement in the roof will show up later as cracked finishes, distorted flashings, or leaks that seem to come and go with the weather.
Fasteners should secure a true opening. They should not be used to pull crooked framing into line.
This is also the stage to plan details that protect the top side of the unit. On many roofs, the head of the skylight needs careful water management above the opening, especially where roof pitch, debris, or heavy runoff increase the load. A properly designed back tray flashing detail for skylights only works if the frame below it is square and correctly supported.
Product selection comes after those checks, not before. Fixed units suit rooms that only need light. Operable units make sense where heat and moisture build up through normal use. Vivid Skylights offers fixed and operable models, including electric and solar-powered options, but the right choice still depends on whether the roof can accept the unit without compromising the framing. That is the part many installers gloss over, and it is the part that decides whether the whole assembly stays dry and stable for the long term.
Mastering the Art of Waterproofing with Perfect Flashing
A lot of leaking skylights get blamed on flashing because flashing is the part people can see. On the roof, the true measure is whether the flashing was installed in a way that matches the frame, the roof covering, and the water flow above the opening. If those parts do not work together, water will find the weakness.

Flashing only works when the frame gives it the right shape
A skylight cuts through a roof system that was built to shed water continuously. Once that surface is interrupted, every flashing piece has to lap correctly, sit flat, and discharge water back onto the roof covering without hesitation. That only happens when the frame below is true.
If the curb or frame is twisted, high on one corner, or unsupported along an edge, the flashing cannot bed properly against it. Installers then start forcing metal into place, relying on sealant to close gaps, or nailing pieces where they should be free to drain. Those shortcuts usually fail first at the lower corners or at the head of the unit, where water sits longer and backs up under pressure.
The trade-off is simple. Clean, well-lapped metal takes more care up front. Sealant-heavy work goes faster and comes back as a callback.
Sequence matters because water follows gravity, not good intentions
The order of installation decides whether water stays on top of the system or gets behind it. Bottom first. Then the sides. Head flashing last. Underlayment or membrane has to lap in the same direction so each layer sheds onto the next one below.
A disciplined flashing sequence usually looks like this:
Prepare the perimeter
Sweep away debris, check that the frame has stayed square, and make sure the surrounding roof surface is flat enough to accept membrane and metal without bumps.Install the sill flashing first
The bottom edge handles runoff immediately. Poor support here often shows up as ponding, stained corners, or water tracking back under the roof covering.Run step flashing up both sides
Each piece should overlap correctly with the roofing courses so water drops out at each step instead of being trapped against the frame.Finish with the head flashing
The top detail has to redirect water around the opening and send it back onto the roof plane. On roofs with heavy runoff, debris build-up, or a long upslope section above the skylight, the head detail needs even more care.
For roofs that need stronger runoff control above the unit, a properly formed back tray flashing detail for skylights can make the difference between a detail that sheds water cleanly and one that stays vulnerable during hard rain.
A tidy bead of sealant may hide a reverse lap for a season. It will not correct the path water wants to take.
Material choice matters too. Tile, metal, and shingle roofs all ask for different flashing profiles and different tolerances. A detail that works on one roof type can create a capillary gap or drainage problem on another. Good installers adjust the flashing package to the roof, not the other way around.
Waterproofing also has a second failure mode that gets missed during handover. A skylight can stay rain-tight and still cause trouble if the assembly creates condensation around the frame or at the top of the shaft. Poor insulation, air leakage, and cold bridging can lead to drips, staining, and mould even when no rainwater is getting in, as discussed in this article on frequent skylight issues and how to fix them.
That is why I never judge a skylight install by flashing alone. The metal has to be right, but the frame has to carry it properly, the laps have to drain in sequence, and the surrounding roof has to support the whole detail without movement. If any one of those parts is sloppy, the leak may show up at the flashing, but the underlying cause started earlier.
Finishing the Job Inside The Light Shaft
A skylight can be perfectly framed and flashed on the roof and still look rough inside. The shaft is where the installation becomes part of the room. It controls how daylight spreads, how clean the finish looks, and whether the opening behaves thermally like a proper building element or a weak point.

Build the shaft from the room side with control
For AU-region residential practice, Vivid Skylights' DIY guidance for Melbourne emphasises drilling reference holes from inside the room, building the timber light shaft, and insulating the shaft walls before lining them with plasterboard. That sequence matters because shaft insulation directly affects condensation risk and thermal performance in Australian homes, especially where ceiling spaces run hot and the room below is air-conditioned, as outlined in this DIY skylight installation guide for Melbourne homes.
That inside-out approach works because it gives you control over alignment. Reference holes confirm the position from below before the roof opening is finalised. The timber shaft then connects the ceiling plane to the roof opening in a way that can be checked for symmetry and light spread, instead of being guessed after the exterior work is complete.
The finish quality indoors usually comes down to three things:
Shaft shape: A well-proportioned shaft spreads light more evenly than a cramped vertical tunnel.
Board fixing: Plasterboard should fit the measured shaft dimensions cleanly, not be forced into tapered gaps.
Joint finishing: Feathering the joints properly matters if you want the opening to disappear into the ceiling finish rather than announce itself with every seam.
Insulation is part of the installation not an optional extra
Many jobs underperform because of a common oversight. People think of insulation as a comfort extra. In a skylight shaft, it's part of the installation itself. If the shaft walls are left thin, broken, or patchy, indoor moisture can meet cooler surfaces and show up later as damp marks, mould, or minor cracking around trims and corners.
A simple checklist helps:
| Internal detail | What works | What does not work |
|---|---|---|
| Shaft insulation | Continuous insulation to shaft walls | Gaps, compressed batts, skipped sections |
| Plasterboard lining | Boards cut to measured dimensions and fixed cleanly | Offcuts pieced in with uneven edges |
| Joint finish | Multiple feathered coats for a smooth transition | Rushed patching that leaves visible seams |
| Interior trim | Neat closure to ceiling and skylight reveal | Over-reliance on filler to hide bad carpentry |
There's also a practical alternative when a traditional roof penetration isn't possible. In apartments, difficult roof structures, or spaces where access and framing make a conventional skylight unrealistic, the interior skylight cover and ceiling finish options are worth comparing with non-penetrating solutions such as AuraGlow LED skylights. They're used where a standard skylight can't be installed and create a skylight-style effect, with light that shifts in colour through the day to mimic the feel of an changing sky.
The room doesn't care whether the leak was stopped on the roof if the shaft still sweats, cracks, or throws harsh uneven light.
Safety Codes Troubleshooting and Knowing When to Call a Pro
Some skylight jobs are straightforward on paper and unsafe in reality. Roof height, pitch, access, and structure change the risk profile quickly. That's one reason DIY confidence can disappear halfway through the work.
Roof access changes the job before the first cut
In Australia, skylight frame installation is strongly shaped by roof safety and access rules. The national model work health and safety regulations require fall-prevention controls for work done at heights. In practice, scaffold, guardrails, or harness systems are often required, which adds time and compliance cost to installation, as outlined in this overview of roofing skylights and roof safety considerations.
That matters because people often price a skylight as if it's only a product and a few hours of labour. On many roofs, safe access is part of the job before the first sheet, tile, or flashing piece is touched. If you want a plain-language refresher on Safe work practices at heights, it's worth reading before deciding whether this is really a weekend project.
A useful self-check is simple:
Steep or awkward roof: Hire a pro if footing, ladder setup, or edge protection is uncertain.
Structural changes required: Bring in qualified advice if the opening affects roof members or load paths.
Low-pitch drainage concerns: Use someone who understands how water behaves on slow-draining roof surfaces.
Permit uncertainty: Check local approval requirements before work begins through this guide to building permit requirements.
Troubleshooting the symptoms properly
When problems show up after installation, match the symptom to the likely cause instead of blaming the whole skylight.
Water at lower corners: Often points to flashing laps or runoff management issues.
Drips without rain: More likely condensation than external leakage.
Visible cracks inside the shaft: Usually movement, poor lining support, or rushed joint finishing.
Drafts around the opening: Often an air-sealing or interior finish problem rather than a glazing problem.
The right time to call a pro is earlier than generally assumed. If the roof structure is unclear, if access is difficult, or if you're relying on sealant to make the details work, the job has already moved beyond simple DIY territory.
Bring Vivid Natural Light into Your Home with Confidence
A skylight succeeds or fails at the opening itself. The frame has to carry load, hold its shape, and keep the unit square under real roof movement. If that work is off, the flashing is left trying to solve a structural problem, and that is how callbacks start.
That is the point many homeowners miss. Glass gets the attention. Flashing gets the blame. But long-term performance depends on the whole assembly being built in the right order, with the frame doing its job first.
Ask practical questions before choosing a unit. How will the opening be framed without weakening the roof? Will the skylight sit at the correct height for the roof covering and flashing kit? Will the shaft be insulated, air-sealed, and lined well enough to avoid drafts, condensation, and a harsh light well that looks unfinished? Those details decide whether the result feels integrated or improvised.
For homeowners still comparing the day-to-day value, these benefits of skylights show what good placement and good installation can add to kitchens, hallways, bathrooms, and living areas.
Vivid Skylights approaches the job as a roof system, not just a product selection. Fixed, electric opening, solar powered, and alternative daylight-style options all need to match the roof structure, the flashing method, and the interior finish. Get that match right, and the skylight brings in light without creating problems you end up chasing later.
Take a closer look at Vivid Skylights if you want to compare units against the actual conditions of your roof, not just the size of the opening.