
You've got the dramatic ceiling already. The rake is there, the volume is there, the architecture has promise. But the room still feels dull in the middle of the day, or oddly top-heavy, or too dependent on lamps once the sun shifts. That's common. A raked ceiling can look impressive and still fail to deliver the feeling people want from it.
The fix usually isn't more decorative lighting. It's overhead daylight, placed with intent. A well-resolved skylight raked ceiling design turns the ceiling itself into the feature. It sharpens the roof line, pulls light deep into the room, and makes the whole space feel taller, calmer, and more expensive.
Table of Contents
The Architectural Impact of Light in Raked Ceilings
A raked ceiling follows the roof pitch. In many Australian homes, that means one sloping ceiling plane. In others, especially larger open-plan spaces, people use the terms cathedral and vaulted more loosely. The distinction matters less than this: the ceiling is visible, prominent, and impossible to fake. If it's dark, the whole room feels compromised.
I see this often in living rooms and kitchen-family zones. The owners love the ceiling height, but the centre of the room stays flat and shadowed. Vertical windows light the edges. The ceiling line disappears. The space never quite lands.

That's why I don't treat a skylight as “just another window”. In a raked ceiling, it's an architectural cut that changes how you read the volume of the room. It can pull your eye along the slope, lift a heavy ceiling plane, and connect the interior to the sky in a way side glazing can't.
A strong skylight doesn't just brighten a room. It reveals the geometry you already paid to build.
There's also a long design lineage behind this move. Skylights began as open roof apertures in ancient Roman architecture, including the oculus, and glazed skylights only became practical after glassmaking advanced around 1000 AD. Roof windows entered mainstream production in the 1970s, when mass manufacturing accelerated residential adoption, which is directly relevant to the pitched roofs and raked ceilings common in Australia, as outlined in this brief history of skylights.
For high-end homes, the aim is a natural integration. You want the opening to feel native to the roof form, not stuck on top of it. That's why detailing, proportion, and product selection matter as much as daylight itself. If you're developing concepts early, Vivid's architectural lighting design guidance is useful for thinking about skylights as part of the room composition, not as an afterthought.
Choosing the Right Skylight for Your Sloping Ceiling
There isn't one right product for every cathedral ceiling skylight installation. The right choice depends on whether the room needs pure daylight, ventilation, or a design workaround where a traditional roof opening can't happen.

Fixed units suit architectural rooms
If your goal is clean visual impact, choose a fixed skylight. This is the strongest move for living rooms, stair voids, dining spaces, and any room where you want uninterrupted glazing and a calm ceiling line.
Fixed units work especially well when the ceiling itself is the feature. No visible opening hardware competing with the architecture. No compromise in the composition. Just light, sky, and a crisp framed opening.
For many clients, fixed skylights are the right answer because they support the architecture rather than adding another operational layer to manage.
Operable units solve comfort problems
If the room traps heat or moisture, fixed glass won't do enough. In kitchens, bathrooms, and tall open-plan areas, electric or solar powered operable skylights are the smarter specification. Warm air rises, and high-level openings let that heat escape naturally.
That matters even more in a raked ceiling because the ceiling height can make manual operation impractical. If the unit is well above reach, remote control and rain-sensing closure stop being “nice extras” and become common sense.
Here's the cleanest way to think about the options:
| Skylight Type | Primary Use Case | Key Benefit for Raked Ceilings | Control |
|---|---|---|---|
| Fixed skylight | Living rooms, dining areas, stair voids | Cleanest visual integration and uninterrupted daylight | None |
| Electric operable skylight | Kitchens, bathrooms, high-use family zones | Adds ventilation to high ceiling spaces | Wall switch or remote |
| Solar operable skylight | Rooms needing ventilation without hardwiring preference | Ventilation with simplified control approach | Remote |
| AuraGlow LED skylight | Internal rooms where roof penetration isn’t possible | Creates a skylight-like ceiling effect | Electrical control |
For a broader overview of how roof windows and other residential skylight options compare across common home settings, that external guide is a decent supplementary reference.
When a roof opening isn't possible
Sometimes the best skylight decision is admitting that a conventional skylight won't work. Maybe the structure is wrong. Maybe services are in the way. Maybe the roof form above the room is too compromised.
That's where AuraGlow LED skylights make sense. They don't replace a real sky view, but they do solve a design problem elegantly. The ceiling still gets a skylight-like feature, and the light shifts in character across the day to mimic the changing sky effect.
For product-specific options across fixed and opening units for angled roofs, see Vivid's skylights for sloping roofs.
Essential Structural and Site Requirements
Good design falls apart fast if the roof can't support the idea cleanly. A skylight raked ceiling installation lives or dies on three absolute necessities: pitch, framing, and waterproofing.
Pitch comes first
Start with roof angle. Don't choose a skylight size and hope the rest sorts itself out. Installed products are rated by pitch range, and one technical sheet lists fixed skylights approved for 14° to 85° roof pitches while also giving rough opening sizes by unit size in the same document, which shows why the roof slope and framing module need to be checked together in any fixed skylight pitch decision, as shown in this technical skylight data sheet.
That single fact kills a lot of bad assumptions. A skylight isn't just a hole in the roof with glass dropped in. It's a system designed to shed water correctly at a particular angle and sit inside a particular framing pattern.
Practical rule: check pitch before you fall in love with the size, shape, or placement.
Framing and waterproofing decide the result
Once pitch is confirmed, the installer needs to form the opening properly. That means coordinated structural framing with the right support around the cut-out. In a raked ceiling, there's very little room to hide sloppy carpentry. If the framing is off, the plaster set-out will look wrong, the reveal will look wrong, and the finished skylight will always feel a bit crooked.
The next issue is water. On a sloping roof, water-shedding details aren't optional. They're the job. A proper flashing kit matters because it directs water away from the opening and integrates the skylight with the roofing material.
My recommendation is simple:
Confirm roof pitch early: don't proceed on assumptions from plan drawings alone.
Coordinate with the framing layout: skylight size should work with rafters, trimmers, and ceiling finish dimensions.
Specify a complete flashing approach: pieced-together site improvisation is where leaks begin.
Avoid awkward structural cuts: if trusses are involved, get the framing strategy sorted before anyone starts cutting.
If you're dealing with altered roof framing, Vivid's article on cutting roof trusses for a skylight is relevant reading before work starts.
Daylighting Strategies and Placement
Placement changes everything. Two skylights of the same size can produce completely different rooms depending on where they sit along the rake.
High placement versus low placement
Independent daylighting guidance for sloped and vaulted ceilings recommends engineering skylight design around lighting quality, energy savings, and construction coordination. It also notes that placing the unit higher on the roof plane sends daylight deeper toward the room centre, while lower placement creates a more concentrated wash on the wall below, as discussed in this daylighting design paper.
That matches what I see in real projects. Put the skylight high and the room feels more evenly daylit. Put it lower and you create drama. That lower placement can be brilliant if there's a textured wall, fireplace mass, timber lining, or art wall worth emphasising.
Neither move is necessarily better. They do different jobs.
One big opening or several smaller ones
A single large skylight gives you a clean, quiet statement. It suits minimalist rooms and strong roof forms. Multiple smaller units create rhythm, repeat the pitch line, and can make a long open-plan room feel more organised.
Use this quick filter when deciding:
Choose one larger unit when the room needs a focal point and the ceiling geometry is simple.
Choose multiple units when the room is long, zoned, or visually heavy.
Keep spacing disciplined so the layout looks intentional from below.
Consider orientation because Australian sun can be generous and unforgiving in the same day.
If you want to understand the broader building-logic side of daylight control, this explanation of how daylight harvesting works adds useful context.
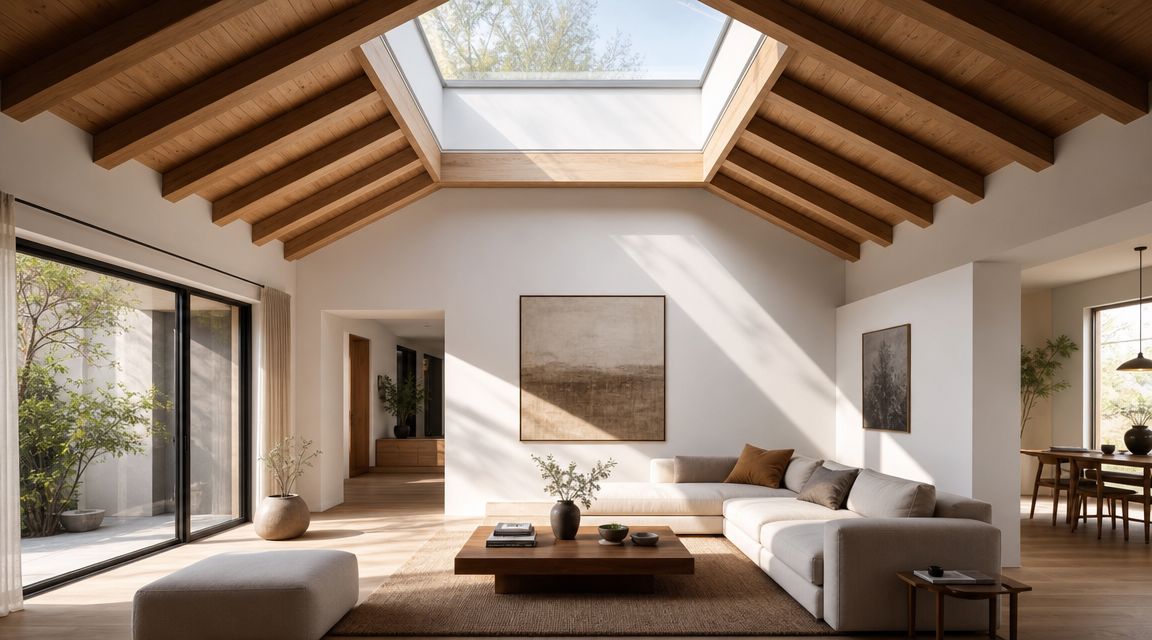
Here's a useful visual reference for how overhead daylight can shape the feel of a room over time:
Light placement should also match how the room is used. A casual living zone wants softness. A kitchen wants brightness where people work. A retreat or bedroom needs more restraint. Vivid's guide to minimum lux levels under Australian standards is worth checking if you're balancing aesthetics with practical light targets.
Finishing the Interior Light Well
The inside edge of the skylight is where high-end work separates itself from builder-grade work. In a flat ceiling, you usually have a deeper shaft to contend with. In a raked ceiling, the shaft is often minimal, which sounds easier but it makes every junction more visible.
The reveal matters more than most people think
Most homeowners obsess over skylight size. Designers should obsess over the reveal. That's the internal transition where the ceiling lining meets the skylight frame. If it's chunky, uneven, or visually unresolved, the whole installation looks secondary. If it's sharp and deliberate, the skylight looks embedded in the architecture.
There's also a genuine daylight benefit in shaping that internal edge well. Guidance focused on shaft geometry notes that the shaft, or light well, is the area between roof skylight and ceiling, and that flaring it can materially improve light distribution. For raked ceilings, where the shaft is often minimal, that flared reveal can still make a visible difference, as explained in this piece on creative light shaft design.
Don't default to the tightest possible plaster return. A small flare can make the daylight feel wider and softer.
Use finish materials to shape the light
The interior finish changes the experience more than people realise. White plasterboard reflects light cleanly and keeps the opening crisp. Timber lining adds warmth but can absorb more light and make the skylight feel more like a crafted aperture than a bright reflector.
What works well in most homes:
Keep the reveal straight and clean: uneven lining edges stand out immediately in top light.
Use lighter finishes if brightness is the priority: darker reveals create mood, not maximum spread.
Coordinate trims with the ceiling material: don't let the skylight look like it belongs to a different room.
Paint carefully: roller marks and patchiness show up fast in angled daylight. If you need a refresher, these tips for painting ceilings are practical.
If glare, darkness, or privacy later becomes an issue, interior accessories matter too. Vivid's information on interior skylight covers is useful if you're planning the reveal and the blind recess together.
Control Comfort and Smart Add-Ons
A skylight in a high raked ceiling shouldn't require a ladder, a pole, or patience. If the unit is out of reach, build in control from day one.
Motorised operation makes sense in high ceilings
Operable skylights are far more useful when they open easily. In a tall ceiling, electric or solar-powered operation removes the most obvious point of friction. People use the opening function when it's simple. They ignore it when it's awkward.
Rain sensors matter too. High ceiling rooms often mean the skylight is well above your line of sight and well outside casual reach. Automatic closure protects the opening when weather changes quickly, which is hardly unusual in Australia.
Blinds and screens are part of the specification
Blinds aren't an optional styling extra. They're part of comfort control.
Use block-out blinds in bedrooms, media rooms, and any space where you need darkness on demand. Use light-filtering blinds in living areas where glare needs to come down without flattening the room. And if the skylight opens, specify a fly screen. Fresh air loses its charm quickly if insects come in with it.
My blunt view is this: if you're investing in a cathedral ceiling skylight installation and skipping control accessories, you're stopping halfway. The architecture brings the wow. The add-ons make it liveable.
Installation Cost and Long-Term Care
A raked ceiling skylight can make a room feel expensive or make it look like a patch job. The difference is rarely the skylight alone. It comes down to how well the opening is integrated into the roof, the ceiling line, and the finished interior.
Anyone asking for a flat price is asking the wrong question. Cost changes with roof pitch, site access, framing work, ceiling repairs, electrical coordination, and the standard of finish you expect. A clean installation in a new build is one thing. Retrofitting a skylight into a prominent vaulted ceiling is another.
What changes the final cost
The cheapest quote is often the one that ignores the architectural work. In a raked ceiling, that work matters most because every flaw sits in plain view.
A simple fixed unit with easy roof access will cost less than an operable skylight that needs wiring, blind coordination, and more detailed internal finishing. If structural changes are required, allow for engineering, reframing, and plastering that restores the ceiling plane properly. If you want the skylight to add visual volume, not just daylight, spend the money on the reveal and set-out. That is where the room gets its polish.
Use this as the practical filter:
DIY only makes sense if you already know roofing, flashing, framing tolerances, and plaster finishing to a high standard.
Bring in a professional installer for steep roofs, visible feature ceilings, or any job involving structural alteration.
Expect more trades to be involved with operable units, especially where power, controls, or integrated blinds are part of the scope.
Protect the interior finish budget because the plaster lines, trim detail, and paintwork shape the final result more than people expect.
Cheap installation usually shows up in two places. Bad flashing outside. Crooked plaster lines inside.
Care should stay low-maintenance
A well-specified skylight should not become a recurring maintenance problem. Ongoing performance comes from the original decisions. Good glazing, correct flashing for the roof type, and accurate installation matter more than any later fix.
Vivid Skylights offers double glazed fixed and operable skylights, including electric and solar-powered opening models, plus the AuraGlow LED skylight range for rooms where a conventional roof opening is not possible. The published product range also includes self-cleaning glass, flashing kits for tiled roofs, and a 10-year leak-free warranty on their skylights.
My advice is simple. Treat the skylight as part of the architecture, not a roof accessory. In a raked ceiling, it affects the room's proportions, mood, and finish quality every day. Get the detailing right once, and the space will keep paying you back in light, calm, and visual impact.