

 Getting a VELUX skylight installation right is about so much more than just cutting a hole in your roof. As professional installers at Vivid Skylights, we’ve seen firsthand that a successful project is built on careful planning and preparation. Get these foundational steps right, and you’re setting yourself up for decades of beautiful, natural light without a single problem.
Laying the Groundwork for Your Skylight Project
Before you even think about picking up a tool, the real work begins. This initial planning phase is your blueprint for success. It’s what separates a stunning, leak-free feature from a costly headache down the track. This isn’t just about picking a spot on the ceiling; it’s about understanding how light, your home’s architecture, and simple practicality all need to work together.
The journey starts with finding that perfect location. This decision needs to be a blend of what looks good and what’s structurally possible.
- Follow the Sun: Take a day to watch how sunlight moves across your home. A south-facing skylight here in Australia will give you consistent, soft light. On the other hand, a north-facing one delivers that strong, direct sunlight which is fantastic for brightening a dark room but might bring in extra heat during summer.
- Think About the Room’s Purpose: How do you use the space? In a kitchen, positioning a skylight directly over the island bench provides brilliant task lighting. In a living room, a central skylight can create a dramatic, sun-drenched focal point that transforms the entire area.
- Check for Hidden Obstacles: Your roof cavity is full of surprises. Before you get your heart set on a location, you must check for things like rafters, electrical wiring, plumbing, or air conditioning ducts. Hitting one of these mid-installation is a complication you really don’t need.
Choosing the Right VELUX Skylight
With a location mapped out, it’s time to pick the right skylight model. VELUX has a fantastic range designed for Aussie homes, and each type has its own strengths. Fixed units are a brilliant, cost-effective choice when your main goal is simply to let in as much light as possible.
But if you want ventilation, you’ll want to look at the opening models. Whether they’re manual, electric, or solar-powered, these are perfect for rooms like kitchens and bathrooms where you need to let steam and cooking odours escape.
For a truly modern touch, smart home integration is the way to go. As you plan, it’s worth exploring options like Velux Smart Home Smart Skylights that can automate your home’s light and ventilation.
VELUX Skylight Options and Estimated Costs in Australia
To help you budget, here’s a quick look at some of the most common VELUX skylight types, their features, and what you might expect to pay for the unit itself in Australia. Keep in mind that installation costs are separate and will vary.
| Skylight Type | Key Feature | Average Unit Cost (AUD) | Best For |
|---|---|---|---|
| Fixed Skylight | Maximises natural light; non-opening | $600 – $1,200 | Hallways, living rooms, and areas needing light only. |
| Manual Opening | Opens with a winder handle for fresh air | $800 – $1,500 | Easily accessible spots like lofts or rooms with low ceilings. |
| Solar Opening | Solar-powered with a remote; no wiring needed | $1,500 – $2,500 | Out-of-reach locations and eco-conscious homes. |
| Electric Opening | Mains-powered with a remote and rain sensor | $1,400 – $2,300 | High ceilings and for ultimate convenience. |
| Flat Roof | Designed specifically for low-pitch or flat roofs | $1,800 – $3,000+ | Modern homes with flat roof extensions. |
This table gives you a starting point for comparing models and deciding which one fits both your needs and your budget before you get quotes.
Sizing and Practical Considerations
In Australia, VELUX skylights come in a range of standard sizes perfect for our pitched roofs. One of the most common sizes you’ll see is 900mm x 600mm, which hits a sweet spot between letting in plenty of light and being practical to install in most homes. Of course, if you have a larger space or want to make a real architectural statement, bigger options like the 1140mm x 700mm are available. These larger models still feature high-performance double glazing for energy efficiency and can be fitted with blinds for complete light and heat control.
Finally, you have to sort out the practicalities—this part is non-negotiable. It means checking with your local council to see if any permits or specific building codes apply. You’ll also need to select the correct flashing kit. This is the component that creates that all-important watertight seal between the skylight and your roof.
VELUX makes specific flashing kits for different roofing materials, whether you have classic tiles or modern Colorbond sheeting. Getting this choice right is absolutely fundamental to preventing leaks and protecting your home for years to come. This groundwork really does set the entire project up for success.
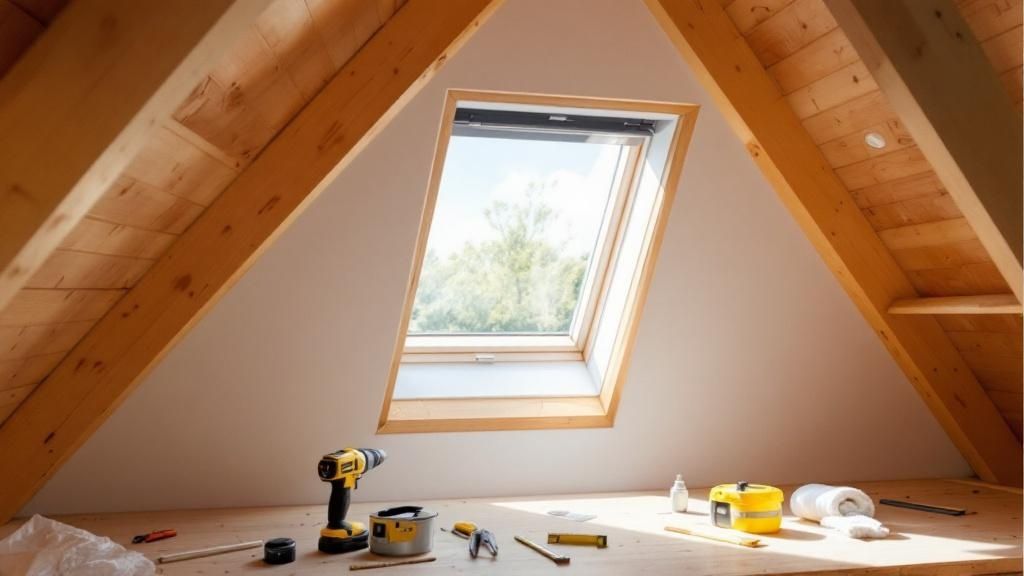
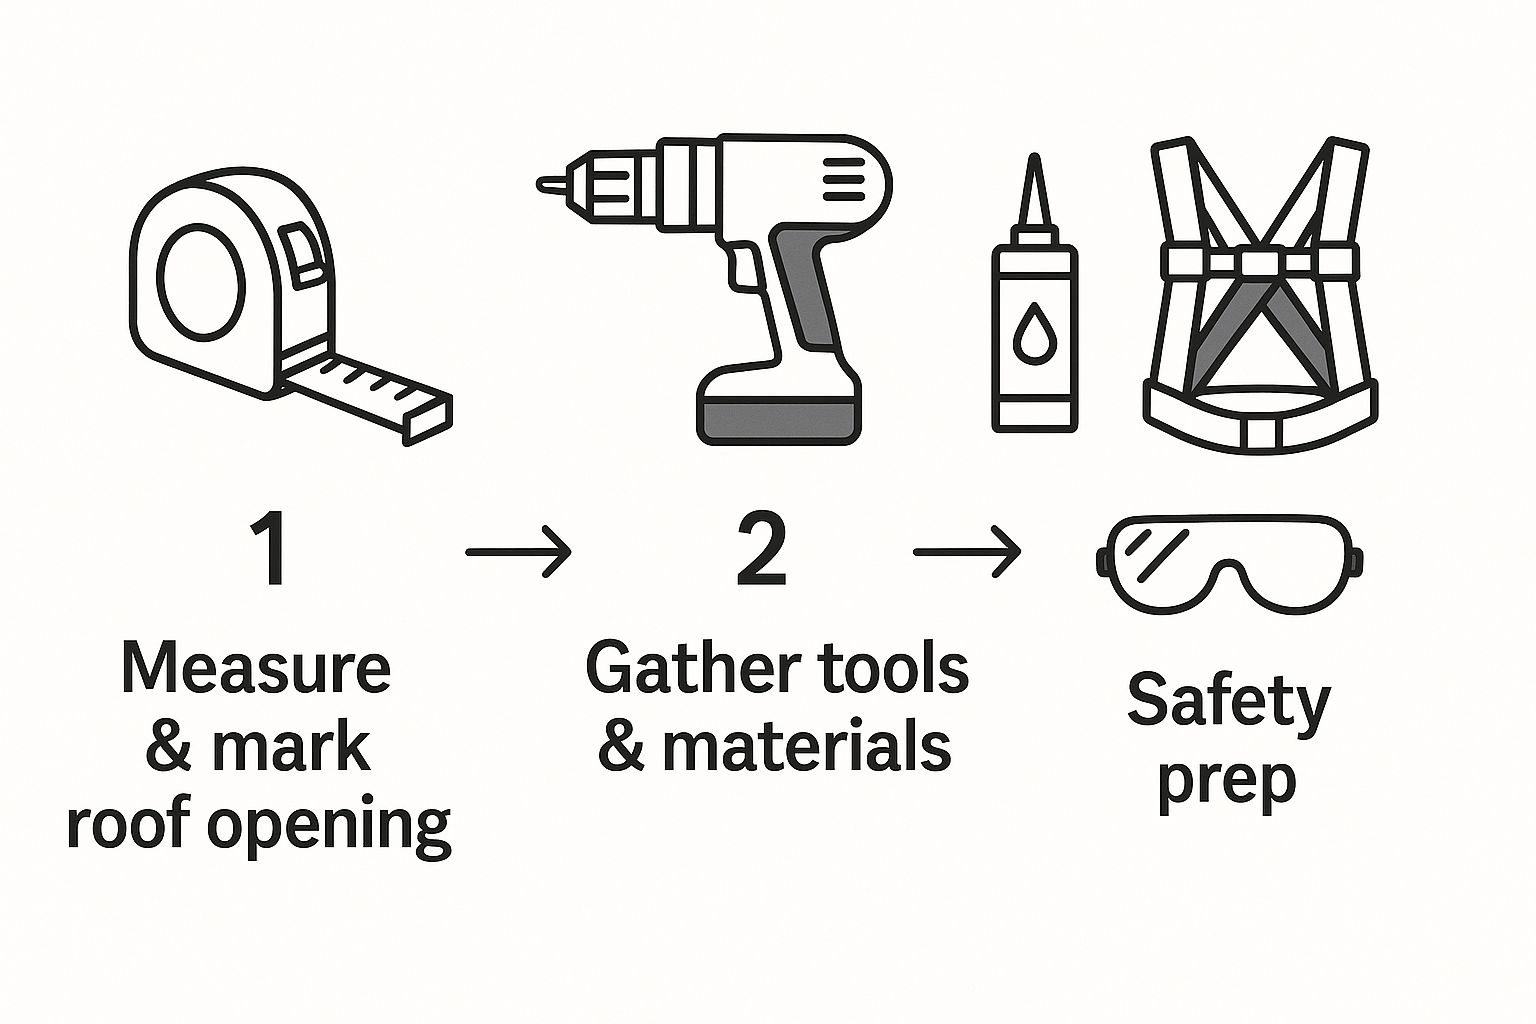
Getting Your Tools and Workspace Ready
Any experienced installer will tell you that a smooth VELUX skylight installation starts long before you ever set foot on the roof. Getting your tools and workspace sorted isn’t just a preliminary step; it’s the foundation for a safe, efficient, and professional-looking job. This is about more than just grabbing a drill and a saw—it’s about thinking through the job and having exactly what you need, right when you need it.
Here in Melbourne, at Vivid Skylights, we see it all the time. Trying to lift roof tiles with a hammer instead of a proper pry bar is a surefire way to end up with a pile of cracked, useless tiles. A simple pry bar, on the other hand, lets you gently pop them up without any damage. That small difference in tooling saves you a trip to the hardware store and a hit to your wallet. Think of your toolkit as your first line of quality control.
The Tools You’ll Actually Need
To get this done right, you’ll need a few specific items. Some are probably already in your garage, but others are more specific to roofing. Here’s a rundown of what you should have laid out before you start.
- Safety First, Always: This is non-negotiable. Get a good safety harness and a solid rope. Add a pair of safety glasses and some decent work gloves to the list.
- Measuring & Marking: You can’t eyeball this. A tape measure, chalk line, and a carpenter’s square are crucial for getting your cuts straight and the skylight perfectly square.
- Cutting Tools: A circular saw will make quick work of the roof sheathing. For trickier cuts or getting through rafters, a reciprocating saw is your best friend.
- Fixing & Fastening: Your most-used tools will be a reliable cordless drill (with a spare battery), a hammer for the basics, and that all-important pry bar for handling roofing materials.
- Sealing & Finishing: Have a caulk gun loaded with a high-quality roofing sealant and a sharp utility knife for trimming back underlayment and flashing.
I always lay my tools out on a tarp before I even think about climbing the ladder. Check that your drill batteries are fully charged. It’s a simple habit that saves you from making risky trips up and down just to grab something you forgot.
Setting Up a Safe and Tidy Work Area
Your prep work isn’t just about tools. You need to prepare the space both inside your house and up on the roof. A bit of organisation now saves a massive cleanup headache later and, more importantly, keeps everyone safe.
Inside, your biggest enemy is dust. When you cut through that ceiling, it’s going to get everywhere if you let it. Lay down heavy-duty drop sheets on the floor and over any furniture in the room directly below. I’d also recommend using painter’s plastic to seal off the doorways. It seems like overkill, but it really stops that fine plaster dust from migrating through your entire home.
Up on the roof, especially a sloped one, your priorities are safety and stability. If your roof has a decent pitch, setting up roof jacks and a plank is a game-changer. It gives you a flat, stable platform to work from and stops your tools from taking a high-speed trip to the ground. Taking the time to properly set up these zones is what separates a DIY job from a professional VELUX skylight installation.
The Nitty-Gritty: Installing Your Skylight From the Inside Out
Right, this is where the rubber meets the road. All that careful planning is about to pay off as we move from paper to plaster. Installing a VELUX skylight is essentially a two-act play: you start inside, creating the opening, and then move to the roof to make it all weatherproof. With a bit of patience and a steady hand, you can get a result that looks like a pro was on the tools.
Making the First Cut in Your Ceiling
This is the point of no return, so measure twice, cut once. Actually, measure three times.
Using the position you pinpointed during your planning, mark the four corners of your skylight opening directly onto the ceiling. The easiest way to get perfectly straight lines between those points is to snap a chalk line. It’s quick, accurate, and satisfying.
Once you’re 100% confident in your layout, it’s time to make the cut. I prefer a drywall saw for control, but a reciprocating saw works too if you’re careful. Your main goal is a clean, precise cut. Brace yourself for a blizzard of plaster dust—those drop sheets you put down earlier are about to earn their keep. With the ceiling section removed, you’ll get your first proper look into the roof cavity.
Building the Light Shaft
With a new hole in your ceiling, the next job is to construct the light shaft. This is the tunnel that guides sunlight from the roof down into your room. It’s essentially a four-sided timber box that connects the ceiling joists to the roof rafters.
The shape of this shaft really matters, as it dictates how the light enters the room:
- A straight, vertical shaft acts like a spotlight, delivering a concentrated beam of light.
- A flared shaft—one that’s wider at the ceiling than it is at the roof—spreads the light out for a softer, more diffused glow.
For most Melbourne homes, we find a slightly flared shaft hits the sweet spot. It fills the room with bright, natural light without feeling harsh. You’ll frame this out with timber now, and it gets lined with plasterboard during the finishing touches later.
Taking the Job to the Rooftop
Now it’s time to head outside. Up on the roof, precision and weatherproofing are everything. The first task is to accurately transfer the location of your internal opening to the roof’s surface. The best way to do this is to drill a small pilot hole up through the roof from each of the four corners of the light shaft you just framed. This gives you four perfect reference points.
Connect these points with chalk lines on your roof, and you’ve got your cutting guide. From here, you need to start carefully removing the roofing material—be it tiles or metal sheets—within that rectangle.
I’ve seen people rush this part and end up with cracked tiles or dented sheeting. Take your time. Use a pry bar to gently lift tiles or an angle grinder with a metal-cutting disc for a tin roof. Stack the materials you remove somewhere safe; you’ll need them again to finish the job.
Framing the Roof Opening for a Watertight Fit
With the roofing material gone, you’ll see the roof battens and the sarking (the membrane underneath). Cut away the sarking and battens inside your marked area. This will finally expose the roof rafters, the main structural supports.
To fit a VELUX skylight correctly, you need to build a robust timber frame for it to sit in. This almost always means cutting a section of a rafter and installing “headers” and “trimmers” to box out the opening. This new frame is critical—it distributes the structural load that the cut rafter was carrying. This is a non-negotiable step for a safe, secure VELUX skylight installation. The opening has to be perfectly square and sized exactly to the manual’s specs. A snug fit here is your first line of defence against leaks.
Installing the All-Important Flashing Kit
If one part of the job makes or breaks a skylight installation, it’s the flashing. This engineered kit is your fortress against the rain. It’s a series of interlocking metal pieces that you layer around the skylight frame, weaving them into your roofing material to channel every drop of water safely away.
The exact process changes slightly based on your roof type:
- For Tile Roofs: You’ll fit pieces under the bottom row of tiles, up the sides, and over the top, creating a system of overlaps that water can’t penetrate.
- For Metal Roofs: The flashing is profiled to match your specific sheeting (like Colorbond). A perfect seal against the metal ridges is crucial to stop water from sneaking underneath.
Seating the Skylight and Nailing the Seal
With the first layer of flashing ready, it’s time to lift the VELUX skylight and lower it carefully into the framed opening. It should sit flush and square. Fasten it down securely to the roof deck with the supplied brackets and screws.
Now, you install the rest of the flashing system over the skylight’s built-in frame. This is detail-oriented work. You have to layer each piece in the correct sequence, starting at the bottom and working your way up to the top, so every overlap sheds water downwards.
Finally, you can start reinstalling the tiles or metal sheets you set aside earlier, cutting them neatly to fit around the new flashing. To make sure everything is battened down securely, it helps to have a reliable coil roofing nailer on hand. This ensures a tight finish that won’t lift in high winds, completing your weatherproof seal.
Mastering the Weatherproof Seal and Interior Finish
Alright, the main structure of your VELUX skylight installation is in place. But don’t crack open a celebratory drink just yet—the job is far from finished. These next steps are what really separate a decent installation from a truly professional one. We’re talking about creating a bulletproof seal against Melbourne’s unpredictable weather and finishing the interior so it looks like it was always meant to be there.
Getting the exterior seal perfect is absolutely non-negotiable. A tiny gap or a poorly layered piece of sarking might not leak for months, but trust me, when it eventually does, it’s a nightmare. This is where your attention to detail will pay dividends for years to come.
Achieving a Bulletproof Watertight Seal
You’ve got the flashing kit on, but the final seal needs a few more layers of defence. The trick is to think like water. You want to create a path for it that has no chance of ending up inside your house.
Your best friend for this part is a high-quality roofing sealant. You’ll want to apply a solid, continuous bead of sealant right under the edges of the flashing where it sits on the roof deck. This acts as a powerful secondary barrier, an insurance policy for the mechanical seal of the flashing itself.
Next, you have to correctly integrate the roof’s existing sarking (the underlayment). This is all about layering.
- The sarking below the skylight must come up and lay over the bottom flashing piece.
- The sarking on the sides should be laid over the side flashing pieces.
- Most importantly, the sarking above the skylight must come down and lay over the top flashing piece.
This top-down approach is the golden rule of roofing. It ensures any water that finds its way under your roof tiles or sheets is channelled down and harmlessly over the flashing, never underneath it. It sounds simple, but it’s a step that’s surprisingly easy to get wrong.
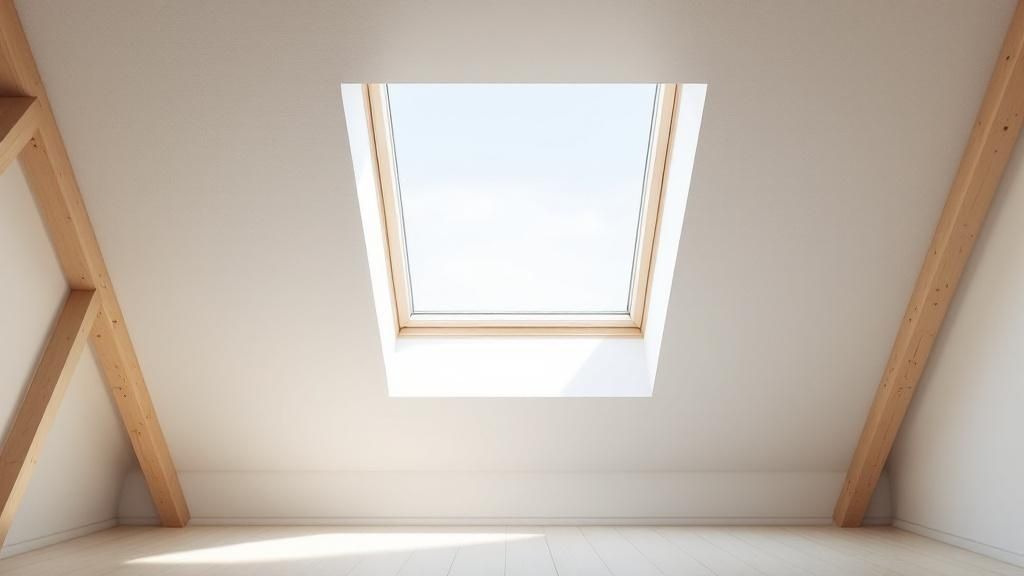
Turning the Interior Into a Seamless Feature
With the roof secure, it’s time to head inside and turn that timber-framed light shaft into a beautiful, integrated part of your ceiling. This is the finishing work—plastering, sanding, and painting—and it requires a bit of patience and finesse.
First up, you’ll line the inside of the light shaft with plasterboard. Cut each piece carefully to size and screw it securely into the timber frame. Use paper tape and jointing compound to cover all the seams between the boards and, crucially, where the new shaft meets your existing ceiling. This is an art in itself; applying several thin coats of compound is always better than slapping on one thick one.
A professional-looking finish all comes down to the sanding. Once a coat of compound is bone dry, sand it smooth with fine-grit sandpaper. A great tip is to run your hand over the surface—if you can feel any bumps or ridges, they’ll stick out like a sore thumb once the paint is on.
The Final Polish: Painting and Accessories
When you’re happy that the plaster is perfectly smooth, it’s time to paint. Always start with a quality primer. This seals the new plasterboard and gives the top coats a solid base to adhere to, ensuring a much better final result.
Choose a ceiling white that matches your existing ceiling colour as closely as possible. You’ll almost certainly need at least two coats to get that even, consistent finish that makes the light shaft look like it was part of the original build. The goal is for the skylight to feel completely intentional, not like a clumsy add-on.
Finally, you can add the accessories that really take your skylight to the next level. Installing something like a solar-powered blockout blind gives you total control over the light and adds a massive amount of practical value. It’s these finishing touches that truly complete the VELUX skylight installation and deliver that “wow” factor you were after.
Budgeting Your Project and Hiring a Professional
Before you get too far down the track, let’s talk about the dollars and cents. Getting a realistic handle on the true cost of a VELUX skylight installation is probably the most critical part of the planning process. It helps you decide whether to tackle it yourself or bring in a pro, ensuring there are no nasty surprises waiting for you later.
The final bill is rarely just the price of the skylight unit you see online. A few key factors come into play, and each one can nudge the total investment up or down.
Key Factors Influencing Your Budget
The cost can swing quite a bit depending on the specifics of your home and what you want to achieve. The biggest variable is usually the skylight model itself. A large, solar-powered opening skylight with all the bells and whistles will naturally be a bigger investment than a small, fixed unit.
The complexity of your roof is another major factor. A steep pitch or an unusual roofline often requires more time, specialised safety gear, and intricate work compared to a simple, low-pitched roof. And sometimes, you don’t know what you’ll find until you open things up. If your installer needs to cut and re-brace multiple rafters, that extra structural work will add to the labour costs. It’s always wise to have a small contingency in your budget for these kinds of unknowns.
In Australia, you can generally expect the total cost to install a single Velux skylight to land somewhere between AUD 1,200 and AUD 3,500. That figure typically includes both the skylight and the professional labour. The unit itself can range from AUD 400 to AUD 2,000, with labour adding another AUD 600 to AUD 1,500 (or more for a tricky job).
Deciding Between DIY and a Professional Installer
I get it, the thought of saving on labour costs by doing it yourself is tempting. But a skylight installation is a serious undertaking. It demands solid skills in roofing, carpentry, and especially waterproofing. One mistake here can lead to thousands of dollars in repairs from leaks and structural damage, wiping out any potential savings in a heartbeat.
For most homeowners, the peace of mind that comes with hiring a professional is worth every cent. An experienced installer gets the job done right, gets it done efficiently, and backs their work with a warranty. It’s the smartest way to protect both your home and your investment. At Vivid Skylights, we offer skylight installation services in Melbourne, ensuring a professional, leak-proof result every time. For more details on what to expect, check out our guide on understanding skylight installation costs.
How to Find and Vet a Qualified Contractor
When you do decide to hire a professional, choosing the right one is crucial. The best place to start is by searching for local installers who have proven experience with VELUX products specifically.
Once you’ve got a shortlist, it’s time to do your homework and ask a few direct questions:
- Are you insured? Always ask to see their certificate of public liability insurance. This is an absolute must.
- Can you show me your work? A good installer will be proud to share references or a portfolio of their recent projects.
- What kind of warranty do you offer? Make sure you ask about their warranty on workmanship, which is separate from the standard VELUX product warranty.
Getting a handle on effective home renovation project management principles can also make the whole process feel less daunting. Finally, insist on a detailed, itemised quote. It should clearly break down the costs for the skylight unit, the flashing kit, labour, and any other materials, so you know exactly where your money is going.
Common Questions About VELUX Skylight Installation
Even with the best guide in hand, it’s completely normal to have some questions floating around about your VELUX skylight installation. Getting the right answers is key to feeling confident, whether you’re gearing up for a DIY project or bringing in a professional. Let’s dive into a few of the most common questions we get from homeowners around Melbourne.
How Much Does Professional Installation Really Cost?
Getting a handle on the budget is always the first step. Here in Australia, the price tag for a professional skylight installation can swing quite a bit based on how complex the job is.
For the basic roofing work alone—fitting the skylight and making it watertight—you’re generally looking at somewhere between AUD 1200 and AUD 1,500.
But that’s only half the story. That price doesn’t usually cover the interior work. Factoring in the framing, plastering, and sanding needed to finish the light shaft can add another AUD 2,100 or more to the final bill. More complex models, like solar-powered or vented units, will naturally sit at a higher price point. This is precisely why a detailed, itemised quote is non-negotiable; it’s the only way to budget properly.
How Long Does a Typical Installation Take?
For a standard installation handled by a seasoned pro, the whole process is surprisingly quick—usually wrapped up in one to two days. Day one is typically all about the heavy lifting: cutting the opening, doing the structural roof work, and getting the skylight securely in place. The second day is then dedicated to the interior finishes, like plastering the shaft and adding the final trim.
Of course, a few things can shift that timeline:
- Weather: Melbourne’s weather can be unpredictable, and a sudden downpour will put things on pause.
- Roof Complexity: A particularly steep pitch or a tricky-to-reach spot will always add a bit more time to the job.
- Unexpected Discoveries: Hitting unforeseen wiring or plumbing once the ceiling is open can extend the project.
A big worry for many homeowners is having a gaping hole in their roof overnight. Let me put that fear to rest. No professional installer will ever leave your roof exposed to the elements. They always ensure the opening is made secure and completely watertight before packing up for the day.
What Kind of Maintenance Do VELUX Skylights Need?
Here’s the great news: modern VELUX skylights are designed to be almost maintenance-free. The exterior glass has a clever coating that uses rainwater to wash away most of the dirt, so your view stays crystal clear without you having to lift a finger.
All you really need to do is a quick annual check-up. Just clear away any built-up leaves or debris from around the flashing to make sure rainwater can drain away properly. A quick clean of the interior glass, just like any other window in your house, is a good idea too. For more in-depth answers, feel free to check out our dedicated skylights FAQ page.