
Why Quality Skylight Flashing Kits Are Non-Negotiable
A critical part of any skylight installation is ensuring a watertight seal. This is where the skylight flashing kit plays a vital role. It acts as the first line of defense against harsh weather, protecting your home from leaks and water damage. Think of it as a specialized waterproof barrier, carefully designed to channel water away from the skylight opening.
Without proper flashing, your skylight can quickly become a source of problems.
Understanding The Role of Flashing
Flashing kits create a weatherproof barrier between the skylight and your roof. They use a system of overlapping components to direct water runoff away from the skylight’s edges. A well-designed kit incorporates key elements like aprons, step flashing, and head flashing for complete protection.
Even in heavy rain, the water is diverted away, safeguarding your home.
A quality flashing kit also contributes to the skylight’s structural integrity. It helps secure the skylight within the roof opening, preventing movement and potential damage from wind or other external forces. Regular inspections and timely repairs are crucial. Sometimes, this involves specialized roofing repair. This proactive approach can prevent minor issues from becoming major, costly problems.
The Consequences of Poor Flashing
Choosing the right flashing kit is essential. In Australia, these kits are crucial for weatherproofing skylight installations. Vivid Skylights, a leading brand, offers a variety of flashing kits designed for tiled roofs. These kits are essential for directing rainwater away, preventing leaks. You can learn more about Vivid Skylights flashing kits here.
But what are the consequences of inadequate or incorrectly installed flashing?
Improper flashing can cause numerous problems, ranging from small leaks to major structural damage. A minor leak may seem insignificant at first, but it can lead to mold growth, timber rot, and even insulation damage over time. These issues not only compromise your roof’s structure but can also create health hazards.
The following table details the issues that can arise from improper flashing:
Common Issues Without Proper Flashing: This table highlights the problems that occur when proper skylight flashing is not installed or is installed incorrectly.
| Issue | Cause | Potential Damage | Prevention |
|---|---|---|---|
| Leaks | Incorrectly installed or damaged flashing | Water damage, mold growth, rotted timber | Professional installation, regular inspection |
| Drafts | Gaps in flashing | Heat loss, increased energy costs | Proper sealing, correct flashing choice |
| Structural Damage | Movement of skylight due to inadequate flashing | Cracks in the ceiling, skylight damage | Secure flashing installation |
| Pest Infestation | Openings created by poor flashing | Damage to insulation, health hazards | Sealed flashing, regular maintenance |
Key takeaway: Proper flashing is crucial for preventing a variety of issues and ensuring the longevity of your skylight.
Ensuring Long-Term Performance
Investing in a quality flashing kit is an investment in your home’s long-term health. While budget-friendly options might be tempting, they often lack the durability and weather resistance necessary for Australian conditions. This can lead to premature failure and costly repairs later on.
Look for kits made from durable materials like Colorbond steel or other robust metals designed to withstand harsh UV exposure and resist corrosion. This ensures your skylight flashing continues to protect your home for years to come, providing peace of mind and long-lasting protection.
Matching Skylight Flashing Kits to Australian Roof Types
Choosing the right skylight flashing kit is crucial for a successful skylight installation. It’s important to remember that it’s not a one-size-fits-all situation. The kit must be compatible with your specific roof type. Here in Australia, we see a wide variety of roofing materials, from the classic terracotta tiles to the more modern Colorbond and corrugated metal. This diversity means selecting the correct flashing is vital for preventing leaks and ensuring your roof can withstand the elements for years to come.
Flashing for Tiled Roofs
Terracotta tiles are a familiar sight on rooftops across Australia. For these roofs, flashing kits usually involve a combination of underlayment and flexible flashing that can mold to the contours of the tiles. This creates a waterproof barrier around the skylight frame, stopping water from seeping in under the tiles. The flashing should blend seamlessly with the tile layout, maintaining the roof’s visual appeal and ensuring proper water runoff.
Flashing for Colorbond and Corrugated Metal
Colorbond and corrugated metal roofs require a different flashing approach. These kits often use pre-formed metal pieces designed to match the profile of the roofing material. This results in a secure, weathertight seal. Skylight flashing kits in Australia are designed with efficiency and cost-effectiveness in mind. For example, flat-pack flashing systems for Vivid skylights, made from durable materials like Colorbond and Duracote steel, are designed for easy installation and can reduce installation time by up to 50% compared to traditional methods. You can learn more about Vivid Skylights flashing systems here.
Considering Roof Pitch and Climate
Beyond the roofing material, the roof pitch (angle) and your local climate are important factors in flashing selection. Steeper pitches generally allow for quicker water runoff, while shallower pitches need more attention to detail to ensure proper drainage. Thinking about skylight installation costs? This article may be helpful: How to master skylight installation costs. Coastal properties experience more salt spray, requiring flashing materials with increased corrosion resistance. Inland areas, conversely, might experience extreme temperature swings, requiring flashing that can handle expansion and contraction.
Specialized Flashing Solutions
Some roof types, like those with complex profiles or multiple intersecting planes, may require specialized flashing solutions. For instance, roofs with valleys or hips often need custom-made flashing pieces to ensure a proper seal. These custom designs accommodate the unique shape of the roof and ensure water is directed away from the skylight opening.
The following table provides a comparison of common skylight flashing kit types in Australia:
Comparison of Skylight Flashing Kit Types: A comprehensive comparison of different flashing kit types for various Australian roof styles.
| Flashing Type | Suitable Roof Materials | Weather Resistance | Installation Difficulty | Average Cost Range | Lifespan |
|---|---|---|---|---|---|
| Flexible Flashing | Terracotta tiles, some metal roofs | High | Moderate | $50 – $150 | 10-15 years |
| Pre-formed Metal | Colorbond, corrugated metal | High | Easy | $100 – $250 | 20+ years |
| Custom Fabricated | Complex roof designs | Highest | Difficult | $200+ | 20+ years |
| Flat-pack | Colorbond, corrugated metal | High | Easy | $150 – $300 | 20+ years |
Key takeaways: While pre-formed and flat-pack flashing offer easier installation, custom fabrication is essential for complex roof designs. Flexible flashing provides adaptability for curved tiles. Material choice significantly influences lifespan and cost.
The Importance of Professional Installation
While DIY might seem appealing, proper flashing installation requires skill and precision. Professional installers have the experience to assess your roof, choose the right flashing kit, and install it correctly for a watertight seal. This investment in professional installation can prevent costly water damage and give you peace of mind.
Master Class: Installing Skylight Flashing Kits Right

This infographic showcases the essential tools and materials needed for a skylight flashing kit installation, all laid out on a workbench. Having everything organized beforehand makes the whole process smoother and more efficient. A well-prepared workspace, as shown here, sets you up for success.
This guide provides a step-by-step approach to installing a skylight flashing kit, specifically designed for Australian conditions. Whether you’re a seasoned DIYer or a professional contractor, this walkthrough offers clear and easy-to-follow steps for a confident installation.
Preparation Is Key
A successful skylight flashing kit installation starts with thorough preparation. This includes accurately measuring the skylight opening and inspecting the roof substrate for any damage or weaknesses. Make sure the timber around the opening is sound and free from rot. Also, check the weather forecast. Avoid installing the flashing kit in rain or strong winds.
Essential Tools and Techniques
Having the right tools makes the installation much easier. These usually include a drill, appropriate screws, sealant, a utility knife, and safety equipment. Check out this helpful resource: How to master skylight installations. When working with subcontractors, efficient workflow management is essential. This resource might be useful: Streamline Your Sub-Contractor Workflow with Automated Job Completion Forms!. You might also need specialized tools, like a slate ripper for tile roofs. Knowing how to work around roof obstacles, like plumbing vents or other skylights, is also important.
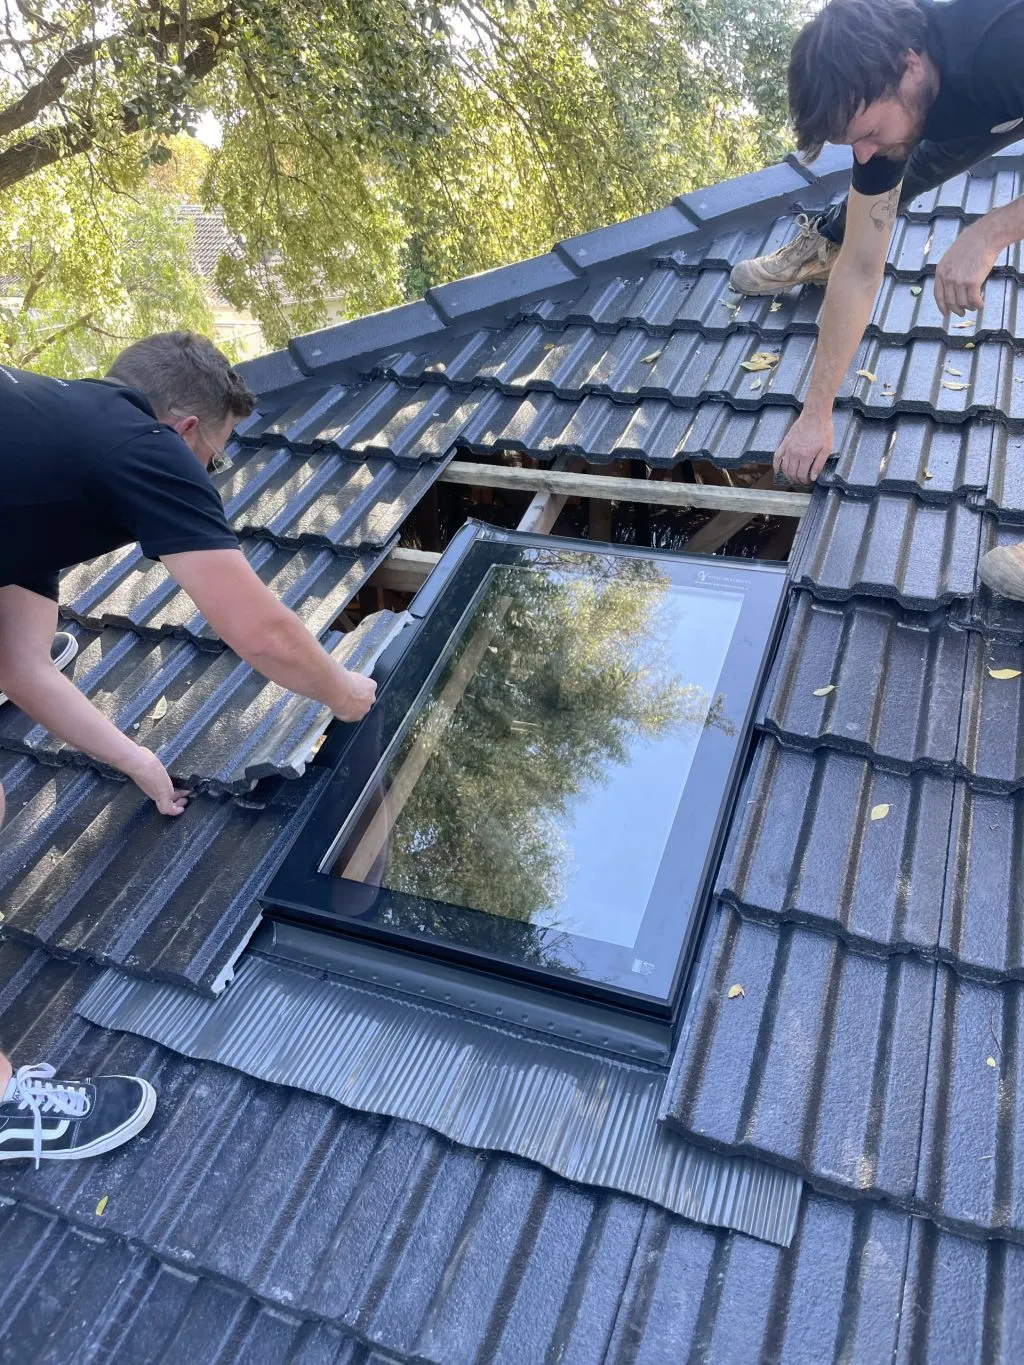
Step-By-Step Installation Guide
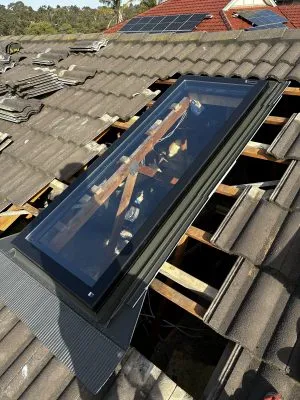
- Step 1: Underlayment Installation: Start by laying down the underlayment, making sure it extends past the skylight opening on all sides. This creates your first waterproof barrier.
- Step 2: Flashing Placement: Place the base flashing over the underlayment, ensuring a tight fit against the skylight frame. Secure it with screws, following the manufacturer’s instructions.
- Step 3: Step Flashing: Install the step flashing along the sides of the skylight, overlapping each piece like shingles to direct water away.
- Step 4: Head Flashing: Install the head flashing above the skylight, overlapping the step flashing to prevent water entry from the top.
- Step 5: Sealant Application: Apply a high-quality sealant around all the flashing edges to create a watertight seal. This is especially important in high-rainfall areas.
- Step 6: Finishing Touches: Lastly, install any finishing caps or trim to complete the installation and give it a polished look.
Adapting to Challenging Pitches and Existing Roofing
Steeper roof pitches can be tricky, requiring extra care to secure the flashing and ensure proper overlap. Integrating the flashing with existing roofing materials requires careful planning. For example, with terracotta tiles, the flashing needs to be carefully integrated to maintain a weathertight seal.
Troubleshooting and Maintenance
Even with the best installation, problems can occur. Ponding water is a common issue, possibly indicating a problem with the roof pitch or flashing. Sealant failure is another potential issue, often due to UV exposure or temperature fluctuations. Regular inspection and maintenance are important. This could involve checking for cracks in the sealant, ensuring water runs off properly, and keeping the area around the skylight clear of debris. Addressing these issues quickly can prevent bigger problems later on. This proactive approach ensures your skylight’s long-term performance and weather resistance.
Material Matters: Selecting High-Performance Flashing Kits
Choosing the perfect skylight flashing kit is about more than just finding the right fit. The materials used have a direct impact on how well it performs over time, especially when exposed to the harsh Australian climate. Think intense UV exposure, salt spray (particularly for coastal homes), bushfire embers, and dramatic temperature swings.
Key Material Considerations for Australian Conditions
Different materials offer varying degrees of protection and durability. Aluminum, for instance, is well-regarded for its corrosion resistance, making it suitable for coastal areas. However, it’s worth noting that it can be susceptible to dents and scratches. Steel, and especially Colorbond steel, is extremely durable and impact-resistant, providing superior bushfire protection compared to other metals. In areas with high rainfall, choosing materials with excellent water resistance is paramount. For more insights into energy efficiency and skylights, check out this helpful resource: How to master energy efficiency with skylights.
Many manufacturers also apply protective coatings to their flashing kits to enhance weather resistance. These coatings can substantially increase the lifespan of your flashing.
Identifying Quality Markers
When selecting a skylight flashing kit, look for key quality markers that distinguish the best options. Material thickness is a crucial indicator of durability. Thicker flashing tends to be more robust and better equipped to handle harsh weather. Choose kits with the minimum thickness recommended for your specific location and roof type. Protective coatings, such as Zincalume or similar products, provide an extra layer of defense against corrosion and UV damage, extending the life of your flashing. Corrosion resistance should be a top priority. Opt for flashing made from materials specifically engineered to resist corrosion in Australian conditions.
Balancing Durability, Compatibility, and Value
Finding the sweet spot between durability, compatibility, and cost is key when choosing a flashing kit. While highly durable materials like stainless steel offer exceptional longevity, they typically come with a higher price tag. More budget-friendly options may not provide the same level of protection. Ensuring compatibility between the flashing material and your roofing material is crucial to prevent galvanic corrosion, which occurs when dissimilar metals come into contact. This careful consideration ensures your chosen kit delivers long-term performance without exceeding your budget.
The Importance of Material Thickness and Protective Coatings
While the type of metal is important, other factors contribute to the effectiveness of your flashing kit. The thickness of the metal is essential. Thicker flashing is inherently more resistant to damage and wear and tear. Flashing with a thickness of 0.55mm, for example, will generally outperform thinner versions, especially in windy locations. Protective coatings also provide a vital shield against UV degradation, corrosion, and even impact damage.
Understanding Corrosion Resistance
Corrosion resistance is paramount for the longevity of your skylight flashing. Australia’s diverse climates present unique corrosion challenges. Coastal areas, for instance, contend with constant salt spray, which can accelerate corrosion. Choosing highly corrosion-resistant materials like marine-grade aluminum or stainless steel is vital in these environments. Areas with industrial activity or high pollution levels may also require specialized flashing materials designed to withstand these conditions.
Selecting the right flashing isn’t just about preventing leaks; it’s about safeguarding your investment. By understanding the properties of different flashing materials, you can make a well-informed choice that ensures your skylight flashing performs flawlessly for years to come.
Navigating Australian Building Codes for Skylight Flashing
Understanding Australian building codes is crucial for a successful skylight installation. This knowledge helps ensure your skylight is compliant, durable, and performs as expected. It also facilitates smoother communication with suppliers, installers, and building inspectors throughout the project. Let’s break down the Building Code of Australia (BCA) standards and their relevance to skylight flashing.
Understanding the BCA and Your Skylight
The BCA establishes the minimum requirements for building work across Australia. It covers essential aspects like weatherproofing, structural integrity, and energy efficiency. Regarding skylight flashing, the BCA offers specific guidelines to safeguard your home from water damage and ensure the skylight’s longevity. These standards consider Australia’s diverse climate zones, accounting for regional differences in rainfall, wind, and temperature.
Weatherproofing Standards in the BCA
The BCA emphasizes weatherproofing, particularly for skylights. The code specifies requirements for water penetration ratings and proper flashing installation techniques. For example, it dictates how flashing should integrate with various roofing materials to create a watertight seal. This protects your home from potential leaks caused by driving rain.
How Flashing Impacts Other BCA Requirements
Proper flashing selection goes beyond just weatherproofing. It also influences energy efficiency. A correctly installed flashing kit minimizes air leakage around the skylight, improving your home’s energy performance. Furthermore, flashing contributes to structural integrity by ensuring the skylight is securely fastened within the roof opening and can withstand wind loads and other external pressures.
Practical Implications for Homeowners
Understanding BCA requirements empowers you as a homeowner. You can ask informed questions and make better choices for your project. Knowing the applicable standards for your location and roof type helps you select the right flashing kit. You’ll also be prepared to discuss compliance with your installer or builder, ensuring your skylight installation meets all regulations. This protects your investment and ensures a durable, weathertight skylight for years to come.
Long-Term Success: Maintaining Your Skylight Flashing System
A well-maintained skylight flashing system is crucial for protecting your home from the elements. By following a few simple maintenance practices, you can significantly extend the life of your skylight and avoid expensive repairs down the road. This is especially important in Australia, where harsh weather conditions can take a toll on roofing systems.
Establishing a Regular Inspection Routine
Regular inspections are the cornerstone of maintaining your skylight flashing kit. Much like regular car maintenance, routine checks can identify minor issues before they become major problems. This proactive approach saves you money and headaches in the long run.
For instance, a small crack in the sealant can often be easily fixed with a little caulk. If ignored, however, that small crack could lead to a leak, potentially damaging your ceiling and insulation.
- Check for Cracks and Gaps: Inspect the flashing for any visible cracks, gaps, or signs of damage. Pay close attention to the areas where the flashing meets the skylight frame and the roofing material.
- Look for Signs of Wear and Tear: Look for signs of rust, corrosion, or deterioration, especially in coastal regions where salt spray can be an issue.
- Inspect Sealant: Make sure the sealant around the flashing is still intact and pliable. Sealant can dry out and crack over time, creating vulnerabilities.
- Clear Debris: Remove any leaves, twigs, or other debris that might have gathered around the skylight. This debris can trap moisture and contribute to corrosion.
Seasonal Timing for Inspections
The best time for inspections depends on your location in Australia. In tropical North Queensland, where heavy rainfall is frequent, more frequent inspections are recommended, especially after significant storms. For those in the southern states, with their fluctuating temperatures, checking in spring and autumn, before and after the most extreme weather, is a good idea.
Identifying Warning Signs
Knowing what to look for during inspections is essential. Some wear and tear is expected, but certain signs indicate a more serious problem. Understanding these signs helps you determine when it’s time to call a professional.
- Water Stains: Water stains on your ceiling or around the skylight clearly indicate a leak.
- Drafts: Feeling a draft around the skylight could mean there’s a gap in the flashing or the sealant has failed.
- Rust or Corrosion: Rust or corrosion indicates the flashing material is deteriorating and requires attention.
- Loose or Missing Flashing: If any flashing pieces are loose or missing, you’ll need to repair them immediately to prevent water damage.
Troubleshooting and DIY Repairs
You can handle some minor flashing problems with DIY repairs. Resealing gaps with appropriate roofing sealant is a relatively simple fix. However, for more complicated issues, or if you’re unsure about doing the repair yourself, it’s always best to contact a qualified roofing professional.
When to Call a Professional
While you can address some minor issues with DIY solutions, some situations require professional help. This includes significant rust or corrosion, complex flashing damage, or persistent leaks. Attempting complex repairs yourself could make the problem worse.
- Extensive Damage: If the flashing is extensively damaged, you might need a complete replacement.
- Complex Roof Design: Roofs with complex designs or steep pitches require specialized expertise for safe and effective repairs.
- Persistent Leaks: If you’ve attempted DIY repairs and the leak continues, a professional can determine the underlying issue.
Maintaining your skylight flashing system doesn’t have to be overwhelming. Regular inspections, prompt repairs, and knowing when to call a professional can save you money and ensure your skylight works effectively for years to come. Let Vivid Skylights brighten your home with natural light. Our high-quality skylights are designed for Australian conditions and come with flashing kits for tiled roofs. Visit us at Vivid Skylights to see our range and get a quote today!