

Putting a skylight into a tile roof is a fantastic way to bring in more natural light, but it’s a job that demands the right gear. The success of the whole project really comes down to choosing a skylight that’s built for the unique shape and challenge of tiles. You’ll need one with a specialised flashing system, specifically engineered to create a perfect, watertight seal that matches the profile of your roof tiles.
Choosing the Right Skylight for Your Tile Roof
Finding the perfect skylight for your tile roof is about more than just picking a size. It’s about getting the balance right between function, aesthetics, and that all-important weatherproof seal. The right choice can completely transform a room, boost airflow, and add real value to your home. Get it wrong, and you could be dealing with annoying issues for years.
For many homeowners, the goal is beautifully simple: more light. A fixed skylight is a brilliant, cost-effective way to achieve this. Think about flooding a typically dim hallway or a Malvern living room with glorious natural sunshine. These non-opening units are designed purely for illumination, giving you a clean, uninterrupted view of the sky.
Balancing Light with Airflow
But in other parts of the house, ventilation is just as crucial as light. A steamy kitchen or a humid bathroom can be transformed by a venting skylight, which opens up to let out trapped moisture and odours. These come in a few different flavours:
- Manual-Venting: These are opened and closed with a simple winder handle, making them a great fit for spots you can easily reach.
- Electric-Venting: Operated by a switch or remote, these offer fantastic convenience, especially for high ceilings where a manual winder is out of the question.
- Solar-Powered: These models are clever. They use a small, integrated solar panel to power the opening mechanism. Many even include a rain sensor that automatically closes the skylight at the first sign of a downpour—a perfect feature for Melbourne’s unpredictable weather.
The most critical piece of the puzzle for any tile roof installation is the flashing. Vivid Skylights are the perfect skylight for tiled roofs with a specific tiled roof flashing that not only look stylish but keep the skylight water tight. These specialised kits are engineered to integrate seamlessly with various tile profiles, from classic terracotta to modern concrete. This is what guarantees your installation is secure and completely watertight from day one.
Comparing Skylight Types for Tiled Roofs
To help you decide, it’s useful to see the options side-by-side. Each type has its own strengths, depending on what you’re looking to achieve in a particular room.
| Skylight Type | Primary Benefit | Ideal Location | Key Consideration |
|---|---|---|---|
| Fixed | Maximum light, cost-effective | Hallways, living rooms, studies | No ventilation provided. |
| Manual-Venting | Light and user-controlled airflow | Kitchens, bathrooms, laundries | Must be within easy reach to operate the winder. |
| Electric-Venting | Convenient remote-controlled airflow | High ceilings, hard-to-reach areas | Requires a power source to be run to the unit. |
| Solar-Powered | Automated, energy-efficient | Any room, especially bedrooms | Often includes a rain sensor for peace of mind. |
Ultimately, the best choice depends on how you use the space. A fixed unit might be perfect for a living area, while a solar-powered venting skylight could be a game-changer for a master bathroom.
Material and Flashing Considerations
Beyond the type of skylight, the materials themselves are a key part of the decision. High-quality laminated glass is a very popular choice. It offers excellent UV protection to stop your furniture and floors from fading and provides a noticeable reduction in outside noise—a real bonus in busy neighbourhoods.
The popularity of installing a skylight on a tile roof has surged across Australia as homeowners look to brighten their homes while keeping that classic roofline. In fact, professional installations designed for tiled surfaces are on the rise, with data showing that around 15-20% of new tiled-roof homes included skylights as of 2022. This trend really highlights the importance of using specialised flashing systems that match specific tile profiles—a crucial detail for ensuring a watertight seal against Australia’s tough, variable climate.
To see how different models could work for your home, it’s worth exploring the various types of skylights available.
Preparing Your Roof for a Perfect Installation
A successful skylight installation on a tile roof begins long before a single tile is moved. Honestly, the prep work is what separates a professional, leak-free job from one that causes problems down the track. Think of this stage as laying the groundwork for a flawless outcome.
Your first move is to measure and mark the location from inside your home. This is the only way to ensure the skylight is perfectly centred and aligned with your room’s layout. Once you’ve got the ceiling marked up, you need to transfer those measurements to the roof above. It’s a task that demands precision—if the interior and exterior openings don’t match up, you’re in for a world of hurt.
Inspecting the Roof Structure
Before you even think about cutting, you absolutely must get into the attic or ceiling space for a thorough inspection. You’re on the hunt for any potential obstructions that could turn a straightforward job into a complex one.
Keep a sharp eye out for:
- Roof Rafters: Your skylight has to fit snugly between these structural supports. Knowing exactly where they are is critical for placement.
- Electrical Wiring: Hidden cables are a major safety hazard if cut. Don’t take any chances.
- Plumbing Pipes: Vent stacks or water lines are common obstacles lurking in roof cavities.
Finding these things early means you can adjust your placement or plan to reroute them, saving you from a massive headache later. For a closer look at the kind of meticulous planning needed for any home upgrade, this expert window installation guide offers some great insights into precise measuring and execution that apply here too.
A critical step that’s so often overlooked is checking in with your local council. If you’re a homeowner in an area like Malvern, for example, you have to confirm your project meets all local building codes. It’s a non-negotiable check that makes sure your installation is fully compliant and saves you from potential fines or having to redo work.
Essential Tools and Safety Gear
Showing up with the right equipment is non-negotiable, both for your safety and the quality of the job. A well-stocked toolkit prevents delays and makes sure every step is done right the first time.
At a minimum, your kit should include a sturdy ladder, tape measure, chalk line, and a drill. But for the specific challenge of a tile roof, you will definitely need a quality angle grinder with a diamond blade to get clean cuts on the tiles, plus a pry bar for lifting them without causing damage.
Most importantly, never cut corners on safety. Working at height is risky, plain and simple. Always use proper fall protection like a safety harness. A good pair of sturdy work boots for grip and safety glasses to shield your eyes from debris are also essential. For a complete list of tools and a step-by-step walkthrough, our guide to skylight installation on a tile roof provides an in-depth checklist.
Creating the Opening in Your Tile Roof
Now that you’ve got your location locked in and your tools are lined up, it’s time for the main event: making the opening for your new skylight. This part of the job demands a steady hand and real precision, as you’ll be working on both your interior ceiling and the roof itself. The aim here is to cut a clean, structurally solid frame that will house the skylight perfectly.
We’re going to start from inside your home. Using the measurements you marked out earlier, you’ll carefully cut through the plasterboard ceiling. A multi-tool or a good old jab saw is ideal for this, as it lets you make a neat opening for the light shaft that will eventually connect the skylight to the room below.
Once that interior hole is cut, you’ll have a clear view of the roof rafters and sheathing from underneath. This is your final chance to confirm the placement is clear of any hidden obstructions. While you can start framing the light shaft from inside at this point, the real structural work happens up on the roof.
Carefully Removing the Roof Tiles
Get yourself safely up on the roof. The next task is to remove the tiles covering the area where your skylight tile roof is going. This is delicate work, so take your time. Roof tiles can be brittle and crack if you rush, so a bit of patience now can save you headaches later.
Use a pry bar to gently lift the tiles just above your marked area, then slide them out one by one. Set them aside carefully—you’ll need to cut and refit some of them around the new skylight frame later on. Working methodically is the key to preventing unnecessary breakages and added costs.
Pro Tip: Before a single cut is made, double-check your measurements. I mean it. Measure the skylight unit one last time and compare it to the marks on your roof. This simple step has saved me from more than one costly mistake over the years.
Cutting and Framing the Roof Opening
With the tiles cleared, you’ll see the roof underlayment (often called sarking) and the timber battens. Grab your chalk line and transfer the exact dimensions of the skylight opening onto this surface.
Now, using a circular or reciprocating saw, carefully cut along your marked lines through the underlayment and sheathing to create the rough opening. The next step is crucial: building the timber frame that will support the skylight’s weight and redistribute the roof’s structural load.
This frame usually involves a few key steps:
- Cutting Rafters: If a rafter is directly in your skylight’s path, it will need to be cut.
- Installing Headers: These are horizontal timbers fitted between the rafters, at the top and bottom of the opening. They take on the load from any rafter you’ve had to cut.
- Adding Trimmers: These are extra vertical supports installed alongside the existing rafters, reinforcing the entire frame.
This timber “box” is the foundation for your skylight, so it absolutely must be perfectly square and level. For homeowners in places like Malvern, ensuring this structural work is up to code is non-negotiable for your roof’s integrity. High-quality flashing kits are essential for creating a watertight seal on a tile roof, but it all begins with a solid, well-built frame. A strong frame ensures your skylight stays secure and supported for decades to come.
Achieving a Watertight Seal with Tile Flashing
Alright, you’ve framed the opening. Now comes what I consider the most critical part of any skylight tile roof project: getting the flashing right. This stage is where you earn your stripes, creating a completely watertight seal that will last for decades.
On a tiled roof, this isn’t just a “nice-to-have” — it’s non-negotiable. Tiles have a complex, overlapping profile that water loves to find its way through. A proper flashing system is designed to outsmart it, actively channelling every drop of rain safely away from your new skylight.
Think of flashing as the unsung hero of a leak-proof job. It’s a series of custom-shaped metal pieces that integrate perfectly with both the skylight and your existing tiles. It essentially creates a purpose-built gutter system just for your skylight, ensuring water flows down the roof, not into your ceiling.
The Correct Flashing Sequence
Installing flashing isn’t a free-for-all; it follows a precise, layered sequence designed for maximum water protection. The golden rule is simple: work from the bottom up. Each new piece must overlap the one below it, mimicking how your roof tiles work to shed water.
A typical tile flashing kit, like the ones we supply with Vivid Skylights, comes with a few key components:
- Sill Flashing: This is your starting point. It fits along the bottom edge (the sill) of the skylight frame. Its main job is to catch water running down the glass and direct it out and over the tiles below.
- Side Flashing: Next up are the side pieces. These run up the vertical sides of the skylight, slotting in over the sill flashing. They’re designed to sit neatly under the tiles on either side of the unit, creating a channel.
- Head Flashing: To finish, the head flashing is installed along the top edge. This piece is crucial because it slides underneath the course of tiles above your skylight. It catches runoff from higher up the roof and diverts it around the sides, completing the protective barrier.
This infographic breaks down the core process, showing how flashing is the central step between cutting the opening and finishing the job.
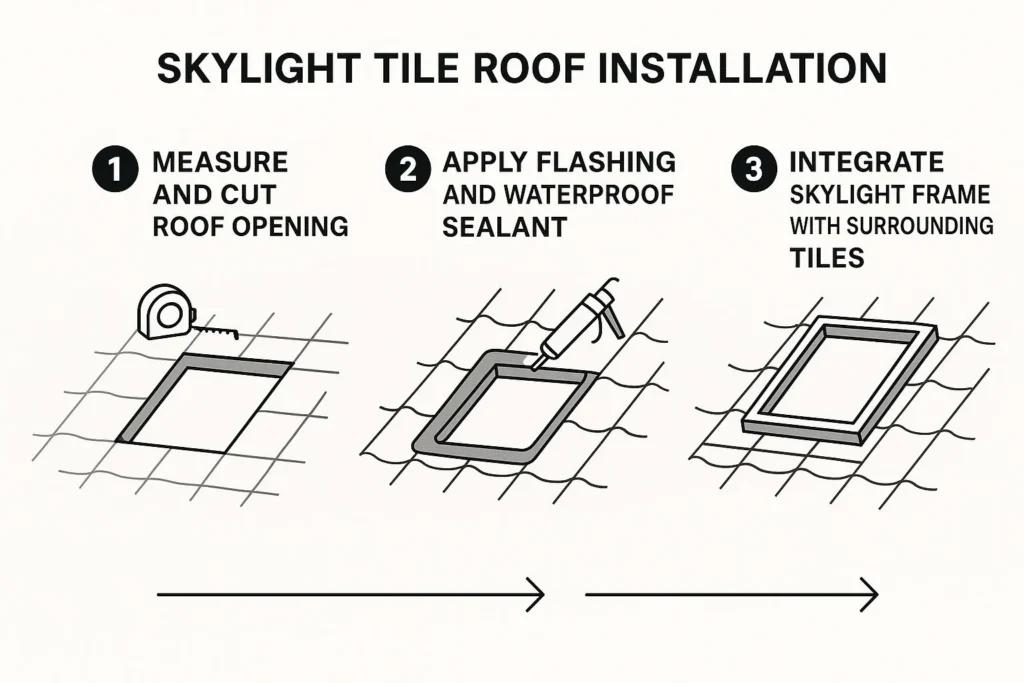
As you can see, getting that waterproof seal is a dedicated, multi-stage effort. It’s not a single action but a careful assembly. For a closer look, you can find more details on our tile roof flashing systems.
Handling Different Tile Profiles
Let’s be honest, not all tile roofs are the same. You’ve got the deep curves of classic terracotta S-tiles, and then you have the flat-profile concrete tiles common in modern suburbs like Malvern. Each one demands a slightly different touch.
A good flashing system needs to be adaptable. Many modern kits include a malleable lead-free apron on the sill flashing that you can press and mould into the tile’s contours. This creates a really snug, custom fit that leaves no gaps for water.
Once the flashing is perfectly in place, the final step is to cut and refit the tiles you removed earlier. This usually means grabbing an angle grinder to make clean, precise cuts. The goal is to get the tiles to sit snugly around the new skylight frame, restoring your roof’s protective outer layer.
When done right, the result is a seamless, professional, and completely watertight installation that looks like it’s always been there.
Getting the Interior Finish Just Right
A top-notch skylight tile roof installation isn’t truly finished once the outside is weatherproof. The job is only done when the inside looks like it was always part of your home. While the exterior work is all about keeping the elements out, the interior finishing is what elevates your new skylight from a simple window to a stunning architectural feature.
These final steps are all about blending the skylight seamlessly with your home’s existing design. This means getting the details right inside the light shaft, not just for looks but for performance. Done correctly, it will prevent common headaches like heat loss and condensation down the track.
Insulating and Plastering the Light Shaft
Before you even pick up a paintbrush, the light shaft needs to be properly insulated. This is a step you can’t afford to skip. An uninsulated shaft acts like a thermal bridge, letting precious heat escape in winter and creep in during summer. This almost always leads to condensation issues. Packing quality insulation batts snugly within the shaft’s framing is a must-do for energy efficiency.
With the insulation in, it’s time to line the shaft with plasterboard. This is where precision counts. You’ll need to cut and fit the boards perfectly to create smooth, straight walls, making the shaft look like a natural extension of your ceiling.
The finishing process is an art in itself:
- Taping the Joints: Carefully apply plasterboard tape to all the internal corners and seams.
- Applying Plaster: This isn’t a one-and-done job. You’ll need to skilfully apply multiple thin coats of plaster over the tape and screw heads. Remember to sand lightly between each coat.
- Final Sanding: One last, gentle sand creates that perfectly smooth surface that’s ready for paint.
A classic mistake is rushing the plastering. Seriously, take your time here. A flawless, smooth finish is what separates a job that screams ‘DIY’ from one that looks like a pro was on the tools. A perfectly plastered shaft just melts into your ceiling, making the skylight feel completely integrated.
Final Touches and Stylish Accessories
Once the shaft is plastered and painted to match your ceiling, the focus shifts to the final details—the skylight’s interior frame and any accessories you want to add. This is your chance to customise the look and function.
A nice touch is to add a timber trim around the base of the shaft where it meets the ceiling. It creates a crisp, architectural border that neatly frames the opening.
To really get the most out of your new skylight, think about accessories. Automated blinds are a fantastic upgrade, giving you control over light and heat with just the press of a button. For homes in sunny spots like Malvern, where the afternoon sun can be intense, a block-out blind offers total command over the room’s atmosphere. It’s these thoughtful final touches that transform your skylight from just a source of light into a polished, practical, and valuable addition to your home.
Your Skylight Tile Roof Questions Answered
Even with the best-laid plans, a few questions always seem to pop up when you’re thinking about a project like installing a skylight on a tile roof. It’s a big decision for your home, so it makes sense to get all your ducks in a row. Let’s tackle some of the most common queries we hear, from long-term upkeep to energy performance.
A lot of homeowners ask us about cleaning. Is it going to be a massive chore? With modern units, it’s surprisingly hassle-free. Many skylights, including those from Vivid Skylights, now come with advanced self-cleaning glass. This clever coating uses the sun’s UV rays to break down organic grime, and the next time it rains, the water just washes it all away. It really cuts down on your maintenance list.
Durability and Lifespan
Another big question is about durability. How long will a skylight really last, and can it stand up to the tough Aussie weather? You’ll be glad to know that high-quality skylights are built tough. They’re designed with materials like robust, powder-coated aluminum frames and double-glazed, laminated glass that can handle impact and sharp temperature changes without a problem.
A common worry is whether a skylight will turn a room into a hotbox in summer or an icebox in winter. This is a totally valid point, especially in a place with a climate like Malvern’s. The key is picking a unit with excellent thermal performance to keep your indoor temperature comfortable all year round.
Energy Efficiency and Building Codes
Speaking of performance, Australia’s Building Code has some strict standards for skylights to make sure they’re energy efficient. The Window Energy Rating Scheme (WERS) gives skylights a star rating to show how well they prevent heat from getting in or out. For instance, units that hit 7 stars or higher are considered top-tier for thermal performance, which can seriously help lower your heating and cooling bills.
In some parts of the country, fire safety rules like AS 3959-2009 also come into play, setting clear guidelines for installations. To get a better handle on these important standards, you can explore the details of Australian skylight regulations.
At the end of the day, a professionally installed skylight tile roof that uses a quality product with the right flashing is a sound, long-lasting investment. It’s a surefire way to bring in more light, boost your home’s value, and add a touch of architectural style.
Ready to transform your home with beautiful, natural light? Explore the stylish and watertight solutions from Vivid Skylights, the perfect choice for your tiled roof. Discover your options at https://vividskylights.com.au.