
There’s usually one room that starts this whole project. A hallway that stays dull even at midday. A kitchen bench that needs lights on from morning. A bathroom with no real connection to the outside. You know the room because you use it all the time, and you’re tired of it feeling closed in.
A well-planned skylight installation changes that room fast. It doesn’t just add light. It changes how the ceiling feels, how surfaces read during the day, and how the whole space opens up without giving away wall space to extra windows. For a capable DIYer, the job is often more achievable than expected, provided you’re realistic about roof work, flashing, and compliance.
This guide is written for Australian homes and real roof conditions, with practical advice that suits both pitched and low-pitch roofs. It also covers fixed skylights, operable units for ventilation, and the situations where a traditional skylight isn’t possible at all.
Table of Contents
From Dark Room to Daylight Dream
The appeal of skylight installation is simple. You’re taking a part of the house that feels flat and turning it into somewhere people actually want to spend time. That could be an ensuite, stairwell, walk-in robe, kitchen, or converted attic.
The biggest shift isn’t only brightness. It’s quality of light. Natural light from above spreads differently from wall light, especially in the middle of the home where windows can’t help much. In practical terms, that often means a room feels cleaner, taller, and easier to furnish because you haven’t used up valuable wall area.
For Australian homes, product choice matters just as much as placement. Double-glazed fixed skylights suit rooms that only need light. Operable models suit bathrooms, kitchens, and upper-storey rooms where releasing warm air makes a real difference. Electric and solar-powered opening options make sense when the ceiling height or shaft depth would make manual operation awkward.
Good skylight work looks effortless when it’s finished. The effort is in the planning, roof prep, and flashing details that nobody sees later.
There’s also a practical fallback for rooms where a roof opening isn’t possible. An AuraGlow LED skylight-style fitting gives the visual effect of a skylight and shifts colour through the day, which works well in apartments, internal rooms, and renovation layouts where structure or services block a conventional unit.
Nationwide delivery matters too. If you’re building or renovating outside Melbourne, getting the right unit, the right size, and the right flashing components to site without piecing together a mixed system saves a lot of frustration.
Planning and Site Assessment
Good skylight jobs are usually decided before the roof opening is cut. The room, the framing, the roof pitch, and the flashing approach all have to agree. If one of those is forced, the install gets slower, messier, and harder to waterproof well.
Choose the room first, then the exact position
Start inside the house and mark the part of the room that needs light, not just the middle of the ceiling. In a kitchen, that might be over the main bench. In a bathroom, it is often over the vanity or the centre of the room where privacy matters. In a hallway, a small shift in position can spread light much better along the full length.
Then get into the roof space and confirm what the room is asking the roof to do. Check rafter or truss layout, wiring, ducting, insulation depth, and how deep the shaft will need to be. A location that looks perfect from below can become a poor choice once you find a truss web, an exhaust run, or a shaft that will flare awkwardly.
A few rules keep the set-out honest:
Place light where it will be used: Centre the skylight over the working zone of the room, not by roof symmetry alone.
Measure shaft depth early: Deep shafts narrow the spread of light and add finishing work.
Work with the framing: Altering structural members can trigger engineering and approval requirements.
Check the view from inside: The final position should make sense from the floor, not only from the roof.
Match the skylight type to the way the room works
Fixed units suit spaces that need daylight but already ventilate well. Living areas, stair voids, and corridors are common examples. They are also simpler to install because there are fewer components and no opening mechanism to allow for.
Operable units suit rooms that trap heat or moisture. Bathrooms, laundries, kitchens, and upper-storey rooms usually benefit from the extra airflow. If the ceiling is high or the shaft is long, electric or solar operation is often the practical choice rather than an upgrade for its own sake.
Check approvals before you order anything or cut plaster. Vivid Skylights has a clear guide to building permit requirements for skylight projects that helps you confirm what applies before roof work starts.
Assess the roof with the flashing in mind
Roof pitch changes the whole job. Lower-pitch roofs drain water more slowly, so flashing details need tighter control and cleaner overlaps. Tile profile matters too. So does exposure to wind-driven rain. A skylight can be perfectly square in the roof and still leak if the water path around it has not been thought through properly.
I tell DIYers to assess the roof as a drainage system first and a cutting job second. That mindset prevents a lot of trouble.
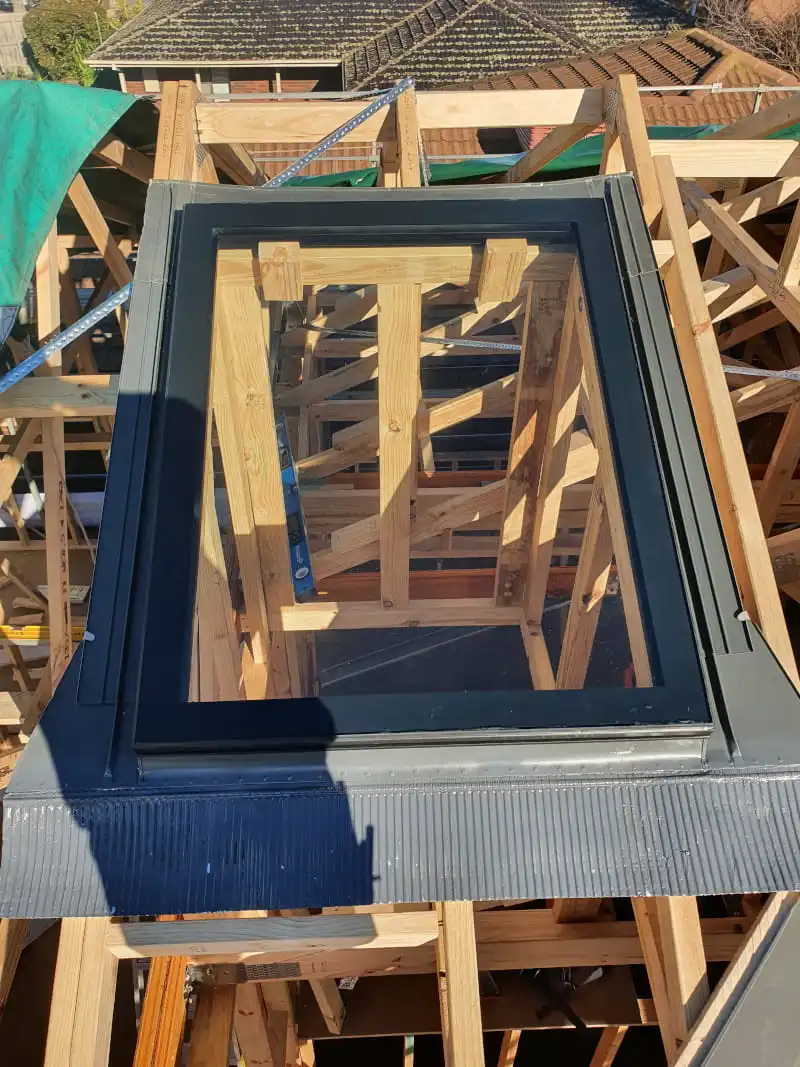
Vivid Skylights has a few design advantages that help here. The units are designed to sit over roof battens, which can reduce awkward set-out compromises and make placement easier when you are trying to line the skylight up properly with the room below. The integrated flashing lip also gives you a much clearer starting point for the roof flashing assembly. You are building from a defined edge instead of improvising waterproofing details on site.
That does not mean every roof is suddenly simple. Very low pitches, brittle older tiles, crowded roof cavities, and sites exposed to hard weather still demand caution. If access is poor or the roof condition is doubtful, slow down and reconsider whether DIY is the right call.
Before any roof work begins, review basic tool and site safety. The Value Tools Co safety guide is a useful refresher, especially if you do not work at height often.
Essential Tools Materials and Safety
Roof work punishes poor preparation. If you stop mid-job to buy sealant, a better blade, or proper fall protection, you’ve already made the work harder than it needs to be.
Tools that make the job cleaner
You don’t need a van full of specialist gear, but a few tools matter more than people think.
Tape measure and layout tools: A reliable tape, square, chalk line, and marker keep the ceiling opening and roof opening aligned.
Stud finder and inspection tools: Useful from inside before you open plaster, especially when the roof cavity is tight.
Reciprocating saw or circular saw: Match the tool to the material and depth of cut. Control matters more than speed.
Pry bar and tile lifting tools: You need to remove roofing materials without breaking half the surrounding area.
Drill and driver kit: Keep separate bits for pilot holes, fixings, and any bracket hardware.
Caulking gun: A solid one. Cheap guns make neat sealing harder than it should be.
Safety gear isn’t optional
A skylight installation puts you on a roof, around sharp materials, and near electrical services. That means proper PPE and fall protection, not “just being careful”.
Use a roof harness suited to the pitch and access conditions. Wear non-slip footwear, gloves, eye protection, and hearing protection when cutting. If you’re using power tools overhead or on a roof edge, slow down and work from stable footing only.
For a sensible refresher on tool handling and job-site habits, the Value Tools Co safety guide is worth reading before you start.
Materials to have on hand before opening the roof
Have every consumable on site before the first cut. That includes underlay repairs, compatible fasteners, quality butyl-based sealing products where specified, silicone where appropriate, timber for framing adjustments, and interior lining materials for the shaft.
If you’re working with a tiled roof system, the roof flashing installation guide is a useful reference for understanding overlap order and waterproofing sequence.
One practical option is Vivid Skylights, which supplies double-glazed fixed and operable units with flashing kits for tiled roofs. The units are designed to sit over roof battens and include a perimeter flashing lip, which simplifies placement and helps create a watertight flashing build-up on different roof types.
The Vivid Skylight Installation Process
A good skylight install usually feels slow at the start and quick at the end. The careful part is setting out the opening, checking the structure, and getting the flashing sequence right. Once those pieces are correct, the unit should drop into place without a fight.

Set out the opening accurately
Start from inside the room, not on the roof. Mark the ceiling position where the light will do the most good, then get into the roof space and confirm the opening against rafters, battens, and any services before cutting further.
This part decides how tidy the whole job will look. If the ceiling mark is slightly off, the shaft ends up crooked, the tiles become harder to reinstate, and the finished skylight can look like an afterthought rather than part of the room.
Cut a small inspection opening if you need one. Check the shaft line, the roof framing, and the clearances around the unit. Then transfer the opening to the roof with care.
If you are working on tiles, this tiled roof skylight installation reference is useful before you start lifting roofing material. Tiled roofs reward accurate set-out and punish guesswork.
Prepare the roof and frame the opening properly
Once the surrounding roof covering is removed, cut the opening to the manufacturer’s size and frame it so the loads are carried properly around the skylight. Keep the opening square and check corner-to-corner measurements before the unit goes anywhere near the roof.
This is one of the practical advantages of the Vivid system. Because the skylight is designed to sit over roof battens, placement is more straightforward than with units that force you into awkward packing or improvised support details. You still need a true opening, but the design gives you a cleaner starting point.
A few habits make this stage go better:
Check the opening twice before lifting the unit: A quick re-measure is faster than trimming framing with the skylight already on the roof.
Alter only what needs altering: Keep structural changes tight and deliberate.
Clean the roof surface around the opening: Grit and tile debris under flashings can stop parts from sitting flat.
Dry-fit the sequence in your head first: Know where the unit, flashing pieces, and surrounding tiles will land before you begin fixing.
If the skylight needs force to seat properly, stop and find the reason. In my experience, it is nearly always a framing or set-out problem, not a skylight problem.
Flash for water control, not just sealant
Most leak call-backs come back to flashing, not glass and not the frame. Trade guidance on roof drainage and penetration detailing makes the same point. Water needs a path to run over the system and away from it, which is why overlap order matters so much, as outlined in the VIVID SKYLIGHTS flashing guide for skylights and roof windows.
Sealant has a role, but it is not the waterproofing strategy. The waterproofing strategy is correct layering, correct laps, and a roof opening that lets the flashing sit flat without distortion.
This is another place where Vivid Skylights make the job easier for a capable DIYer. The integrated perimeter flashing lip gives you a clear edge to bring the roof flashing into. That is a better detail than trying to create a weatherproof transition against a plain vertical box side, especially on tiled roofs where each surrounding piece wants to move the flashing line slightly.
Common errors are predictable:
Reverse laps: Water gets directed under the flashing instead of over it.
Too much faith in sealant: It may look tidy on day one, then crack or peel as the roof moves.
Poor tile reinstatement: Rocking tiles and open gaps interrupt drainage.
Forcing flashing to suit the roof: Flashing should follow the roof profile, not fight it.
Seat the skylight and test it before finishing inside
Once the opening is framed and the flashing base is ready, lower the skylight into place and make sure it sits evenly on all sides. On a Vivid unit, the batten-sitting design helps with this stage because the skylight has a more defined and repeatable bearing position. That reduces the trial-and-error that can happen with some other units.
Fix the skylight to the manufacturer’s requirements and check operation before you close anything in. Operable units should open, latch, and seal cleanly. If the model includes electrical or solar components, test them while access is still easy.
Then water-test the installation. Use a controlled hose test that mimics rainfall over the upper roof area and flashing, not a pressure blast straight into joints. If something is wrong, this is the moment to find it.
Inside the room, the shaft finish does the last part of the work. Straight lines, clean plastering, and sensible shaft shaping make the light look deliberate. A flared shaft usually throws daylight wider, while vertical sides give a sharper, more architectural look.
DIY Installation vs Professional Fitting
Not every homeowner should DIY a skylight installation, and that’s not a knock on your ability. It’s just an honest reading of what the job asks for. Roof access, framing judgement, flashing skill, and interior finishing rarely all sit in one person’s comfort zone.
When DIY makes sense
DIY can make sense if you’ve already handled roof penetrations, minor framing, or detailed waterproofing work. It also suits straightforward jobs where the roof is accessible, the shaft is simple, and there are no awkward compliance issues.
The strongest DIY candidates usually have these conditions in their favour:
Simple roof geometry: Clear access and no complicated valleys or junctions nearby.
Good tool access: Not just basic carpentry tools, but roof-safe access gear as well.
Confidence with finishing: The internal shaft can make or break the finished look.
Time to work carefully: Rushed weekend installs tend to create the problems that appear in winter.
When professional fitting is the smarter call
Professional fitting is the right move when the roof is steep, access is poor, framing needs alteration, or the home sits in a regulated zone with added material requirements.
In Australia, AS 3959 compliance is mandatory in Bushfire Attack Level zones, and many of Melbourne’s bayside suburbs fall into BAL-12.5 to BAL-29 zones, which means ember-resistant frames and impact-rated glazing are required. In those cases, professional installation is highly advisable.
It’s also worth comparing your DIY budget against a fitted quote before deciding. The skylight cost and installation guide is a practical place to start if you want to weigh product choice against labour and finishing scope.
Decision Guide DIY vs Professional Skylight Installation
| Factor | DIY Installation | Professional Fitting |
|---|---|---|
| Cost control | Lower labour outlay, but you carry the risk of errors and rework | Higher upfront cost, but less risk of remedial roofing or plaster repair |
| Time on site | Usually spread across planning, roof work, and finishing over several sessions | Faster and more coordinated, especially when roof and interior trades are organised |
| Skill requirement | Best for confident renovators with roofing, flashing, and finishing ability | Suits homeowners who want the result without learning roof waterproofing on the job |
| Tools and access | You need roof safety gear, cutting tools, lifting help, and sealing materials | Installers arrive with the access gear and trade-specific equipment |
| Compliance and approvals | You need to check permits, standards, and zone-specific requirements yourself | Professionals are better placed to handle compliance-sensitive installs |
| Stress level | Rewarding if it goes well, frustrating if the opening, flashing, or shaft gets complicated | Less hands-on, but usually far more predictable |
If you’re on the fence, that usually means the project needs a harder look. A simple job feels simple when you inspect it properly.
Finishing Touches and Frequently Asked Questions
Roofing gets the attention, but the interior finish is what you live with every day. A strong skylight installation can still look average from inside if the shaft is clumsy, the corners wander, or the paint reflectivity hasn’t been thought through.
Build a light shaft that actually improves the room
A vertical shaft gives a crisp architectural look. A flared shaft spreads light more broadly into the room. Neither is automatically better. It depends on ceiling depth, room proportions, and the look you want.
Keep the shaft framing straight and the plaster reveals even. Bright interior finishes usually help bounce daylight deeper into the room. If insulation or vapour control is required in your roof assembly, make sure the shaft is finished to suit the rest of the ceiling build-up rather than treated as an afterthought.
A good final check is to stand in the doorway and look up. If the shaft feels centred, square, and clean from that angle, it will usually feel right everywhere else too.
Common questions after the roof work is done
How much maintenance does a skylight need?
Not much if the roof integration is right and the glass is suited to the environment. Self-cleaning glass coatings can reduce maintenance in dusty Melbourne conditions, which is helpful on roofs that are safe to inspect but awkward to clean manually.
Can a skylight work on different roof materials?
Yes, but the flashing detail must suit the roof. Tiled and corrugated metal roofs are not flashed the same way, and trying to adapt one detail to another is where leaks start.
What if I can’t install a traditional skylight?
That’s where the AuraGlow LED skylight range fits. It’s a strong option for rooms with no direct roof path, difficult structure, apartment constraints, or service congestion above the ceiling.
How do I deal with sealing questions later on?
If you need a maintenance reference, the guide on how to seal a skylight is a practical starting point for understanding what should be checked and what shouldn’t be patched blindly.
If you ever find yourself adding more and more sealant to a skylight, stop and inspect the flashing logic. Water problems usually start with path, not product.
Are double-glazed units worth it in Australian conditions?
Yes, especially in rooms that get full sun or where comfort matters through both hot and cool parts of the year. They help the room feel more stable, not just brighter.
Should I choose fixed or operable?
Choose fixed for pure daylight and simplicity. Choose operable where airflow is part of the brief, especially in bathrooms, kitchens, and upper-storey spaces that trap heat.
If you’re weighing up a skylight installation for a renovation or new build, Vivid Skylights offers double-glazed fixed, electric and solar-powered operable skylights, plus Australia-wide delivery and options for rooms where a traditional skylight won’t suit.