
Understanding Why Tile Roof Flashing Actually Matters
Protecting your home from harsh weather is essential, especially in Australia. A durable roof is your first line of defense against everything from intense sun to heavy downpours. This is where tile roof flashing comes in. It’s a vital part of your roofing system, preventing costly water damage.
Why Flashing Is So Important
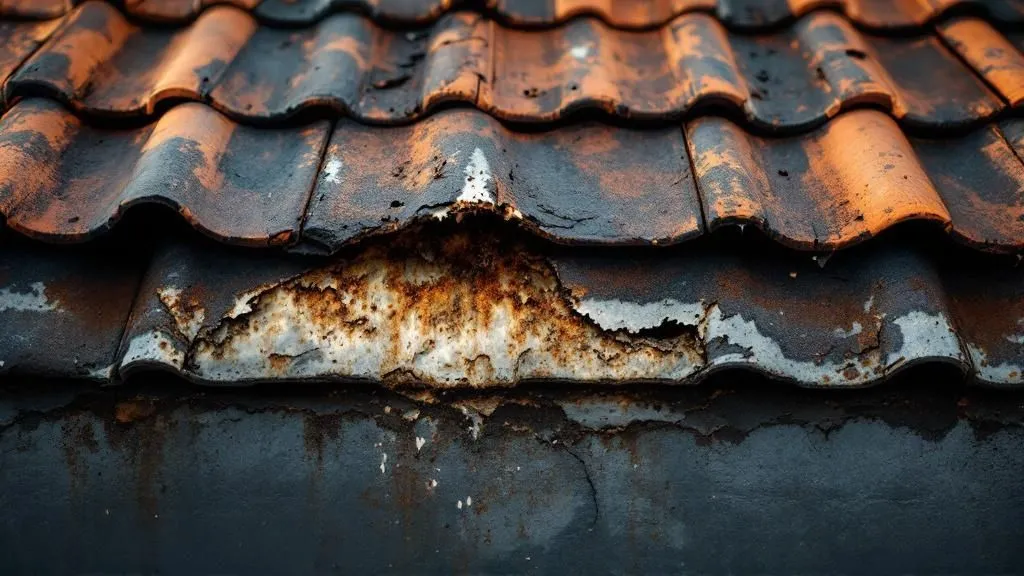
Flashing failures are the leading cause of water damage claims, surpassing all other roofing issues. Even small gaps or cracks can allow water to seep into your roof structure, leading to rot, mold, and costly structural repairs. A small leak around a chimney, for example, can quickly become a major problem if the flashing is not correctly installed or maintained.
Australian Weather and Your Roof
Australian weather conditions pose unique challenges. Cyclonic winds can damage flashing, and heavy rainfall puts immense pressure on roof seals. Standard flashing methods often struggle in these conditions, making choosing the right materials and meticulous installation crucial.

The Importance of Correct Installation
Roof flashing in Australia ensures watertight seals around vents, chimneys, and skylights. Lead flashing was historically common due to its durability and flexibility. However, alternatives like Wakaflex and Fastflash now offer lead-free and environmentally friendly options compliant with Australian standards. Learn more about advancements in flashing: Flashing Advancements. For information on skylight flashing, see How to master skylight flashing.
Different Tiles, Different Needs
Different tile types require different flashing systems. Understanding how your tile type impacts flashing choice and installation is essential for long-term roof health. Some tiles need specialized flashing to accommodate their specific shape and size.
Vulnerable Areas of Your Roof
Certain roof areas, such as valleys and junctions where the roof meets walls, are particularly susceptible to leaks. Proper flashing installation in these areas is critical. Regularly inspecting these vulnerable spots can help identify potential problems early on.
Warning Signs and Prevention
Recognizing the signs of flashing issues can prevent expensive repairs. Look for water damage indicators like stains on ceilings, peeling paint, or dampness around windows and skylights. These signs might indicate flashing problems requiring immediate attention. Understanding tile roof flashing is not just about preventing leaks; it’s about protecting your investment and your home’s lifespan.
Choosing The Right Materials For Australian Conditions
Choosing durable flashing that stands up to the Australian climate is a critical decision. Selecting the wrong material can lead to expensive repairs down the line. This guide explores the performance of different flashing materials, from the heat of Queensland summers to Melbourne’s varied weather.
Material Performance in Australia
Analyzing material successes and failures reveals why some traditional options are falling out of favor. For example, galvanized steel, once a staple, is prone to rust in coastal areas due to salt spray. Some materials expand and contract with temperature fluctuations, leading to cracks and leaks. Choosing the right material for your specific climate is essential.
The Hidden Costs of Flashing Materials
The initial price tag doesn’t tell the whole story. Consider installation complexity, maintenance, and compatibility with your tile type. A cheaper material might require frequent upkeep or specialized installation, increasing the overall cost. Investing in quality materials upfront can minimize long-term expenses.
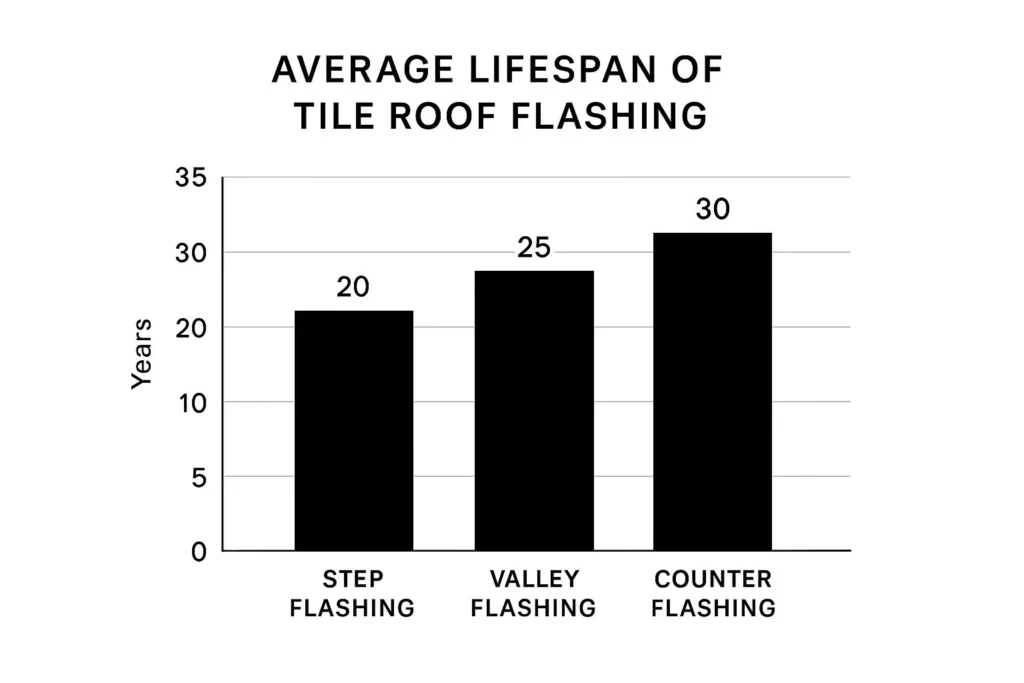
This infographic shows the average lifespan of different tile roof flashing types. Counter flashing typically lasts the longest, followed by valley flashing, then step flashing. Using a shorter-lived material like step flashing in a high-stress area like a valley can lead to early failure and costly replacements.
To help you choose the right flashing material, we’ve compiled a comparison table outlining the pros and cons of various options:
To understand the nuances of each material and make an informed decision for your roofing needs, consult the table below. It offers a detailed comparison, highlighting key differences in durability, cost, environmental impact, and installation difficulty.
Tile Roof Flashing Materials Comparison:
| Material | Durability (Years) | Cost Range | Environmental Impact | Installation Difficulty |
|---|---|---|---|---|
| Galvanized Steel | 15-25 | Low | Moderate | Easy |
| Colorbond Steel | 40-50 | Medium | Low | Easy |
| Aluminum | 20-35 | Medium | Low | Medium |
| Copper | 75-100 | High | Low | Difficult |
| Wakaflex | 25-30 | Medium | Low | Easy |
| Fastflash | 20-25 | Medium | Low | Easy |
| Lead (No longer recommended) | 50-75 | Medium-High | High (Toxic) | Medium |
Key takeaways from the table:
- Cost vs. Lifespan: While materials like copper offer exceptional durability, the higher upfront cost may not be justifiable for all projects.
- Environmental Considerations: Modern, lead-free options like Wakaflex and Fastflash minimize environmental impact.
- Ease of Installation: Flexible flashing options generally offer easier and faster installation, potentially reducing labor costs.
Modern Flashing Alternatives
Colorbond steel, with its protective coating, offers superior corrosion resistance compared to traditional galvanized steel. Wakaflex and Fastflash, lead-free and flexible, provide environmentally friendly solutions compliant with Australian standards. These often come with longer warranties, highlighting their durability.
Installation Time and Durability
Material choice impacts installation time. Flexible flashing is often quicker to install than rigid materials, saving on labor. While durable materials might be more expensive initially, they save money long-term by reducing the need for repairs and replacements.
Navigating Australian Building Standards Without Confusion
Building codes and Australian Standards can feel overwhelming, but grasping the essentials of tile roof flashing is simpler than you might think. This guide offers practical advice for homeowners and contractors across Australia.
Understanding the 75mm Rule
The National Construction Code specifies requirements for flashing, such as ensuring joints are at least 75 mm and overlap in the direction of the roof’s slope. This detail is vital for preventing water damage. Picture overlapping tiles—the overlap must be enough to stop water from flowing uphill and under the flashing. This move toward lead-free flashing aligns with growing emphasis on sustainability and regulatory compliance in Australian roofing. Learn more: Flashing Advancements.
Why Lapping Direction Matters
The overlap must always follow the roof’s slope. This ensures water flows over the joins, preventing a “dam effect” that can lead to leaks.
Installation Practices That Pass Inspection
Proper tile roof flashing installation is essential. Compliance with Australian Standards isn’t just a formality; it safeguards your home. Material selection should consider local weather conditions, as highlighted in this guide: Tasmania’s Unique Climate Patterns.
Regional Variations in Australian Standards
Australian Standards acknowledge diverse climates. From the tropical north to the temperate south, building needs differ. Coastal high-wind zones might require stronger fixings and robust flashing. Bushfire-prone areas may need fire-resistant materials. Understanding these regional differences ensures your flashing is suitable for your location.
Keeping Up with Regulatory Changes
Regulations change with new technologies and building performance understanding. Staying informed about updates, like shifts in materials and installation methods, ensures compliance. This not only protects your home but also adds value.
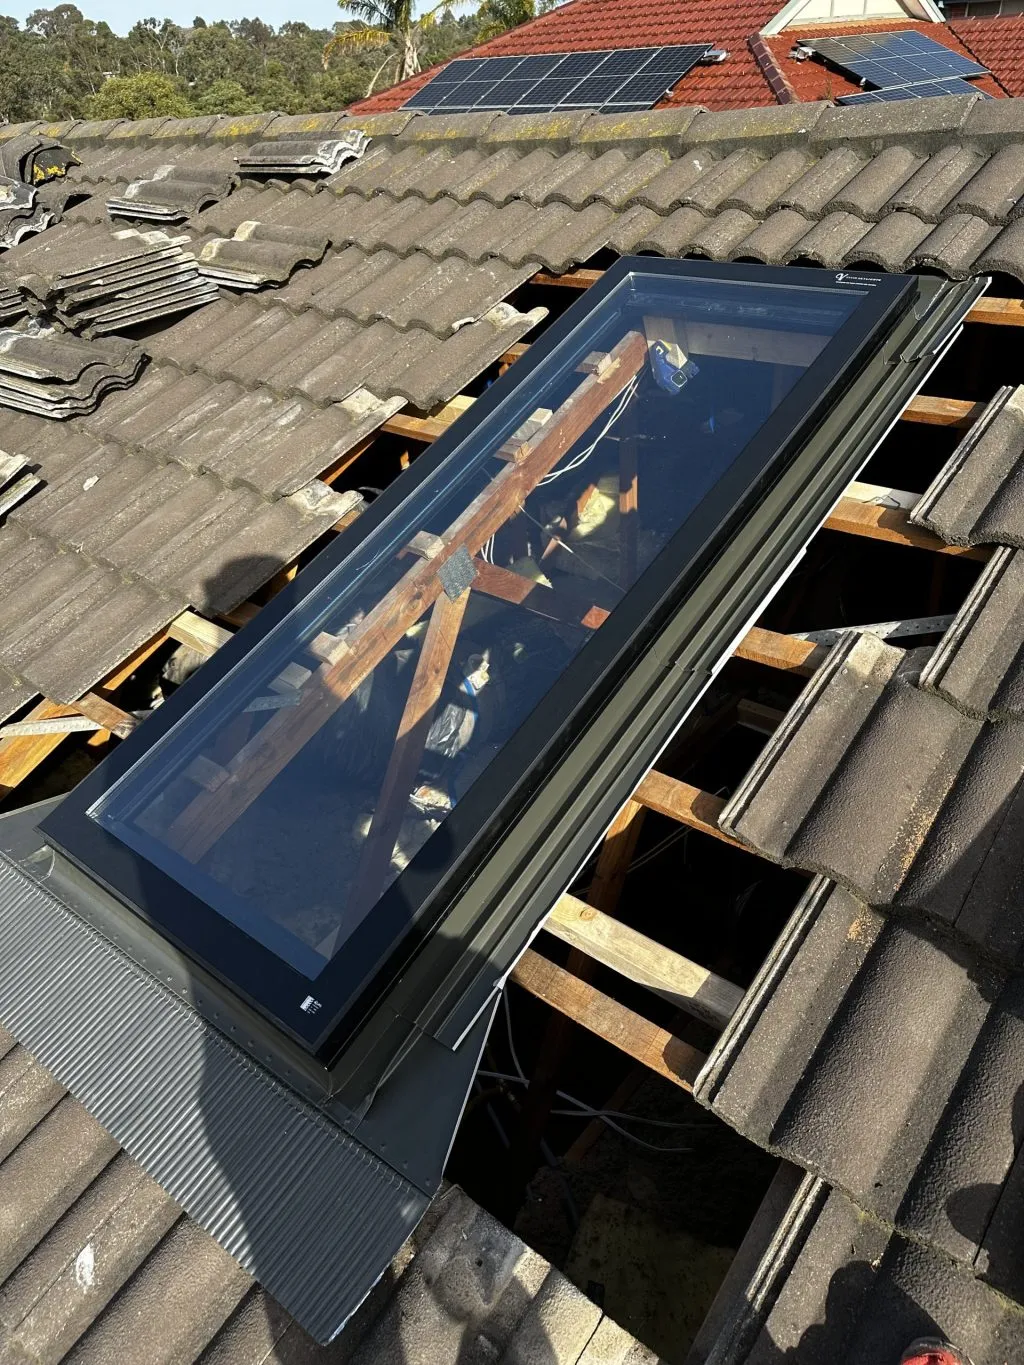
Managing Solar Panel Integration With Existing Flashing
Solar panels are becoming increasingly common across Australia. Integrating them seamlessly with your existing tile roof flashing is a critical part of the installation process. It’s not just about placing the panels; it’s about maintaining the integrity of your roof while accommodating the new penetrations and mounting systems. This careful integration ensures a watertight and structurally sound roof for years to come.
Challenges of Solar Panel Installation
Solar panel installations present some unique challenges for flashing systems. Each point where mounting hardware penetrates the roof requires meticulous flashing to prevent leaks. The panels themselves also change how water flows across your roof. This can overload existing drainage and put extra stress on flashing in valleys and around chimneys.
As of 2024, over 36% of Australian households have solar panels, significantly increasing the nation’s renewable energy generation. This growing trend underscores the need for robust flashing systems designed to handle both traditional tile roofs and modern solar installations. You can find more detailed statistics on the Australian Solar Panel Statistics page.
Coordinating Solar and Roofing Professionals
Effective solar integration requires close collaboration between solar installers and qualified roofing professionals. Ideally, a roofer should be involved from the initial planning stages of your solar project. This collaborative approach ensures the chosen mounting system and flashing methods are compatible with your existing tile roof and adhere to all relevant Australian Standards. This proactive approach minimizes the risk of leaks and structural problems down the line.
Timing and Cost Savings
Strategic timing of your solar installation can result in significant cost savings. If your roof is nearing the end of its lifespan, consider replacing the roof and flashing before installing solar panels. This avoids the extra expense and disruption of removing and reinstalling panels later. It also presents an opportunity to optimize flashing details specifically for the solar panel mounts, creating a more robust and watertight system from the outset.
Future-Proofing Your Flashing
When planning for solar, consider the future of your flashing system. Think about potential panel upgrades or additions you might want down the road. Ensure the initial installation can handle these changes without major flashing modifications. This forward-thinking approach prevents costly rework later and ensures continued protection for your roof as your energy needs evolve.
Questions to Ask Installers
Don’t hesitate to ask your installers detailed questions about their flashing methods. Inquire about their experience working with tile roofs, the specific flashing materials they plan to use, and their overall strategy for integrating the panels with your current flashing. A knowledgeable installer will be happy to discuss these details, address your concerns, and ensure a smooth installation that prioritizes the long-term health of your roof. By addressing these critical aspects of solar panel integration, you can confidently embrace renewable energy while safeguarding your home’s most important asset: its roof.
Getting Installation Right The First Time
Poor installation can ruin even the best tile roof flashing projects. High-quality materials are worthless if not installed correctly. Understanding the entire process, from the initial roof assessment to the final quality checks, is essential for long-term success.
Tools and Techniques for Professional Results
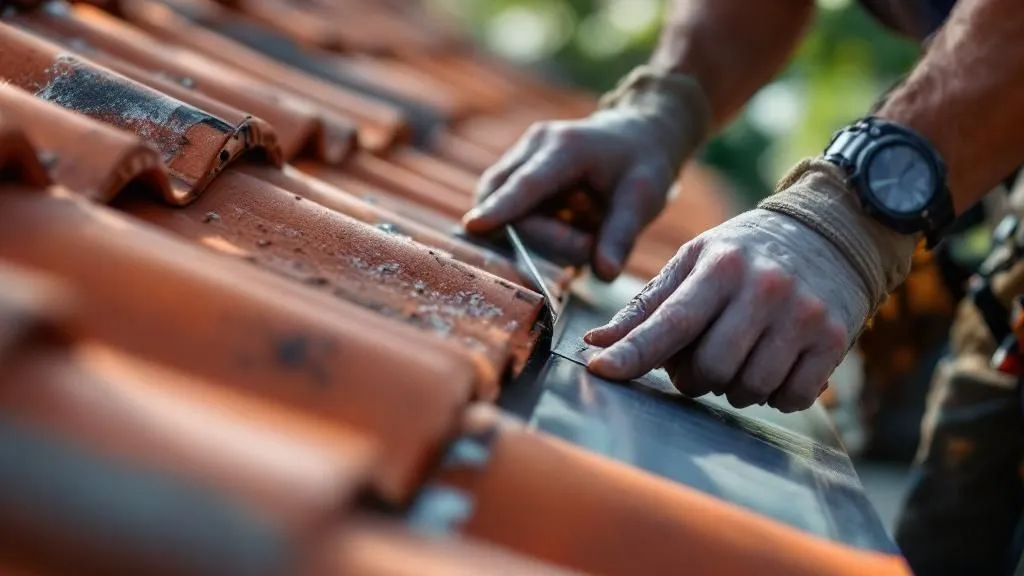
One key difference between DIY and professional results lies in the tools used. For instance, a slate ripper (rather than a hammer) removes old flashing without damaging surrounding tiles. A tuck pointer allows for precise sealant application, creating a watertight seal. These specialized tools, combined with professional expertise, significantly impact the final product.
Step-by-Step Installation Guide
Here’s a breakdown of the vital installation steps:
- Surface Preparation: Thoroughly clean the area. Remove debris, old sealant, moss, and lichen. This creates a clean surface for proper adhesion and ensures the new flashing sits flush.
- Weather Considerations: Avoid installation during rain or extreme heat. Moisture compromises sealant effectiveness, while excessive heat can make materials difficult to work with.
- Integration Methods: Different penetrations (chimneys, vents, skylights) require specific flashing techniques. For skylight installation, see our guide: How to install a skylight. This ensures a proper seal around each penetration type.
DIY vs. Professional Installation
While minor flashing repairs (like replacing a small section of step flashing) might be suitable for DIY enthusiasts, complex installations around chimneys or skylights are best left to professionals. Professionals have the experience, tools, and knowledge to handle intricate details and guarantee a watertight seal, preventing costly mistakes and offering peace of mind.
Quality Checks for Lasting Performance
Thorough quality checks after installation are vital:
- Visual Inspection: Look for gaps, wrinkles, or areas where the flashing isn’t flat.
- Water Test: Simulate heavy rainfall with a hose to check for leaks. This proactively identifies vulnerabilities.
- Sealant Check: Verify the sealant is correctly applied and fully cured. This extra layer of protection prevents moisture penetration.
Proper Surface Preparation and Weather Timing
Proper roof preparation is crucial. This includes removing dirt, debris, and old sealant to create a clean, dry surface. Timing is also key. Avoid installation in wet or extremely hot conditions, which can affect sealant effectiveness and overall installation integrity.
Integration Methods for Different Penetration Types
Each roof penetration demands a specific tile roof flashing technique. Chimneys, vents, and skylights have unique shapes and require specific approaches for a watertight seal. Chimney flashing often involves step flashing (under shingles) and counter flashing (embedded in mortar). Skylight flashing usually requires a specialized kit for the specific model. Understanding these differences is crucial for choosing the right materials and techniques.
Before we dive into installation specifics, let’s review a helpful checklist to ensure every step is covered correctly. This table outlines the crucial stages, requirements, checks, and common mistakes to avoid.
Tile Roof Flashing Installation Checklist
| Installation Stage | Key Requirements | Quality Checks | Common Mistakes |
|---|---|---|---|
| Surface Preparation | Clean, dry surface free of debris and old sealant | Visually inspect for cleanliness; ensure proper adhesion | Failing to remove all debris; applying sealant to a wet surface |
| Flashing Installation | Correct flashing type for the penetration; proper overlapping and securing | Check for gaps, wrinkles, and secure attachment | Incorrect flashing type; improper overlapping; insufficient securing |
| Sealant Application | Compatible sealant; proper application technique; adequate curing time | Inspect sealant for proper coverage and complete curing | Using incompatible sealant; applying too little or too much sealant; not allowing sufficient curing time |
| Water Test | Simulate heavy rain with a hose | Check for leaks or water penetration | Insufficient water pressure during testing; failing to inspect all potential leak points |
This checklist highlights the essential steps for successful tile roof flashing installation. By following these guidelines, you can ensure a long-lasting, watertight seal that protects your roof for years to come.
Understanding Current Market Trends and Pricing
The Australian roofing industry is a dynamic market. Staying up-to-date on the latest trends is essential for making informed choices about your tile roof flashing. This includes understanding how material availability and pricing can influence your project. For additional insights on pricing, you might find this resource helpful: How to master skylight pricing.
Material Availability and Pricing
Material availability and costs can shift due to several factors. These include seasonal changes, supply chain issues, and global events. For instance, high demand during peak building seasons can increase prices and lead to longer wait times. Global events can disrupt supply chains, affecting the availability and cost of materials like steel and aluminum. Keeping track of these market fluctuations will help you plan strategically, potentially saving both time and money.
Project Timelines and Budgeting
Understanding typical project timelines is key to effective planning. Factors like material lead times, contractor availability, and weather can all impact project duration. This knowledge helps you build a realistic budget and avoid unexpected delays. Accurately budgeting for your tile roof flashing will keep your project on track and within your financial limits.
Evaluating Contractor Proposals
Comparing multiple contractor proposals is more important than ever. Don’t just focus on the price; look at the details. Seek out contractors who offer clear explanations of their work, including materials, installation methods, and warranties. This helps you select a contractor who prioritizes quality and value, not just the lowest bid.
The Australian roofing industry has experienced some shifts. Revenue has seen a 1.6% compound annual growth rate (CAGR) decline over the past five years, reaching an estimated $3.8 billion in 2024. Even with this decline, the demand for quality tile roof flashing remains strong, especially with the increasing popularity of solar panel installations. For a deeper dive into industry statistics, see this report.
Technological Innovations and Warranties
The roofing industry is constantly evolving, with new technologies and materials regularly appearing. It’s crucial to distinguish between genuine advancements and marketing hype. Research different options, read reviews, and consider consulting with a roofing professional to determine the best solutions for your tile roof flashing needs. Also, pay close attention to warranty offerings. A solid warranty shows the manufacturer’s confidence in their product and provides you with peace of mind.
Insurance Considerations
Finally, remember to review your insurance coverage. Ensure your homeowner’s insurance policy covers roofing-related issues, such as damage from faulty flashing. Understanding your insurance and how it works with contractor warranties protects your investment. By considering these market trends, pricing factors, and insurance details, you can confidently make decisions about your tile roof flashing project, ensuring a successful and long-lasting outcome for your home.
Maintaining Performance For The Long Haul
Quality tile roof flashing installation is the crucial first step, but ongoing maintenance is what truly determines whether your investment provides long-term value or turns into a costly recurring problem. This section outlines practical maintenance routines that can easily be incorporated into your regular home care schedule.
Early Detection Prevents Major Problems
The key to effective flashing maintenance is early detection. Small issues, like a slightly lifted corner or a minor crack in the sealant, can quickly escalate into major problems if left unaddressed. Regular inspections allow you to identify and address these minor issues before they cause significant damage. Think of it as regular car maintenance – a small investment of time can prevent expensive repairs down the road.
Seasonal Inspections for Australian Conditions
Australia’s harsh climate, with its intense sun, heavy rainfall, and strong winds, necessitates specific seasonal inspections. After a major storm or high winds, it’s essential to check for any damage. Debris trapped against flashing can lead to water buildup and eventual leaks. Summer’s intense heat can cause sealants to dry and crack, compromising their effectiveness. A quick inspection after a heatwave can save you from future headaches.
Safe Assessment Techniques
Assessing your tile roof flashing doesn’t require scaling the roof. A simple visual inspection from the ground, perhaps aided by binoculars, can often spot obvious problems. If a closer look is needed, always use a stable ladder and exercise extreme caution. Avoid walking directly on the tiles to prevent damage.
Minor Maintenance Extends System Life
Addressing minor issues promptly can significantly extend the lifespan of your tile roof flashing. Resealing a small crack or re-securing a loose section can prevent further deterioration and avoid costly full replacements. This simple upkeep can save you hundreds, if not thousands, of dollars over time.
Cleaning Techniques That Protect Your Flashing
Regular cleaning helps maintain the performance of your tile roof flashing. Remove leaves, debris, and moss buildup that can trap moisture and contribute to damage. Use a soft brush or gentle water spray to avoid scratching the flashing material. Harsh chemicals should be avoided, as they can corrode or degrade the flashing.
Integrated Roof Maintenance Maximizes Investment
Tile roof flashing is just one component of your roof system. A comprehensive maintenance plan should address all parts, including gutters, tiles, and underlayment. This integrated approach ensures your entire roof functions effectively, protecting your home and maximizing your investment. Just as a healthy body requires care for all its systems, a healthy roof needs attention to detail in every area.
Ready to brighten your home and enjoy the benefits of natural light? Visit Vivid Skylights today to explore our range of high-quality skylights and flashing solutions perfect for Australian homes.