
Knowing when it’s time to replace your skylight domes is the first, and most important, step. Sure, a massive crack is a dead giveaway, but the real signs are often much sneakier. Things like a stubborn fogginess that won’t clean off, condensation trapped between the dome layers, or a brittle, chalky feel are all tell-tale signs the material has given up the ghost. When you see these, your dome isn’t just looking tired—it’s failing to insulate and protect your home properly.
Recognising When Your Skylight Dome Needs Replacing
Your skylight dome isn’t just a window to the sky; it’s a critical part of your roof’s defence against the elements. But over the years, the harsh Aussie sun, wild temperature swings, and seasonal downpours really take their toll. That crystal-clear view can slowly degrade, hitting your home’s energy efficiency and its ability to keep the weather out. Learning to spot these early warning signs can save you from bigger headaches down the track, like water damage or eye-watering energy bills.
It’s all too easy to write off some of these issues as just cosmetic wear and tear, but they usually point to a much deeper problem. If you ignore them, you could be setting yourself up for a much more expensive fix later on.
Beyond the Obvious Cracks
A shattered dome is an emergency, no doubt about it. But most of the time, the signs of failure are far less dramatic. The material itself will tell you everything you need to know.
- Discolouration and Haziness: If your acrylic or polycarbonate dome has gone yellow or hazy, that’s a classic symptom of UV degradation. It’s not just cutting down the quality of light getting into your home; it means the plastic has become brittle and is one bad hailstorm away from cracking.
- Chalky Texture: Next time you’re safely on the roof, run your hand over the dome. If it feels chalky or leaves a fine powder on your fingers, the protective UV coating is gone. The plastic itself is now breaking down.
- Crazing: Look really closely at the surface. See a fine web of tiny cracks spreading across it? That’s called crazing. Think of it as the final warning sign before bigger, more serious fractures appear.
Telltale Signs of a Failing Seal
Sometimes the dome looks okay at a glance, but the real problem is with the seal. When it fails, moisture gets trapped inside, and all the insulating properties go right out the window. This is a massive issue for double-domed skylights.
A common mistake is thinking a foggy skylight just needs a good clean. But if the condensation is between the layers of the dome, no amount of scrubbing will help. That’s a definitive sign the seal has failed. A replacement is the only way to get its thermal performance back.
That persistent fog between the panes is a huge red flag. It means the inert gas that was once trapped in there for insulation has leaked out, and humid air has gotten in. This absolutely tanks the skylight’s energy efficiency, causing heat to pour out in winter and bake your home in summer. You might even notice your heating or cooling bills have crept up for no obvious reason—a failing skylight is often the culprit.
Another subtle but critical clue is finding faint water stains on the ceiling or walls directly under the skylight. Even if you’ve never seen a single drip, these stains point to a slow, intermittent leak. This kind of quiet moisture intrusion is the perfect recipe for mould growth and structural rot, making it vital to check on the health of your skylight replacement domes before a small problem becomes a disaster.
How to Choose the Right Replacement Skylight Dome
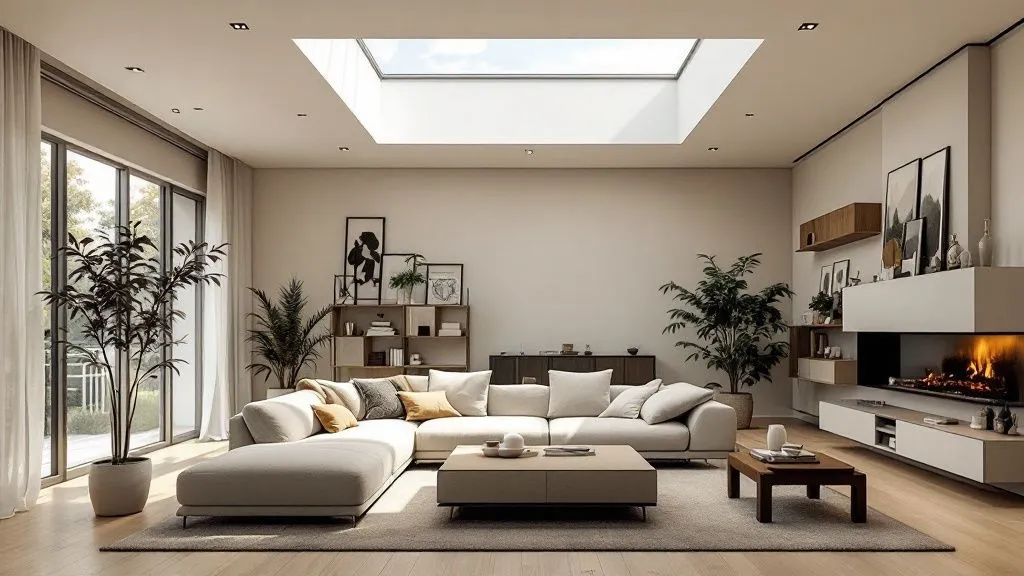
Picking the perfect replacement dome is about more than just finding one that fits. It’s an opportunity to genuinely upgrade your home’s performance. The right choice can flood a once-gloomy room with beautiful, natural light, boost your energy efficiency, and stand up to Australia’s demanding climate for years to come.
On the flip side, a poor choice can lead to disappointing light quality, unwanted heat gain in summer, or even a cracked dome after the first decent hailstorm. You want to think of it as a balancing act between light, strength, and thermal comfort, with your local climate and the room’s purpose guiding every decision.
Material Matters: Acrylic vs. Polycarbonate
Your first big decision is the material: acrylic (often known by the brand name Perspex) or polycarbonate (like Lexan). They might look similar at a glance, but their performance is worlds apart. Honestly, your home’s location and what you need the skylight to do should make this choice for you.
Acrylic has long been the go-to, mostly because of its incredible optical clarity and natural UV resistance. It lets a huge amount of visible light pour through, which is fantastic for spaces where you want the brightest, most natural illumination possible—think kitchens, art studios, or south-facing rooms.
Polycarbonate, however, is the undisputed champion when it comes to toughness. It’s a beast, boasting up to 250 times more impact resistance than glass of the same thickness. If you live in a hail-prone area or have trees dropping branches on your roof, this is a non-negotiable upgrade. I’ve seen too many homeowners replace a cracked acrylic dome only to have it happen again the next season. Moving to polycarbonate is a smart, long-term investment in peace of mind.
While polycarbonate is tougher, acrylic generally has better long-term clarity and is less prone to yellowing over many years of intense sun exposure. However, modern polycarbonate domes often come with advanced UV-protective coatings that greatly mitigate this issue.
Making the right call between acrylic and polycarbonate is crucial for the longevity and performance of your skylight replacement domes. Here’s a straightforward comparison to help you weigh up the pros and cons for your home.
Skylight Dome Material Comparison
This table breaks down the key differences between the two most common dome materials, helping you decide which one best suits your climate and needs.
| Feature | Acrylic (Perspex) | Polycarbonate (Lexan) |
|---|---|---|
| Impact Resistance | Good | Exceptional |
| Clarity & Light Transmission | Excellent (higher initial clarity) | Very Good (slightly lower clarity) |
| UV Resistance | Naturally high | Requires UV-protective coating |
| Scratch Resistance | More prone to scratching | More resistant to scratching |
| Best For | Maximising natural light in low-risk areas | Hail-prone regions and high-impact zones |
Ultimately, polycarbonate is the clear winner for durability in harsh conditions, while acrylic is perfect for maximising pure, bright light in safer environments.
Shape and Tint: How to Control Light and Heat
Once you’ve locked in the material, it’s time to think about the dome’s shape and colour. These elements directly control not just how much light gets in, but also what that light feels like and how much heat comes with it.
The shape—usually a smooth domed profile or a sharper pyramid—is mainly an aesthetic choice, but it does subtly change how light spreads. A classic dome tends to scatter light more broadly and evenly across a room. A pyramid can create more defined, focused light patterns, which can be a neat architectural feature.
The tint, on the other hand, is all about performance. Your main options are:
- Clear: This gives you maximum light transmission for the brightest possible interior. It’s perfect for south-facing rooms that don’t get direct sun or any space that just feels dark and needs opening up.
- Opal (White): A fantastic all-rounder. This translucent finish diffuses light beautifully, cutting out harsh glare and providing a soft, even glow. It also blocks a good amount of solar heat and adds a layer of privacy, making it ideal for living areas, bedrooms, and bathrooms.
- Bronze (Grey/Tinted): Your best weapon against the heat. A bronze tint dramatically reduces solar heat gain and harsh glare, which is an absolute must-have for north-facing skylights in hot Australian climates. You’ll trade a bit of brightness, but the improvement in comfort on a 35°C day is more than worth it.
Don’t Forget Australian Standards
This last point is critical. Any replacement dome you buy must comply with Australian Standard AS4285. This isn’t just a suggestion; it’s a benchmark for safety and quality that covers everything from water penetration and wind load to surviving human impact.
A dome built to AS4285 has been properly tested to handle Australian conditions. It means you can trust it won’t leak in a downpour or fail during a storm. Reputable local manufacturers build their products to meet these strict requirements as a matter of course.
For example, Skyspan produces its traditional skylight domes right here in Australia, designing them for all common roof types like corrugated iron and tile. They use durable Zincalume steel bases and acrylic glazing from 3mm to 4.5mm thick, balancing durability and light transmission while adhering to AS4285. You can find out more about their commitment to local skylight manufacturing on Skyspan.com.au.
Always ask for and confirm compliance before you hand over your money. It’s the best way to ensure your new dome is safe, durable, and built to last.
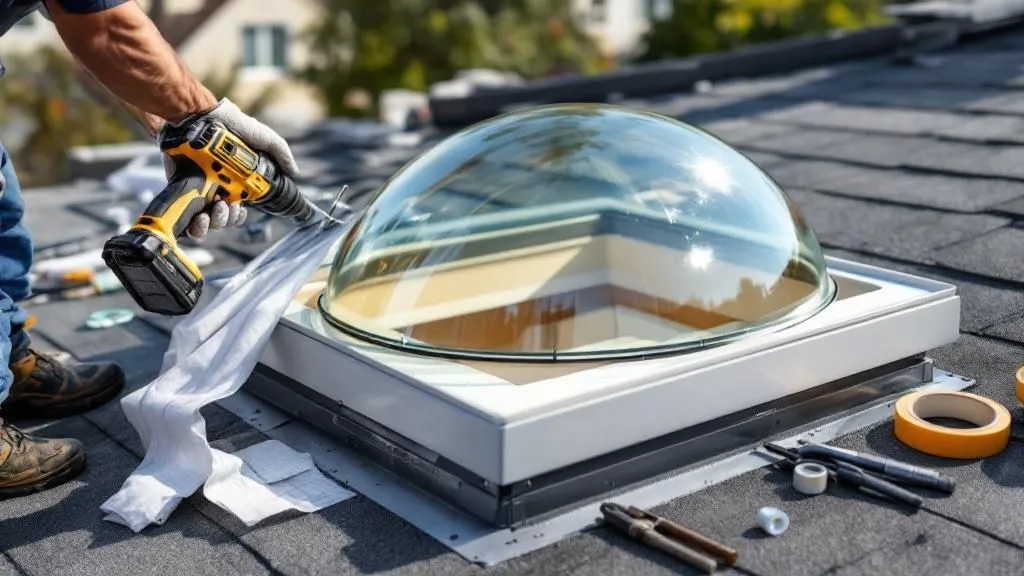
Get Ready for a Safe and Smooth Installation
A successful skylight dome replacement is won or lost before you even touch a ladder. Getting your prep right is the difference between a job that goes off without a hitch and a frustrating mess of safety risks and potential leaks. This isn’t just about grabbing your tools; it’s about setting up your entire worksite, both on the ground and up on the roof, for a safe and efficient project.
Trust me, rushing this part is a rookie mistake. It can lead to damaged property, an injury, or a dodgy seal that you’ll be patching up later. An hour of solid prep now can easily save you a full day of headaches down the track.
Assembling Your Installation Toolkit
There’s nothing worse than getting onto the roof only to realise you’ve forgotten the right screwdriver bit. A complete checklist of tools and materials beforehand stops those momentum-killing trips up and down the ladder.
You’ll need more than just the new dome itself. Think through every single step, from getting the old fasteners out to applying the final seal on the new unit.
- Safety Gear is a Must: This is non-negotiable. At a bare minimum, you need a sturdy, well-fitting safety harness, high-grip footwear, and a good pair of work gloves for any roofing job.
- Tools for Removal: A cordless drill with a range of bits is essential. You’ll also want a small pry bar for stubborn frames, a utility knife for slicing through old sealant, and a wire brush to clean up the curb once the old dome is off.
- Installation Supplies: Make sure you have the correct type and number of fasteners, as specified by the dome manufacturer. Most importantly, grab a high-quality, weatherproof sealant designed specifically for outdoor and roofing use.
Don’t be tempted to use that leftover silicone from a bathroom reno. You need a product properly formulated to stand up to Australia’s harsh UV and wild temperature swings to get a lasting, watertight seal for your new skylight replacement domes.
Choosing the Perfect Day for the Job
Your biggest unknown when working on a roof is always the weather. Trying to get this job done in poor conditions isn’t just dangerous; it actively works against you getting a durable, leak-proof finish.
The perfect day for this job is dry, calm, and mild. Rain is an obvious deal-breaker, as any moisture will stop the new sealant from curing properly, compromising the seal from day one. Strong winds are another major safety hazard, especially when you’re trying to manoeuvre a large, light object like a skylight dome.
I once saw a homeowner try to install a dome on a blustery day. A sudden gust caught the dome like a sail, ripped it from his hands, and sent it crashing into the garden. Always check the forecast and pick a day with little to no wind.
Even extreme heat can cause issues. Many sealants can cure way too fast in direct, intense sun, which can prevent them from bonding correctly to the frame. Your best bet is an overcast but dry day, or to tackle the job during the cooler hours of the morning or late afternoon.
Prepping the Work Area Inside and Out
The final piece of the prep puzzle is protecting your property from the dust and debris that are bound to fall. This little bit of effort makes the final cleanup a breeze and prevents any accidental damage.
Start inside by prepping the area directly under the skylight. Lay down some drop sheets or plastic tarps over your furniture, floors, and anything else you value nearby. Old screws, dried-out sealant, and years of dust will come down during the removal, and you’ll be glad you took this step.
The same thinking applies outside. If the skylight is above a garden bed, deck, or paved area, cover them up. A tarp will catch any falling debris and stop your old, brittle dome from scratching up surfaces if it happens to break on the way down. Make sure you have a clear, safe path to and from your ladder so you aren’t tripping over garden hoses or tools. Nail these steps, and you’ve set the stage for a smooth, risk-free installation.
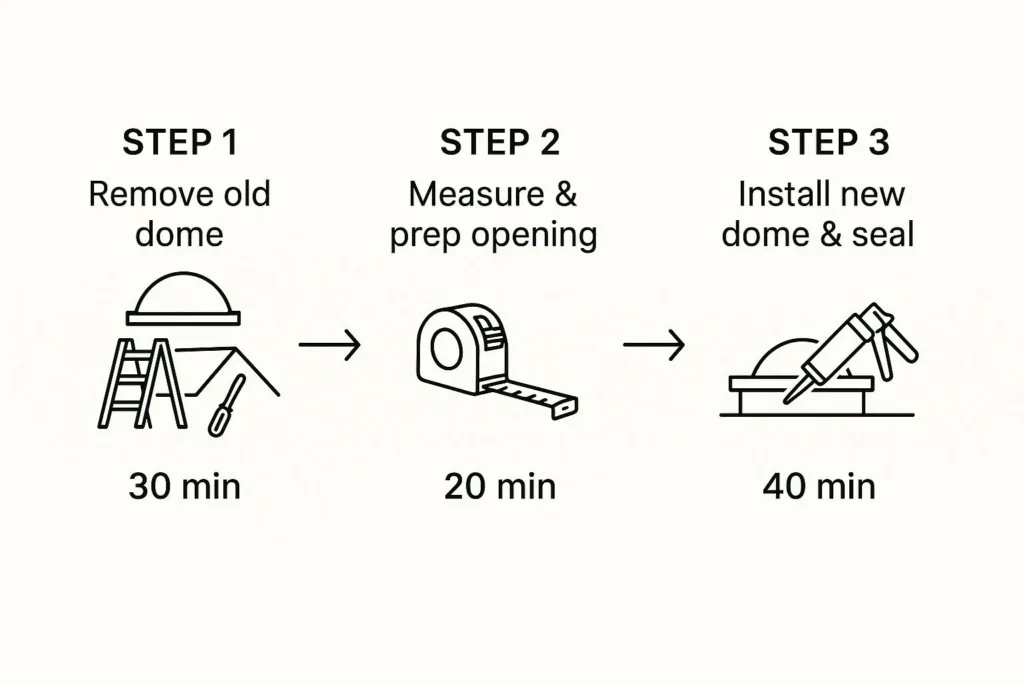
Removing the Old Dome Without Damaging Your Roof
Alright, you’ve got your new dome, the weather is cooperating, and it’s time to get hands-on. The first real job is getting that old, damaged unit off the roof. This is one of those moments where patience really pays off.
The main goal here is simple: remove the old dome without creating new problems. You absolutely want to avoid damaging the roof flashing or the timber/metal curb the skylight sits on. Rushing this can easily lead to a gouged roof or a bent frame, which are prime spots for future leaks that even a brand-new dome can’t fix.
How you tackle this really depends on the state of the old dome. A brittle, sun-scorched dome needs a much gentler touch than one that’s just a bit foggy.
Detaching the Dome and Retaining Frame
Most skylight domes are held in place in a couple of common ways. You’ll usually find an outer retaining frame fastened with screws, or sometimes a series of clips. Before you do anything, take a good look at how yours is put together.
Often, the fasteners are the biggest hurdle, especially after they’ve been sitting out in the rain and sun for years.
It’s pretty common to find screw heads that are rusted solid, stripped, or buried under old, rock-hard sealant. Your first instinct might be to use brute force, but hold off. A quality penetrating oil can be a lifesaver for rusted screws if you give it some time to work its magic. If the heads are stripped, a screw extractor bit is a small investment that will save you a massive headache.
Once the fasteners are out, the frame should lift off. If it feels stuck, it’s likely just old sealant holding on. Grab a utility knife and carefully slice through the sealant around the edge. Just be careful not to dig into the roof flashing underneath.
Handling a Brittle or Shattered Dome
If your dome is covered in fine cracks (a condition known as “crazing”) or is already broken, it can shatter pretty easily during removal. This is where safety is non-negotiable. Always wear your gloves and eye protection.
Instead of trying to lift a fragile dome off in one piece, it’s often much safer to break it up into smaller, more manageable sections. You can cover the dome with a thick blanket or a drop sheet to contain any flying pieces of acrylic or polycarbonate as you work. The focus, as always, is on protecting that curb and flashing.
Cleaning and Inspecting the Frame for a Perfect Seal
With the old dome out of the way, you’ve arrived at the most critical part of the entire job: preparing the mounting surface. This is what separates a professional, leak-proof result from a DIY disaster.
The skylight curb has to be perfectly clean, dry, and smooth. This ensures the new sealant can form a completely watertight bond. Any little bit of old silicone, butyl tape, or general grime left behind will compromise the new seal and practically invite water in. Don’t rush this part.
Here’s how to get that surface ready:
- Scrape Away Old Gunk: Use a plastic scraper or a putty knife to carefully peel off all the old sealant. You need to be firm, but gentle enough that you don’t gouge the curb itself.
- Tackle Stubborn Spots: For any tough, leftover bits, a wire brush works wonders to get the surface spotless.
- Wipe It Clean: The final step is to wipe down the entire curb with a clean rag and a solvent like methylated spirits. This removes any final oily residue and gives the new sealant the best possible surface to stick to.
After cleaning, run your hand over the whole curb. It should feel completely smooth. Any little bumps or bits of debris, no matter how small, can create a tiny channel for water to find its way in over time.
While you’re cleaning, take the chance to give the curb and the flashing a good inspection. On a timber curb, look for any signs of rot. On a metal one, check for rust. Make sure the flashing is still sitting tight against the roof and hasn’t lifted or cracked anywhere.
For a deeper dive into common issues to look for before you install the new dome, our guide to skylight dome replacement has some great tips. Catching these small problems now will save you from major headaches down the track.
Getting That Professional, Leak-Proof Finish
You’ve done the hard part. The old dome is gone, the curb is prepped and clean, and now you’re at the most rewarding stage of the job. This is where all that careful preparation comes together to create a perfect, watertight seal that will protect your home for years. Nailing this final step is what separates a top-notch installation from a future headache.
The secret isn’t some complicated trade trick; it’s all about patience and paying attention to the small stuff. Applying the sealant just right, placing the dome without making a mess, and securing it properly—these are the three things that guarantee a leak-proof result. Rushing now would be a huge mistake.
Applying a High-Quality Weatherproof Sealant
Creating a seal that lasts starts with the right sealant. This isn’t the place to save a few dollars on a generic tube from the bargain bin. You need a high-quality, neutral-cure silicone sealant made specifically for roofing and outdoor conditions. It has to be tough enough to handle Australia’s brutal UV rays and constant temperature changes.
Once you’ve got the right product, the application is pretty straightforward, but you have to get it right.
- Cut the Nozzle: Snip the tip of the sealant cartridge on a 45-degree angle. You want the opening to be about 6-8mm wide, which is perfect for laying down a nice, consistent bead.
- Apply a Continuous Bead: Pop the cartridge in your caulking gun and place the nozzle right on the cleaned skylight curb. Apply steady, even pressure and lay a single, unbroken bead of sealant all the way around the top edge.
- Check for Consistency: Make sure the bead is uniform in size. Look for any gaps, thin patches, or air bubbles. This continuous bead is what forms the primary waterproof gasket between the curb and your new dome.
A common rookie mistake is to be a bit stingy with the sealant or leave little gaps, thinking the screws will just squeeze everything together. Trust me, water is relentless and will find any tiny weakness. A generous, unbroken bead is your best line of defence against leaks down the track.
Positioning and Securing the New Dome
With a perfect bead of sealant ready to go, it’s time to gently lower your new skylight dome onto the curb. This step takes a bit of finesse—you want to get it right the first time without smearing that fresh silicone everywhere.
Carefully lift the new dome, align it with the corners of the curb, and lower it straight down. As it settles into the sealant, you should see a little bit squeeze out from under the dome’s flange. That’s a good sign! It means you’ve got solid contact all the way around.
Now for the fasteners. This part is a delicate balance. The screws need to be snug enough to create a firm seal, but not so tight that you risk cracking the new acrylic or polycarbonate. This is especially true for acrylic, as it’s a bit more brittle.
- Hand-Tighten First: Pop all the screws in and tighten them by hand to start. This makes sure the dome sits evenly without putting too much pressure on one spot.
- Use a Low Torque Setting: Grab your cordless drill, but turn the clutch down to a low-torque setting. Gently tighten the screws in a crisscross pattern, just like you would when changing a car tyre.
- Aim for a Snug Fit: You’re looking for a snug fit, not maximum torque. Tighten until the screw head is flush and the washer underneath is just slightly compressed. Over-tightening is the #1 cause of cracked skylight replacement domes.
For a more detailed walkthrough of this part of the job, check out our complete guide on how to install a skylight.
Reinstalling Outer Frames and Final Checks
If your skylight has an outer retaining frame or cover, now’s the time to put it back on. This piece usually adds another layer of weather protection and helps spread the pressure from the screws more evenly across the dome. Secure it using that same gentle, crisscross tightening method.
Once everything is fastened down, do one last check. This final look-over is your peace of mind. Walk around the skylight and visually inspect the seal. You want to see that consistent line of sealant squeezed out along the entire perimeter.
Gently press on the dome in a few different spots to make sure it doesn’t rock or move. It should feel completely solid. Lastly, clean up any excess sealant that squeezed out for a tidy, professional finish. That’s it—your new dome is secure, watertight, and ready to handle whatever the weather throws at it. The importance of these standards can’t be overstated, especially when you consider that the commercial sector made up about 78.61% of the global skylight market in 2022, where leaks are a major reason for replacements. You can learn more about these global trends in the skylight replacement market on Arizton.com.
Common Skylight Dome Replacement Questions
Even with a solid plan, it’s completely normal to have a few questions before you get started on replacing a skylight dome. Getting your head around the details—like cost, longevity, and maintenance—is key to feeling confident about the project.
We’ve pulled together the most common questions we get from homeowners just like you. Think of this as your go-to guide for quick, straight-to-the-point answers on everything to do with skylight dome replacements.
How Often Should a Skylight Dome Be Replaced?
The lifespan of a skylight dome really comes down to its material and how much sun it cops. A standard acrylic dome will generally give you a good 10-15 years before UV rays start to take their toll. Step up to a more durable polycarbonate option, though, and you could easily see over 20 years of service.
Here in Australia, our harsh sun can make materials brittle and hazy much quicker than in milder climates. It’s a good habit to give your dome a once-over every year. Look for any yellowing, fine cracks (often called crazing), or fogginess between the layers—these are all dead giveaways that it’s time for a replacement.
Can I Just Replace the Dome or Do I Need a New Skylight?
In most situations, you can absolutely just replace the dome itself. This is a far more budget-friendly and simple fix, perfect for when the skylight’s frame, flashing, and curb are all still in solid, leak-free condition. It’s the ideal solution when the dome is simply old, cracked, or hazy.
However, if you spot any rust on the frame, warping, or signs of water damage, replacing the whole skylight unit is the smarter long-term move. A new dome won’t fix a failing frame, and a complete replacement is the only way to prevent serious leaks down the track.
It’s a classic mistake to pop a brand-new dome onto a damaged or rotting frame. This is just a temporary patch-up that almost always leads to bigger water damage problems later on. Always give the curb and flashing a thorough inspection before you decide to replace only the dome.
What Is the Average Cost of a Skylight Dome Replacement?
The cost can swing quite a bit depending on the dome’s size, the material you go for, and whether you decide to DIY it or call in a professional. For the replacement dome itself, you’re looking at anywhere from $150 to over $500.
If you opt for a professional installation in Australia, which includes labour and materials, the total cost will likely fall between $500 and $1,200. Things like the pitch of your roof, its height, and how easy it is to access will all play a part in the final quote.
How Do I Measure for a Replacement Skylight Dome?
Getting your measurements spot-on is absolutely critical for a perfect fit. You’ll need to measure the outside dimensions of the skylight’s frame or curb—that’s the raised structure the dome actually sits on.
Grab a tape measure and get the length and width from the very outer edges of that curb. It’s also a good idea to note the dome’s shape (is it a standard dome or a pyramid?) and give all these details to your supplier. Getting this right ensures your new dome will sit properly and create a watertight seal, allowing you to fully enjoy, If your after a new double glazed skylight checkout https://vividskylights.com.au/benefits-of-skylights/.