


Why Your Skylight Keeps Betraying You

That persistent drip isn’t just annoying; it’s a sign of a bigger issue. From my experience tackling numerous skylight leaks, I can tell you some common culprits. Dodgy flashing installation is a major one. Many contractors rush this critical step, using subpar materials that can’t handle the constant expansion and contraction from temperature changes. Worn-out weatherstripping is another frequent problem, especially in Australia, where we swing between scorching summers and freezing winters.
Decoding the Water’s Whispers
Think like a detective. Water stains and pooling aren’t just ugly; they’re clues. Interpreting these clues is key to effective skylight leak repair. A stain directly under the frame often signals a flashing problem. A stain further down the wall or ceiling might mean a problem with the skylight itself, or even a separate roof leak making its way down. Don’t jump to conclusions!
Condensation vs. Catastrophe
It’s also important to differentiate between condensation and a real leak. Condensation is usually a thin film of moisture across the whole skylight, especially on cold mornings. A real leak will be localized dripping or pooling. Understanding how temperature changes affect your skylight’s seals is also important. Materials expand and contract, stressing the seals and potentially creating cracks or gaps. Skylight leaks are a big problem in Australia, with water damage impacting many homes. As of 2024, 1 in 2 Australians have reportedly experienced water damage, leading to significant repair costs, sometimes over $2,000 for a single skylight. This emphasizes the importance of proper installation and upkeep. Dive deeper into skylight leak issues here.
The Longevity Puzzle
Why do some skylights last for ages, while others fail quickly? Material quality is a big factor. High-quality, UV-resistant materials are essential, especially in the harsh Australian sun. Proper installation is just as crucial. A poorly installed skylight, even with great materials, is prone to leaks. It’s like building a house on a shaky foundation.
Diagnosis is Key
Getting the diagnosis right is critical for successful skylight leak repair. A wrong diagnosis means wasted time, money, and recurring leaks. The next section covers the tools and materials you’ll need to tackle these repairs, so you’re ready for anything your skylight throws at you.
Getting Armed With The Right Tools
There’s nothing more frustrating than being halfway through fixing a leaky skylight and realizing you’re missing a crucial tool. After patching up countless skylights, I’ve learned exactly what you need (and what you don’t). Let’s get your toolkit sorted.
Sealants: The Unsung Heroes
Good sealant is absolutely essential for skylight repairs. But here in Australia, the harsh sun and temperature swings can turn even the “best” sealants into cracked, useless messes pretty quickly. Don’t just grab whatever the hardware store recommends. Look for sealants specifically made for roofing and outdoor use, ones that boast serious UV resistance and flexibility. I’ve had good luck with Sikaflex and Bostik products – they seem to hold up well against the Aussie climate. Spend a bit more upfront, and you’ll save yourself the hassle of redoing the job in a few months.
Essential Tools for the Job
Besides sealant, you’ll need a few other key tools to get this done right. A decent caulk gun is vital for applying the sealant smoothly and evenly. Trust me, a cheap one can turn this into a real pain. You’ll also need a sharp utility knife for cutting flashing tape and scraping off old sealant. A set of putty knives is helpful for smoothing sealant in those tricky corners.
- Scraper: A sturdy scraper with a sharp edge is essential for getting rid of old, hardened sealant and prepping the surface for the new stuff.
- Cleaning Supplies: Methylated spirits and some rags are key for cleaning the area and ensuring the sealant bonds properly. Don’t skip this step! A clean surface is crucial for a long-lasting repair.
- Measuring Equipment: You’ll want a tape measure and a level to get accurate measurements for any replacement parts and to make sure your skylight is sitting properly.
- Flashing Tape: Don’t forget high-quality flashing tape. Butyl rubber tape is your best bet. It’s super sticky and weather-resistant.
Before we move on, let’s look at the tools you’ll need in a handy table:
Essential Skylight Leak Repair Tools Breakdown
Complete comparison of tools, materials, and supplies needed for different skylight repair scenarios, with real-world cost estimates and difficulty ratings.
| Tool/Material | Best Use Case | Cost Range (AUD) | Difficulty Level | Durability Rating |
|---|---|---|---|---|
| Sealant (Sikaflex/Bostik) | Sealing gaps and cracks | $15 – $30 | Easy | High |
| Caulk Gun | Applying sealant | $10 – $50 | Easy | Medium |
| Utility Knife | Cutting flashing tape, removing sealant | $5 – $20 | Easy | Medium |
| Putty Knives | Smoothing sealant | $10 – $25 | Easy | High |
| Scraper | Removing old sealant | $5 – $15 | Easy | High |
| Methylated Spirits | Cleaning surfaces | $5 – $10 | Easy | N/A |
| Tape Measure | Measuring for replacements | $5 – $20 | Easy | Medium |
| Level | Ensuring proper skylight position | $10 – $30 | Easy | High |
| Butyl Rubber Tape | Sealing around skylight frame | $15 – $30 | Easy | High |
| Safety Harness | Roof safety | $50 – $150 | N/A | High |
This table gives you a quick overview of the essentials. Remember, investing in decent tools will make the job easier and the repair last longer.
Safety First, Always
Working on your roof is risky. A slip can lead to serious injury. Always use a sturdy ladder and seriously consider a safety harness, particularly on a sloped roof. Wear non-slip shoes and gloves to protect your hands. Check the weather forecast and never work on a wet or windy roof. Waiting for a clear, calm day is always the best option.
Professional-Grade vs. DIY Supplies
For simple skylight leaks, regular DIY supplies are fine. But for more complex problems or a large skylight, you might want to think about professional-grade materials. They’re usually more durable and perform better, but they cost more. Figure out what you need and choose materials that match your situation and budget. Don’t go cheap on sealants and flashing tape, though. These are the most important things for preventing future leaks. A well-stocked toolkit is key to fixing your skylight successfully.
Staying Safe While Working Above Ground

Roof work can be tricky, and skylight repair adds another level of difficulty. I’ve seen firsthand how quickly things can go wrong when safety is overlooked. Having the right tools is paramount – check out this article on Essential Tools for a good rundown. Australian weather throws in its own curveballs: morning condensation can make surfaces slick, midday sun turns metal scorching hot, and sudden weather changes can catch you unprepared.
Ladder Logic and Fall Protection
Proper ladder placement is your first line of defense. Make sure it extends at least a metre past the roofline and sits on firm, level ground. Securing it whenever possible is a no-brainer. Invest in a safety harness – it’s worth its weight in gold, especially on a sloped roof. Even on a flat roof, a harness provides that extra bit of security.
You’ll thank yourself for taking the precaution.
Assessing Your Roof’s Readiness
Before even thinking about climbing up, give your roof a thorough inspection. Loose tiles, damaged sections, or anything that looks unstable are red flags. If your roof feels spongy or bouncy underfoot, it’s a sign that it might not be safe to work on. Call a professional – it’s not worth the risk.
Weather Wisdom for Roof Work
Australian weather is notoriously unpredictable. Never, ever work on a wet roof. Even a slightly damp surface can be treacherous. Extreme heat is another hazard – metal skylight frames can get hot enough to burn you. Check the forecast and pick a cool, dry day for your repair.
Insurance Implications for DIY Repairs
It’s crucial to understand your insurance policy. Some policies won’t cover damage from DIY repairs, particularly if you’re not qualified. Check the fine print or contact your insurer to be sure. This could save you a lot of hassle and expense later.
Knowing Your Limits
Some skylight repairs are easy fixes. Others? Best left to the pros. If you’re facing complex structural problems, significant water damage, or an unfamiliar skylight type, professional help is often the smartest and most economical choice in the long run. Don’t risk injury or further damage by tackling a repair beyond your skillset. Knowing your limits isn’t a weakness – it’s smart. Sometimes, the best DIY you can do is knowing when to call in an expert.
Playing Detective To Find The Real Problem
Let’s talk skylight leaks. Most folks rush to slap a patch on any hole they find, but that rarely solves the actual problem. Water is sneaky. It can follow rafters and end up dripping far from where it first entered. Think of it like a detective case; you’ve got to investigate!
Tracking Down the Culprit
Your investigation begins inside. Check the ceilings and walls for water stains. These are your clues! A dark, concentrated stain usually points you right to the main leak. Lighter, more spread-out stains mean the water has traveled. Grab a flashlight and a mirror to get a good look at the tricky spots around the skylight frame.
Now, head outside. (Safety first! Working at heights requires caution – think of the same precautions you’d take with a drone. Drone Safety Tips are a good starting point.) Examine the skylight carefully. Look for any cracks or gaps in the flashing (that’s the metal sheeting that seals the skylight to your roof). Is the sealant around the frame cracked, brittle, or peeling? Even leaves and twigs can block drainage channels and cause water to back up under the flashing.
Unraveling the Story of Damage
Don’t just look for the obvious holes. Subtle clues can tell a story. For instance, if the shingles around the skylight are raised or warped, that suggests water damage underneath. Rust stains on the flashing? Another red flag. Even tiny gaps can become major headaches, especially in a downpour. Document everything you find with photos. Trust me, this is super helpful for insurance and if you need to call in a roofing pro.
You might be interested in: Read also: How to Fix a Leaking Skylight
Multiple Factors at Play
Sometimes, a leak isn’t caused by one single thing. It could be a combination of issues. A small crack in the sealant might be fine on its own, but add some clogged drainage to the mix, and suddenly you’ve got a leak. Age matters too. A skylight that’s 20 years old might just need new sealant. A newer skylight that leaks? That could be a sign of poor installation. Figuring out the difference is key to choosing the right repair.
Simple Fixes vs. Major Overhauls
Finally, learn to tell the difference between easy maintenance and a big problem. A loose screw or some debris in a drain? Easy fix. Extensive water damage or warped framing? You might need a professional. Understanding the real problem will save you time, money, and prevent the same leak from coming back. Properly diagnosing the source of your skylight leak is like building a solid foundation—it sets you up for successful, long-lasting repairs.
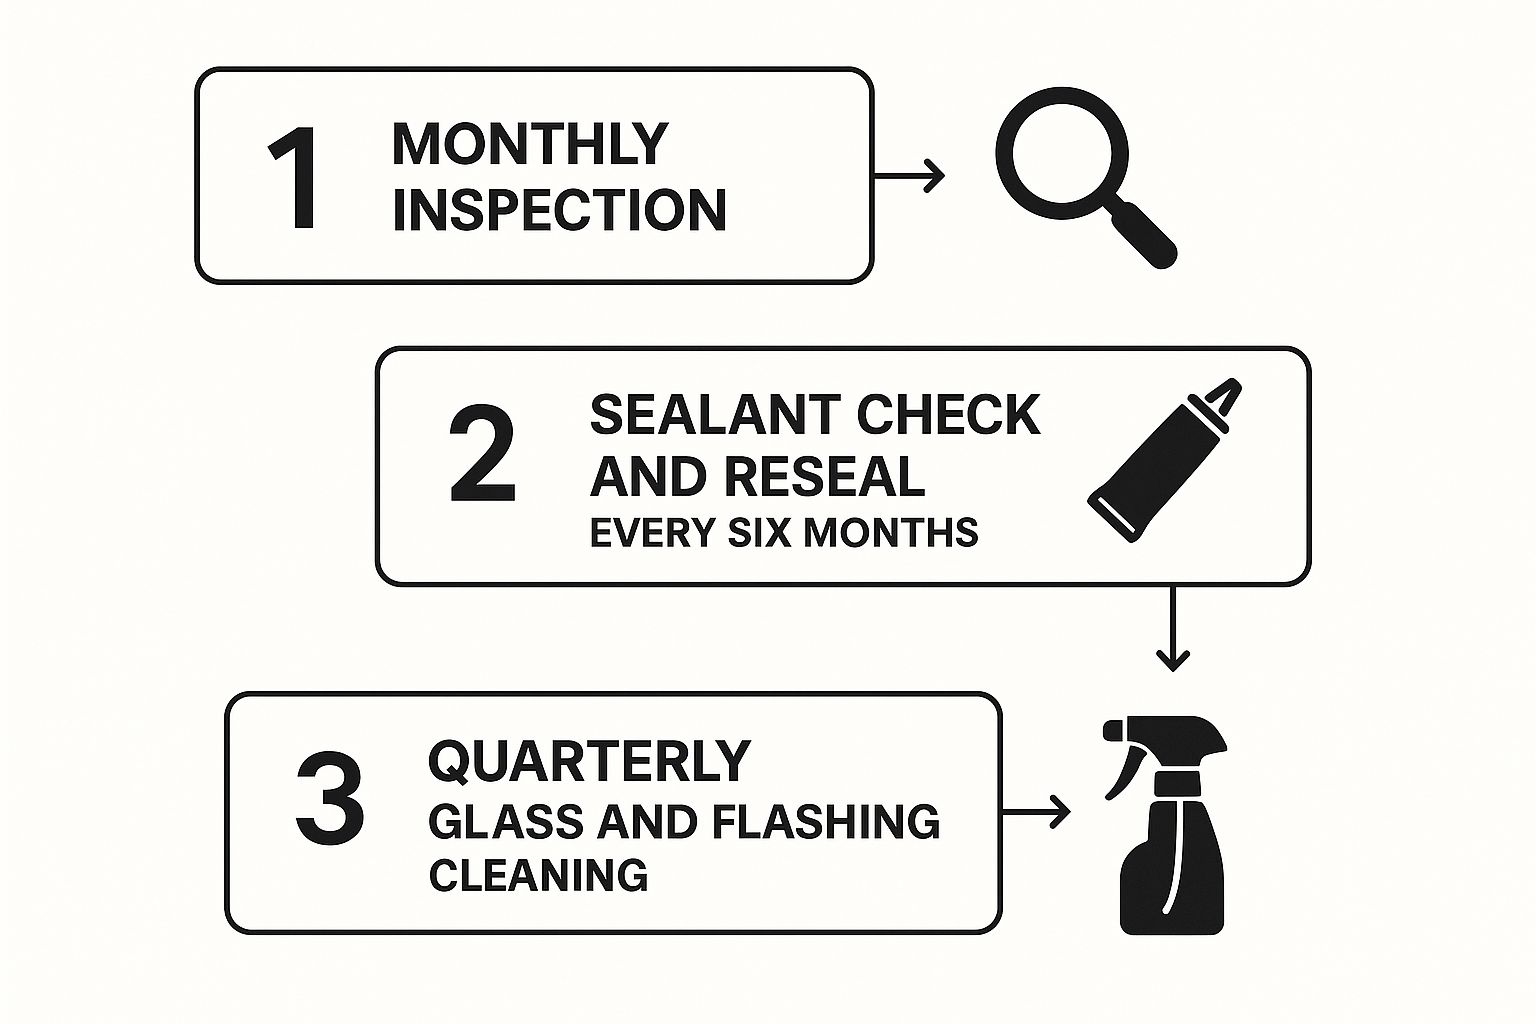
Repair Techniques That Actually Last
The infographic above shows a simple preventative maintenance plan for your skylights. Regular checks, sealant inspections, and cleaning are key to preventing leaks. A little preventative maintenance goes a long way! Now, let’s get into the repairs.
Sealing the Deal: Replacing Skylight Seals
Replacing seals seems easy, but doing it right makes all the difference. Clean the area around the old seal with methylated spirits. Get it super clean! Scrape away any loose sealant. This gives the new sealant a perfect surface to stick to. Apply a continuous bead of sealant, no gaps allowed. Where the skylight frame meets the roof, apply a thicker bead. This allows for expansion and contraction. Smooth the bead with a putty knife for a professional look. Let it dry completely as per the instructions. This creates a watertight seal that can handle anything.
Flashing Fixes: A More Involved Approach
Flashing repairs are more complex. The key is to create angles that shed water. Work with the roof’s structure, not against it. Integrating new flashing with existing flashing can be a puzzle. Be patient and precise! Carefully remove the damaged flashing. Check underneath for any rot or damage. Measure twice, cut once! Make sure the new flashing fits snugly. Use high-quality butyl rubber tape to seal all joints. This will keep water out. I’ve seen a lot of skylight leaks in Australia caused by poor installation. This can lead to major water damage if not fixed. Repairs can cost over $2,000. It’s worth getting a pro involved. Find out more about the causes of skylight leaks.
Glass Troubles: Knowing When to Replace
Cracked glass? Safety first! Cover the damaged area with heavy-duty plastic or plywood. Assess the damage. Small cracks might be fixable with special sealant, but bigger damage means replacing the whole pane. This is often a job for the professionals, especially with double-glazed units. You might find this helpful: Check out our guide on skylight installation.
Troubleshooting Your Skylight Repair
Sometimes, even after a repair, leaks persist. Check these spots:
- Sealant gaps: Tiny gaps can cause big leaks. Reapply sealant carefully, focusing on corners and joints.
- Flashing alignment: Make sure the flashing overlaps correctly and is securely attached.
- Debris buildup: Remove any leaves or debris around the skylight and in your gutters. Sometimes a simple blockage is the culprit!
DIY vs. Professional: An Honest Assessment
Some skylight repairs are easy DIY projects. Resealing, minor flashing repairs, and cleaning are usually manageable. But complex flashing, glass replacement, or structural repairs? Call a professional. They have the know-how and the right tools. Plus, their work is usually guaranteed. Knowing when to call a pro is a smart move. It’s about getting the job done right and safely. Don’t hesitate to call an expert if you’re unsure. It can save you money and future headaches.
When To Call The Pros (And When You Don’t Need To)
Let’s be honest, tackling a leaky skylight can feel a bit like venturing into the unknown. Is it something you can handle yourself, or is it time to call in the reinforcements? Cost is definitely a consideration, but it’s not the only piece of the puzzle. Getting a professional to fix your skylight often comes with the added bonus of warranties and insurance coverage – that peace of mind you just can’t beat. However, plenty of skylight maintenance tasks are absolutely within reach for the average homeowner. Let’s break down both sides of the coin.
The Real Cost of DIY
DIY projects often seem like the budget-friendly option, but it’s important to consider those hidden costs that can sneak up on you. Tools can really add up, especially if you’re building your collection from scratch. Plus, there’s the value of your time. What seems like a quick fix can easily swallow an entire weekend, particularly if you encounter unexpected hurdles. And what happens if your DIY endeavor takes a turn for the worse? You might find yourself shelling out even more cash to fix the original damage and your well-intentioned but ultimately flawed repair.
Evaluating Repair Complexity
Take a good, honest look at the task at hand. Is it a simple crack in the sealant? You can probably handle that yourself. However, if you’re dealing with extensive water damage, flashing issues, or anything that involves the actual structure of the skylight, it’s best to leave it to the pros. For more insights into various repair options, check out our skylight repair page. Being able to spot the signs of serious structural problems – things like sagging ceilings, wood rot, or multiple leaks – is crucial. These often signal the need for professional intervention.
Before we dive deeper, let’s take a look at a helpful table summarizing the key differences between DIY and professional skylight repair. This will give you a clearer picture of the costs, time commitment, and other factors involved in each approach.
DIY Versus Professional Skylight Repair Analysis
Comprehensive comparison of costs, time commitment, warranty protection, and success rates for different types of skylight leak repairs.
| Repair Type | DIY Cost | Professional Cost | Time Required | Success Rate | Warranty Coverage |
|---|---|---|---|---|---|
| Minor Sealant Crack | $20-50 | $150-300 | 1-2 hours | High (if done correctly) | None |
| Flashing Repair | $50-100 | $300-500 | 4-6 hours | Moderate | Varies by contractor |
| Skylight Replacement | $720-2000 (materials only) | $800-2000+ | 1-2 days | Low (for complex installations) | Manufacturer & Contractor |
| Structural Damage Repair | N/A (Not recommended for DIY) | $500-2000+ (depending on extent) | Varies greatly | Moderate to High (depending on contractor expertise) | Varies by contractor |
As you can see, while DIY might seem cheaper upfront, the potential for complications and added costs is a real factor to consider. Professional repairs, while more expensive initially, often provide better long-term value due to warranties and a higher likelihood of successful, lasting repairs.
Liability and Insurance
DIY repairs can sometimes have implications for your home insurance. Some policies won’t cover damage resulting from DIY work, especially if you’re not a licensed tradesperson. Before you grab your toolbox, it’s a good idea to review your policy. Professional contractors, on the other hand, carry liability insurance. This protects you from additional expenses if anything goes wrong during the repair process – a huge advantage should unforeseen issues arise.
Getting the Most From Professional Quotes
If you decide to hire a professional, don’t settle for just one quote. Get a few from different contractors. Don’t automatically go with the cheapest option either. Inquire about warranties, insurance, and their specific experience with skylights. A reputable contractor will clearly explain the repair process and readily answer any questions you have. They’ll also use high-quality materials designed to withstand the harsh Australian climate.
DIY Danger Zones: Voiding Warranties and Insurance
Be aware that attempting DIY repairs can sometimes void existing warranties on your skylight, especially if it’s relatively new. Check your warranty terms before you undertake any work. Similarly, using incorrect materials or techniques could create problems with your insurance coverage down the line.
The Smart Choice: Balancing Cost and Peace of Mind
In the end, the best approach involves balancing cost with your skill level and the long-term impact on your home. Don’t let cost be the sole deciding factor. Consider the value of your time, the risk of causing further damage, and the long-term benefits of a professional repair backed by a warranty. Making a wise decision now can save you a lot of headaches (and money) in the future.
Keeping Your Skylight Happy For Years To Come
The best way to fix a leaky skylight? Never needing to fix it in the first place! A little smart maintenance goes a long way in extending your skylight’s lifespan and catching small issues before they turn into major headaches (and expenses). Australian weather is brutal – scorching sun, dramatic temperature swings, and powerful storms all take their toll.
A Realistic Maintenance Schedule
Let’s be honest, who has time for complicated maintenance checklists? I’m all about practical, real-life solutions. Forget those lengthy lists and focus on the essential tasks that truly protect your investment. Regular inspections are your best friend here. Here in Melbourne, with our unpredictable weather, regular checks are even more vital.
Spotting the Early Warning Signs
Knowing what to look for during your checks is half the battle. Start with the sealant around the skylight frame. Any cracks, gaps, or peeling? That’s a red flag. Then, check the flashing. Is it rusted or damaged? How about the shingles around the skylight – warped or lifted? These are all clues that a leak might be just around the corner.
Preventative Measures That Pay Off
Here are a few simple things you can do to prevent major repairs (and save some serious cash):
- Regular Cleaning: Keep the skylight and the surrounding roof area free of leaves, debris, and anything that might clog up the drainage. A blocked drain can cause water to pool and seep under the flashing.
- Sealant Check: Twice a year, give the sealant around the skylight frame a good once-over. If it’s cracked or peeling, reapply a fresh bead of high-quality, UV-resistant sealant.
- Gutter Maintenance: Don’t forget the gutters! Clogged gutters overflow onto your roof, putting extra pressure on your skylight seals and flashing. Clean them regularly, especially in autumn after the leaves have fallen.
The Gutter-Skylight Connection
Gutters and skylights might seem unrelated, but they’re actually a team. When your gutters are blocked, that overflowing water often ends up right around your skylight, overwhelming even the best sealant and flashing. Keeping those gutters clear is a small step with a big impact.
Upgrading for Better Performance and Easier Maintenance
Sometimes, the smartest maintenance is a well-placed upgrade. Consider these:
- Advanced Sealants: High-quality, UV-resistant sealants designed for the tough Australian climate are worth their weight in gold. They last longer and need replacing less often.
- Improved Ventilation: Good ventilation helps control temperature and humidity around your skylight, minimizing condensation and moisture buildup. This is particularly important in damp areas like bathrooms and kitchens.
Making Maintenance a Habit
The trick is to make skylight maintenance a routine, not a dreaded chore. Set reminders on your phone or calendar. Combine skylight checks with other seasonal maintenance, like gutter cleaning or roof inspections. And if a leak does happen and you’re dealing with water damage, especially after a big storm, remember you might need to file an insurance claim. This resource on flood insurance claims might be helpful.
By spending a little time on regular upkeep, you can keep your skylight leak-free and extend its life, saving you money and stress in the long run. Ready to bring more natural light into your home? Check out Vivid Skylights and their range of high-quality skylights designed specifically for the Australian climate.