
A brilliant skylight installation all comes down to the prep work you do before ever touching the roof. This is the crucial first step where you map out your space, pick the perfect skylight for your needs, and get all your tools and approvals lined up. Honestly, getting this part right is the difference between a project that goes off without a hitch and one that turns into a series of expensive headaches.
Your Pre-Installation Planning Checklist
Before you even think about picking up a saw, a truly great skylight installation starts with smart, detailed planning. It’s not just about finding a good spot; it’s about making sure your chosen location is safe, structurally sound, and perfectly placed to catch as much natural light as possible. Nailing this stage sets you up for success.
A little bit of planning upfront helps you avoid common traps, like accidentally cutting into hidden pipes, weakening your roof structure, or finding out you need a permit when you’re halfway done. It’s the most important step to ensure you get a beautiful, leak-free skylight that you’ll love for years.
Assessing Your Roof and Ceiling Space
First things first, you need to do a proper site assessment. Head up into your attic or roof cavity during the day, armed with a powerful torch. You’re scouting for that perfect spot between your roof trusses or rafters. In Australia, standard truss spacing is typically 600mm or 900mm, which conveniently lines up with many of our standard skylight sizes.
Your main mission up there is to spot any potential roadblocks. Keep a sharp eye out for:
Structural bits: Rafters, trusses, and ceiling joists that you absolutely cannot cut.
Services: Any electrical wiring, plumbing pipes, or HVAC ducts running through the cavity.
Stuff on the roof: Solar panels, antennas, or satellite dishes that might cast a shadow or get in the way of the flashing.
Once you’ve found a promising area, mark your proposed opening on the ceiling with a pencil. Then, grab a plumb bob or a laser level to project that spot directly up to the underside of the roof. This double-checks that the external position is clear and looks right from the outside, too.
Choosing the Right Vivid Skylight Model
With your location sorted, it’s time for the fun part: choosing the skylight model that fits your home and how you live. As a leading supplier of premium double glazed fixed and operable skylights, we’ve got options for just about every situation. We offer both electric and solar powered operable models, ensuring there’s a perfect solution for your ventilation and convenience needs.
To help you decide, here’s a quick comparison of our main types.
Choosing Your Vivid Skylight Model
This table helps you compare our models to find the perfect fit based on your ventilation needs, automation preferences, and where you plan to install it.
| Skylight Type | Best For | Key Feature | Power Source | Typical Application |
|---|---|---|---|---|
| Fixed Skylight | Maximising light in areas without ventilation needs. | Simple, sleek design for pure, uninterrupted light. | N/A | Hallways, living rooms, studies. |
| Electric Operable | Rooms needing regular ventilation with easy control. | Remote-controlled opening; rain sensor included. | Mains Power | Kitchens, bathrooms, bedrooms. |
| Solar Operable | Easy installation and eco-friendly ventilation. | Self-contained solar panel and battery operation. | Solar | Renovations, areas far from mains power. |
Think about it: do you just want light, or do you need ventilation as well? A fixed skylight is brilliant for flooding a hallway or living room with natural light. But for a kitchen or bathroom, an operable (opening) skylight is a game-changer for letting out steam and keeping the air fresh.
A hot tip from the pros: Solar-powered operable skylights are a fantastic choice for a simpler install. Because they run on their own built-in solar panel and battery, you don’t need a licensed electrician to run new wiring through your house.
Measuring and Checking Permits
This is the part where you can’t afford to guess. Accurate measurements are absolutely essential. Measure the clear opening between your rafters and ceiling joists to make sure the skylight you’ve got your eye on will fit nicely. We offer eleven standard sizes at Vivid Skylights, so it’s easy to find one that works with your home’s framework.
Finally, before you hit “buy,” have a chat with your local council about permits. Small changes might not need one, but any project involving significant structural alterations usually will. To get a better idea of what to expect, you can learn more about building permit requirements in our detailed guide. Sorting this out now saves you from potential fines and legal dramas later on, ensuring your installation is above board from the get-go.
And remember, Vivid Skylights makes it easy by delivering our high-quality units nationwide across Australia, right to your door.
Budgeting for Your Skylight and Understanding Its Value
Thinking about a skylight installation means we need to talk numbers, and it’s important to see the full picture. The final bill is more than just the price tag on the skylight itself; it’s a mix of factors unique to your home that will shape the overall budget. It’s a project that really is about balancing the initial outlay with some pretty significant long-term gains.
Understanding these variables from the get-go helps you set realistic financial expectations. The complexity of the job is always the biggest influencer. A straightforward installation on an easy-to-reach, standard-pitch roof is naturally going to be more cost-effective than a project that needs major structural work or specialised access gear.
Key Factors That Influence Your Installation Budget
So, what actually makes the price tag move up or down? As a leading supplier of premium double glazed skylights, we’ve seen a few common factors that every homeowner should get their head around when planning their budget.
Skylight Model Choice: The type of unit you choose is a primary cost driver. A fixed double glazed skylight is the most wallet-friendly option, perfect if you’re just looking to add light. Stepping up to an operable model—either our electric or solar powered variants—brings in ventilation and convenience, but the motors and control systems do add to the unit cost.
Roof Characteristics: The pitch and material of your roof play a massive role. A standard tiled roof with a moderate pitch is what we see most often, but low-pitch or very steep roofs can demand more labour time and specialised flashing, which will impact the final cost.
Accessibility: How easily can a tradesperson get to the installation spot? A single-storey home with clear roof access will be cheaper to work on than a multi-storey property where scaffolding or other safety equipment is non-negotiable.
Setting Realistic Financial Expectations
To give you a clearer idea, market data from major Australian cities is a really useful guide. In Melbourne, for example, a standard fixed skylight installation often lands somewhere between AUD $1,500 and $5,000. This range typically covers both the skylight unit itself—which could be anywhere from $720 to $1,600—and the professional labour costs. Naturally, the more advanced ventilated or operable models will sit at the higher end of that scale.
You can dive into a more detailed breakdown of these figures on our blog about what to expect from skylight installation costs.
A Skylight Is More Than a Cost—It’s an Investment
While it’s absolutely crucial to budget carefully, looking at the expense purely as a cost misses the bigger picture. A skylight is a genuine investment in your home, delivering tangible returns that add up over time. The most immediate benefit is slashing your reliance on artificial lighting, which can lead to noticeable savings on your electricity bills, day in and day out.
Beyond the utility savings, the impact on your property’s value is significant. A home bathed in natural light just feels bigger, more inviting, and more premium to potential buyers.
A well-placed skylight doesn’t just illuminate a room; it elevates the entire living experience. This enhancement in atmosphere and appeal is a powerful factor in commanding a higher resale price.
As you weigh up the long-term benefits, it’s worth understanding its potential contribution to your overall home remodeling return on investment. Upgrades that boost both aesthetics and energy efficiency, like a high-quality skylight, are consistently valued by the market.
Ultimately, choosing a Vivid Skylight is a decision backed by quality and confidence. We are a leading Australian supplier of both double glazed fixed and operable skylights, with options including advanced electric and solar powered models. All our units are double glazed for superior thermal performance. Plus, we deliver our skylights nationwide across Australia, making it easy to bring exceptional quality to your project, wherever you are. This commitment is supported by our 10-year leak-free warranty, giving you complete peace of mind in your investment for the years to come.
The Core Installation Process for Your Vivid Skylight
Alright, this is where the planning stops and the real work begins. Bringing your vision to life involves a series of careful, precise steps that turn a solid section of your roof into a beautiful source of natural light. Let’s walk through the actual skylight installation so you know exactly what’s involved in fitting your new Vivid Skylight.
The whole process starts with some meticulous prep work on the roof itself, followed by the critical moment: making the cuts through your roofing material and the ceiling inside. Every stage, from getting that perfect seal to wiring up the fancy features, is crucial for a result that looks fantastic and lasts for years.
Preparing the Roof and Marking the Opening
First things first, we need to transfer those carefully taken interior measurements to the outside of your roof. Precision here is everything. Being off by even a few centimetres can create major headaches down the line, so the old saying, “measure twice, cut once,” has never been more true.
Your installer will start by removing the roofing material—whether that’s tiles or metal sheeting—in an area a little larger than the final skylight opening. This gives them clear access to the roof structure underneath. Once that’s exposed, they’ll mark out the exact dimensions for the cut, double-checking that the lines are perfectly square and line up with the opening you marked out inside.
This is a good time to think about the return on your investment. A skylight isn’t just an expense; it’s a value-add.
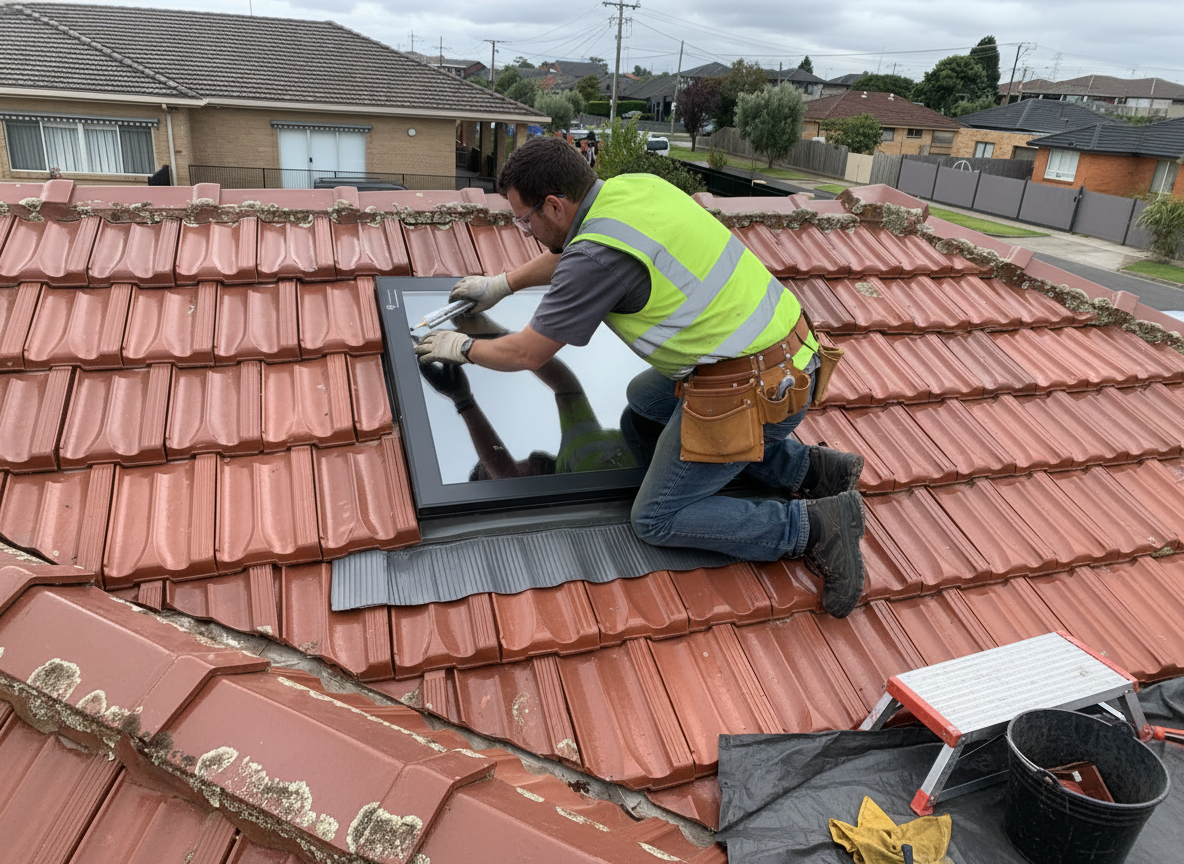
Making the Cut and Fitting the Flashing
With the lines marked and checked, it’s time to create the opening. Using the right cutting tools for your roof type, the installer will carefully cut through the roof decking and then the ceiling plasterboard below. This is a job for a steady hand and a sharp focus on safety to create a clean, perfectly square hole.
Now comes what is arguably the most critical part of the entire installation: fitting the flashing kit. Every Vivid Skylight comes with a high-quality, custom-designed flashing kit to guarantee a weather-tight seal. The flashing pieces are installed in a specific order, carefully woven into the surrounding roofing material to create channels that direct water away from the opening.
The flashing is your skylight’s number one defence against the weather. Getting this step right is completely non-negotiable for the watertight seal that backs our 10-year leak-free warranty. It’s the one part of the job where shortcuts simply aren’t an option.
While skylights have their own unique requirements, the fundamental principles of creating a weatherproof seal are shared across many types of general installation services. For a really deep dive into this specific part of the job, have a look at our comprehensive roof flashing installation guide right here on our website.
Securing the Skylight and Integrating Operable Features
Once the flashing is securely in place, the double glazed skylight unit itself is ready to be lowered into the opening. The tough aluminium frame of our Vivid Skylights is engineered for a snug fit. It’s then securely fastened to the roof structure according to the instructions, creating a solid, stable fixture that’s built to last.
This is also where the magic happens for our operable models. If you’ve opted for one of our premium electric or solar powered operable skylights, this is the moment the motors and control systems are connected.
For an electric model, this means connecting the pre-installed motor to your home’s power—a job that must be done by a licensed electrician. For a solar-powered model, it’s even more straightforward. The self-contained solar panel is positioned to catch maximum sun, and the system is connected without any need for internal wiring.
As a leading supplier of both fixed and operable skylights, we make sure our instructions are crystal clear for every model. We’re proud to deliver these advanced units nationwide across Australia, so no matter where you are, you can bring top-tier quality to your home renovation.
Nailing the Finish: Inside and Out
A top-notch skylight installation isn’t just about getting the unit on the roof. The real magic happens in the finishing touches—those fine details inside and out that transform a simple roof window into a seamless architectural feature. This is where you ensure longevity, perfect integration with your home’s interior, and flawless operation.
Your first line of defence against the harsh Australian climate is the exterior work. This goes beyond just fitting the flashing; it’s about meticulously sealing every single potential entry point for water. A high-quality, UV-stable sealant around the flashing’s edge is non-negotiable. It creates a flexible, durable barrier that backs up the mechanical protection of the flashing itself, giving you total peace of mind.
Crafting the Perfect Interior Light Shaft
Once you’re watertight on the outside, the focus shifts to the inside and the construction of the light shaft. This is the tunnel that guides daylight from your roof down into the room, and its design is every bit as important as the skylight itself. It all starts with building a timber frame that connects the roof rafters to your ceiling joists, forming the shaft’s four walls.
With the frame in place, it’s time to line it with plasterboard. You’ll cut the sheets to size and fix them to the timber, creating a smooth surface ready for finishing. The real skill comes into play with the plastering. Taping the joints, applying a few thin coats of plaster, and sanding it all back until it’s perfectly smooth is what will make the light shaft feel like it’s always been a part of your home.
To Splay or Not to Splay
As you’re framing the light shaft, you’ll face a key design choice: should it be straight or splayed?
Straight Shaft: This is where the walls of the shaft run perpendicular to the ceiling. It creates a sharp, focused column of light that can be a really striking and dramatic feature.
Splayed Shaft: Here, the walls angle outwards from the skylight down to the ceiling opening. This makes the opening in your ceiling larger than the skylight, which does a fantastic job of spreading and diffusing natural light across a much wider area.
In most cases, a splayed shaft is the way to go for maximising light, particularly in bigger rooms. It just makes the space feel more open and evenly lit.
Our Take: A straight shaft definitely has a clean, modern appeal. But for pure light diffusion, a splayed shaft is hard to beat. You can even get creative by splaying the top and bottom of the shaft more than the sides to throw light further along the length of a room.
Installing Accessories and Final Checks
With the construction and plastering done, you can move on to the final touches. This is the ideal moment to install any optional accessories that add that extra layer of comfort and convenience. A fly screen is a must-have for any operable skylight—you want the fresh air without the bugs. It’s also the perfect time to fit our custom-made motorised skylight blinds for ultimate light control at the push of a button.
The very last step is to give everything a thorough check, especially for operable models. If you’ve installed one of our electric or solar powered operable skylights, grab the remote and test that it opens and closes smoothly. Many of our units also feature a rain sensor. A quick spray of water on the sensor will confirm it triggers the window to close automatically, just as it should.
As a leading supplier of premium double glazed fixed and operable skylights, Vivid Skylights designs every component for peak performance. With our nationwide delivery across Australia, you can get this quality delivered directly to your site, ready for you to create that flawless, professional finish.
Integrating Solar Power and Smart Home Features
Today’s skylights are a world away from the simple roof windows of the past. They’ve become intelligent, energy-savvy additions that fit seamlessly into the modern Australian home. As a leading supplier of double glazed fixed and operable skylights, we’re right in the middle of this evolution, offering models that add both smarts and sustainability to your skylight installation.
The real game-changer here is the solar-powered operable skylight. These units are a massive leap forward, giving you sophisticated features without adding a headache to the installation process. By running entirely on the sun’s energy, they operate completely off-grid, which is a huge practical win.
The Simplicity of Solar Power
One of the best things about choosing a solar-powered model is that you can forget about the electrical work. Unlike hardwired units, there’s no need to hire a licensed electrician to snake cables through your walls and ceiling. This makes the whole installation process simpler and can save you a fair bit on labour costs.
This self-sufficiency makes our solar powered operable skylights a fantastic option for both new builds and existing homes. The built-in solar panel keeps an onboard battery topped up, so your skylight is always ready to open or close when you need it—all powered by clean, free energy. You can dive deeper into the specs of our solar-powered skylight range to see how it could work for your project.
Tapping into Australia’s Solar Trend
Choosing a solar-powered skylight just makes sense, especially with how much Aussies have embraced renewable energy. The uptake of rooftop solar has been incredible, with total installations now topping 4 million systems across the country. In a recent year alone, Aussies installed over 300,000 new systems, and almost 29% of those included battery storage—a clear sign that energy independence is a big priority. You can read more about Australia’s solar adoption on the Clean Energy Council website.
Integrating a solar-powered skylight is a natural extension of an energy-conscious household. It’s a small but meaningful step that leverages the same principles as a full rooftop solar array, reducing your home’s carbon footprint one feature at a time.
Smart Features for Modern Living
It’s not just about solar power, either. Our operable skylights are loaded with smart features designed for real life. The most practical of these has to be the built-in rain sensor. This clever bit of tech automatically detects moisture and closes the skylight at the first sign of a downpour. It gives you total peace of mind, whether you’re home or out for the day.
This kind of automation adds a layer of protection and effortless convenience to your home. At Vivid Skylights, we deliver these advanced electric and solar powered skylights nationwide in Australia, making this technology accessible for any renovation project.
Your Skylight Installation Questions Answered
Even the most meticulously planned project can leave you with a few questions before you get started on your skylight installation. It’s completely normal. This section is designed to tackle the most common queries we get from homeowners all over Australia, giving you the clear, straightforward answers you need to move forward with confidence.
As a leading supplier of premium double glazed skylights, we’ve helped thousands of Aussies bring beautiful natural light into their homes. Let’s dive into some of the questions that might be on your mind.
Can I Install a Skylight on Any Type of Roof?
This is one of the first things people ask, and the good news is the answer is nearly always yes. Versatility is at the core of the Vivid Skylights design. Our units are engineered to work flawlessly on both standard pitched roofs (with a slope between 15-90 degrees) and low-pitch or flat roofs (down to as low as 2-15 degrees).
Every skylight we ship comes standard with a flashing kit made specifically for Australia’s common tiled roofs. This ensures a perfect, watertight seal straight out of the box. If your home has a different roofing material, like corrugated metal, your installer can easily source a custom flashing to match your roof’s unique profile.
How Long Does a Skylight Installation Take?
For a professional installer or a confident DIYer, a standard installation is usually a one-day job. A straightforward project will typically take somewhere between four to eight hours from the first cut to the final clean-up.
Of course, a few things can stretch that timeline. Tricky roof access, complex interior work to build the light shaft, or a sudden change in the weather can add extra hours. It’s always smart to block out a full day for the project. This ensures nothing feels rushed, especially the all-important weatherproofing and sealing steps.
What Is the Difference Between Electric and Solar Skylights?
The key difference really boils down to the power source and how involved the installation is.
Electric Operable Skylights: These models are hardwired directly into your home’s electrical system by a licensed electrician, giving you reliable, push-button control over ventilation.
Solar Powered Operable Skylights: These are completely self-sufficient. Each unit has a small, integrated solar panel that charges an onboard battery, meaning they operate entirely off-grid.
The biggest draw of a solar powered skylight is the simplicity of the installation. Because it requires no wiring into your home’s mains power, there’s no need to hire an electrician. This can help keep the overall project cost down while giving you a sustainable, energy-independent way to get fresh air and light.
For homeowners wanting the ultimate convenience with the least amount of fuss, the solar powered option is a clear winner. It delivers all the benefits of an opening skylight without the need for any internal electrical work.
How Do I Maintain My New Vivid Skylight?
We design our skylights to be incredibly low-maintenance. The goal is for you to spend more time enjoying the light and less time worrying about upkeep. The exterior glass has a special self-cleaning coating that uses rainwater to wash away most of the dirt and grime that builds up over time.
We suggest a quick visual check once a year to make sure the flashing is clear of any leaves or debris. The frames are made from robust, powder-coated aluminium built to handle tough Australian conditions, so they’ll never need painting. The interior glass can be cleaned just like any other window in your house. For a deeper dive, you can explore our full list of skylight FAQs for more detailed advice.
Do You Deliver Skylights Across Australia?
Absolutely. This is a huge part of our service. As a leading national supplier, Vivid Skylights delivers right across the country. It doesn’t matter if your project is in a major city or a regional town, we can get our full range of double glazed fixed and operable skylights delivered safely to your door.
This nationwide reach ensures that every Australian homeowner has access to high-quality, energy-efficient skylights, ready for either a professional or DIY skylight installation.
Ready to transform your home with beautiful, natural light? At Vivid Skylights, we offer a premium range of double glazed fixed, electric, and solar-powered skylights to suit any project. Explore our full collection and find the perfect fit for your space today.