
Thinking about tackling a do it yourself skylight project? It’s a fantastic home upgrade, and with the modern kits available today, it’s more achievable than you might think. A well-designed system can turn what seems like a complex job into a rewarding weekend project, flooding your home with valuable natural light.
Why A DIY Skylight Project Is Within Your Reach
The idea of cutting a hole in your own roof can definitely feel a bit intimidating. But trust me, the satisfaction of seeing a once-dark room filled with sunlight is a powerful motivator. Modern skylight kits have really demystified the whole process, making it accessible for anyone with a solid grasp of basic building skills.
This isn’t just about looks, either. You’re creating a healthier, more inviting living space. Especially for homeowners in areas like Rowville, a project like this adds serious value and appeal to a property. It all comes down to good preparation and using the right materials from the get-go.
The Power of a Well-Designed Kit
A successful DIY job really hinges on the quality of the kit you choose. You want something that simplifies the process, not complicates it. The best kits are the ones clearly engineered with the home renovator in mind.
Look for these key features:
- Comprehensive Instructions: Clear, step-by-step guides are essential. They take the guesswork out of the equation.
- Integrated Components: An all-in-one kit that includes the skylight, flashing, and seals ensures everything fits together perfectly. No surprises on installation day.
- Built for Durability: High-quality materials like powder-coated aluminium frames and double-glazing mean your hard work is going to last for years.
The real secret to a successful do it yourself skylight installation is confidence. And that confidence comes from having a product that’s designed to prevent common mistakes. A well-engineered kit with clear instructions is your best friend up on that roof.
Is This Project Right for You?
So, should you take this on yourself or call in a pro? If you’re comfortable with tools and have some home improvement experience under your belt, you’re already halfway there. For instance, our Vivid Skylights range are perfect for the DIYer with easy to follow installation instructions. Anyone with basic building skills and know-how will be able to successfully install our skylight range in their home.
Here’s a quick look at how the two approaches stack up:
DIY vs Professional Skylight Installation Snapshot
| Aspect | DIY Installation | Professional Installation |
|---|---|---|
| Cost | Lower upfront cost (materials only) | Higher initial cost (labour + materials) |
| Timeline | Flexible, depends on your schedule | Scheduled, typically faster completion |
| Skills Required | Basic carpentry, roofing, and safety knowledge | No personal skills needed |
| Satisfaction | High sense of accomplishment | Peace of mind from expert work |
| Warranty | Product warranty only | Product and workmanship warranties |
| Tools | Need to own or rent necessary tools | All tools provided by the installer |
Ultimately, installing your own skylight offers more than just saving a bit of money on labour. There’s an immense sense of pride in completing a project that so dramatically improves your home’s atmosphere.
By choosing the right product and following a clear plan, you can absolutely turn this challenging idea into a stunning reality. Before you get started, it’s worth exploring the many benefits of skylights to get that extra bit of motivation. This guide will walk you through every step, from planning and prep to the final finishing touches.

Mapping Out Your Skylight Project
A successful do it yourself skylight installation is all in the prep work. Honestly, the planning you do long before you pick up a saw is what makes or breaks the project. This first phase is about balancing your dream of a light-filled room with the practical realities of your home’s structure.
Get this part right, and the rest of the job will be surprisingly smooth.
That first decision is always the most exciting: where will the light come from? You might picture a skylight perfectly centred over the kitchen island or maybe positioned to catch that beautiful morning sun in the living room. Hold onto that vision, but be prepared to check it against the hidden framework of your house.
Finding The Ideal Skylight Location
Your roof cavity is a busy place, filled with more than just empty space. Before you get too attached to one particular spot, you need to play detective and figure out what’s hiding above the plasterboard. The main things you’ll be working around are the roof trusses or rafters.
These are the bones of your roof. In Australia, standard truss spacing is often 600mm or 900mm, which is great news because many standard Vivid skylight sizes are designed to fit perfectly in that gap. The goal is to slot your skylight neatly between two trusses without having to cut any of them. Altering a truss is a major structural job that needs an engineer and council approval—something we want to avoid.
You can start your search from inside with a stud finder, or just by gently tapping on the ceiling. You’ll hear the difference between the solid thud of a joist and the hollow sound of plasterboard. Once you’ve got a rough idea, drilling a small, discreet pilot hole can confirm exactly where the joists are.
Don’t forget, it’s not just timber you need to watch out for. Electrical wiring, plumbing pipes, and air conditioning ducts love to hide in roof spaces. A quick peek in the attic can save you from a massive headache down the track.
Sizing Up Your Options
Once you’ve found a clear, unobstructed space between your trusses, you can figure out the best skylight size. This isn’t just about how much light you want; it’s also about keeping your home comfortable. A bigger skylight lets in more light, but it can also let in more heat in summer and lose heat in winter.
This is why high-quality, double-glazed units are non-negotiable. They provide excellent insulation and keep your home’s temperature stable all year round. If you need a hand weighing up the different types and features, check out our detailed guide on how to choose a skylight. It’ll help you find the perfect balance of size, performance, and features.
Precision Marking From The Inside Out
With your location confirmed and your skylight chosen, it’s time for the most critical measurement of the whole project: mapping out the opening. You have to be precise here to make sure the hole in your ceiling lines up perfectly with the hole you’ll eventually cut in the roof.
Here’s a simple, field-tested method for getting it spot on:
- Mark the Ceiling: From inside the room, carefully measure and mark the four corners of your skylight’s rough opening on the ceiling. Use a chalk line to snap clean, perfectly straight lines between these points.
- Drill Your Reference Holes: At each of the four corners you just marked, drill a small pilot hole straight up through the ceiling and the roof itself.
- Connect the Dots on the Roof: Now for the fun part—get up on the roof. You’ll see those four tiny pilot holes poking through. These are your guides. They guarantee the opening you mark on the roof will be perfectly aligned with the ceiling below.
This methodical approach takes all the guesswork out of it. A well-placed skylight doesn’t just change a room’s atmosphere; it adds real value to your home. Taking the time to plan meticulously ensures your DIY project is a complete success from start to finish.
Gathering Your Tools And Safety Equipment
Before you even think about marking that first cut for your do it yourself skylight, let’s talk about getting your gear in order. This means taking a serious look at your tools and, just as importantly, your safety equipment. A successful project isn’t just about how good it looks at the end; it’s about getting there safely and without unnecessary headaches.
Having the right gear on hand is what separates a frustrating struggle from a smooth, professional job. It’s a bit like cooking – you wouldn’t try to dice an onion with a butter knife, would you? The same idea applies here. The right tool not only makes the work easier but dramatically improves the quality of your finish, especially when you’re aiming for a perfectly sealed, leak-proof skylight.
Your Essential Toolkit
While every installation has its own quirks, there’s a core set of tools that you’ll absolutely need. Let’s go beyond just a list and talk about why each one is critical for this job.
- Measuring & Marking: A good quality tape measure, a carpenter’s square, and a chalk line are your best mates for making sure everything is perfectly square and aligned. A few millimetres out here can cause major headaches down the line.
- Cutting Tools: You’re going to need a circular saw for those long, straight cuts on the roof sheathing, plus a reciprocating saw. That trusty reciprocating saw is a lifesaver for cutting through rafters or making plunge cuts where a circular saw just can’t go.
- Sealing & Fastening: A high-quality, dripless caulking gun is non-negotiable. It gives you the fine control you need to lay down a perfect bead of sealant, which is your main line of defence against water. You’ll also need a reliable drill/driver for securing the skylight frame and flashing.
- Basic Hand Tools: Don’t overlook the basics. A sharp utility knife for trimming roofing felt, a pry bar for gently lifting shingles, and a solid hammer are all must-haves.
Our Vivid Skylights range are perfect for the DIYer, with easy to follow installation instructions. For anyone in Rowville with basic building skills and know-how, having these tools ready means you can successfully install our skylight range in your home.
Safety First. Always.
Let’s be blunt: working on a roof is risky. There is absolutely no room to cut corners when it comes to safety. A fall, even from a single-storey house, can have devastating consequences. Planning your safety strategy is every bit as crucial as planning the installation itself.
Safety isn’t just a checklist you tick off; it’s a mindset. Always check the weather forecast before you start. A windy, wet, or blistering hot day is no time to be up on a roof. Be patient and postpone the job for better conditions – the skylight can wait.
The most important tool you have is yourself. A properly secured ladder, a roof safety harness, and the right personal protective equipment (PPE) aren’t optional extras; they are non-negotiable investments in your own well-being.
Personal Protective Equipment (PPE) Essentials
Wearing the right gear is your first line of defence against the usual worksite injuries. It’s such a simple thing to do, but it makes a world of difference.
- Eye Protection: Safety glasses are mandatory. They’ll shield your eyes from the sawdust, roofing grit, and other bits of debris that will definitely be flying around.
- Hand Protection: A solid pair of well-fitting work gloves will save your hands from splinters, the sharp metal edges of flashing, and the rough surface of shingles.
- Hearing Protection: When you’re running a circular saw or reciprocating saw for any length of time, earplugs or earmuffs are essential to protect your hearing.
- Footwear: Proper work boots with non-slip soles are critical. They give you the secure footing you need to move around confidently on the roof.
Finally, a roof safety harness is one of the most important pieces of kit you can own. Make sure you secure it to a proper anchor point on the roof, following the manufacturer’s instructions to the letter. It might feel a bit awkward at first, but it gives you priceless peace of mind, letting you focus completely on your do it yourself skylight project knowing you’re properly protected.
Your Step-By-Step Skylight Installation Walkthrough
Right, with all the planning sorted and your tools laid out, it’s time to get hands-on. This is the moment your vision of a sun-drenched room starts to become a reality. We’re going to break down the entire do it yourself skylight process into clear, manageable stages, so it feels less like a major construction project and more like a series of achievable steps.
We’ll kick things off inside your home, carefully cutting the opening in the ceiling. After that, we head up to the roof to tackle the exterior work. The main focus up there? Creating a completely watertight seal—this is the absolute cornerstone of a successful installation, so we’ll spend some real time on it.
Creating The Interior Ceiling Opening
Making that first cut can feel a bit daunting, but all your careful planning is about to pay off. You’ve already marked the four corners and drilled those pilot holes straight up to the roof. Now, it’s just a matter of connecting the dots.
Grab a plasterboard saw or reciprocating saw and carefully cut along the chalk lines you snapped earlier. It’s a smart move to lay down some drop sheets first; cutting plasterboard creates a surprising amount of dust. Once the opening is cut, you’ll get your first look at the roof sheathing from below—a pretty satisfying milestone.
Moving To The Roof For The Main Event
Now for the real action. Get yourself safely up to the roof, where you’ll find the four pilot holes you drilled from inside. Use these as your guide and snap chalk lines between them to create a perfect rectangle. This is your cutting guide, ensuring the hole in your roof will line up perfectly with the one in your ceiling.
Before you start cutting the roof itself, you’ll need to clear the way by removing the roofing material—whether that’s tiles or metal sheeting—from an area slightly bigger than your marked rectangle. Be gentle with tiles; they can be brittle. If you’ve got a metal roof, you’ll likely need to unscrew a section of sheeting. This clears the deck and gives you clean access to the sarking or sheathing underneath.
This simple visual breaks down the core sequence of events once you’re on the roof.
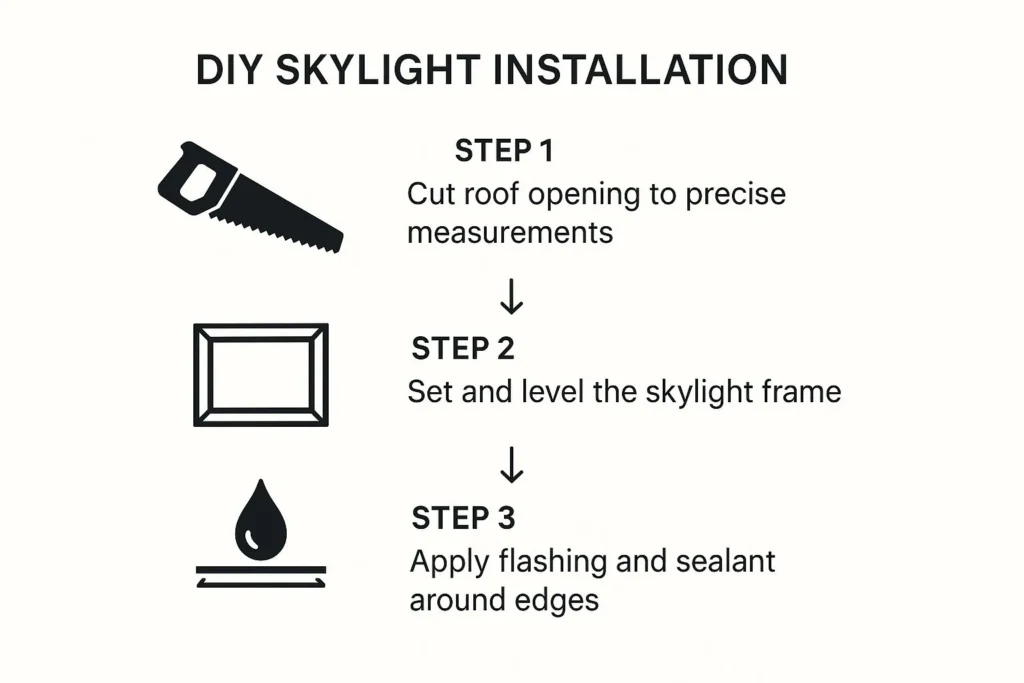
As you can see, it really boils down to three key actions: cutting with precision, placing the frame securely, and sealing everything meticulously. Get these three things right, and you’re well on your way to a leak-free finish.
Setting The Skylight And Mastering The Flashing
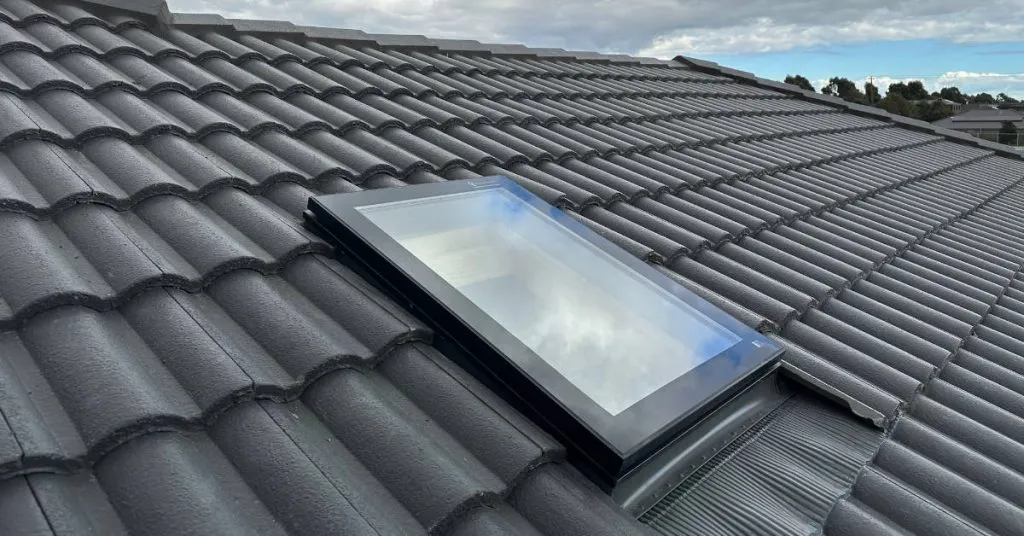
With the roof sheathing exposed, take your circular saw and cut out the opening, following your chalk lines as accurately as you can. It’s now time to set the skylight frame into the opening. It should fit snugly. Give it a quick check to make sure it’s level and square before you drive in the screws provided with your kit to secure it to the roof deck.
What comes next is hands-down the most critical part of the entire job: installing the flashing. This is how you create the waterproof barrier that will defend your home against rain and weather. Using a high-quality kit, like those from Vivid Skylights, really simplifies this stage because the flashing pieces are custom-engineered to fit together perfectly.
The secret to effective flashing is all in the layering. Picture it like the tiles on a roof—each piece has to overlap the one below it to direct water downwards. Never, ever rely on sealant alone to keep water out. The mechanical barrier formed by properly layered flashing is what does the heavy lifting.
You’ll start with the bottom (sill) flashing piece first. Then, you’ll work your way up, installing the side (step) flashing pieces and weaving them in with your roofing material as you go. Lastly, the top (head) flashing piece goes on, making sure it slides neatly underneath the row of roofing material above it. For a much more detailed look, you can follow our complete visual guide on how to install a skylight, which gets into the specifics for different roof types.
Constructing The Light Shaft
Once the skylight is securely in place and completely weatherproofed up on the roof, it’s time to head back inside. The next job is to build the connection between your new skylight and the ceiling opening. This tunnel is called the light shaft, and it’s what will funnel all that beautiful daylight down into the room.
The task here is to build a simple timber frame that runs from the ceiling opening up to the skylight frame. You can build it straight up, or you can have it splayed. A splayed shaft—one that’s wider at the ceiling than at the skylight—is a great trick for spreading the light more broadly across the room.
- Framing: Use timber to construct a box that connects the ceiling joists to the roof rafters surrounding your opening.
- Insulation: It is absolutely crucial to insulate the walls of the light shaft. This will help prevent heat loss in winter and stop excess heat from getting in during summer.
- Plasterboard: Finally, you’ll line the inside of the shaft with plasterboard, fixing it securely to your timber frame.
This interior work does require some basic carpentry skills, but the good news is that our Vivid Skylights range are perfect for the DIYer. The easy-to-follow installation instructions will guide you through this process, ensuring anyone with know-how can successfully install our skylight range in their home.
The final steps involve finishing the interior, which we’ll cover in the next section. But for now, step back and admire what you’ve accomplished. You’ve cut a hole in your roof, installed a window to the sky, and made it completely weatherproof. Well done.
With the skylight securely in place and fully weatherproofed on the roof, you can breathe a sigh of relief—the heavy lifting is officially done. Now it’s time to shift your focus indoors for the final, and arguably most satisfying, stage of your do it yourself skylight project: the interior finishing.
This is where you’ll transform a raw opening in the ceiling into a seamless architectural feature, making it look like it was always meant to be there. Getting these details right is what makes all your hard work truly pay off, turning a functional installation into a stunning design element.
Installing Plasterboard in the Light Shaft
First up, you need to line the timber-framed light shaft with plasterboard. This is what creates the smooth, paintable tunnel that will guide all that beautiful sunlight down into your room.
Start by carefully measuring each of the four sides of the shaft, from the skylight frame right down to the ceiling opening.
Once you have your measurements, cut the plasterboard pieces to size. I find it’s easiest to work from the top down, fixing the highest piece first, then the sides, and finishing with the bottom piece. Secure the plasterboard to the timber frame with plasterboard screws, sinking them just a tiny bit below the surface. That little dimple you create is key for getting a perfectly flat finish later on.
Achieving a Seamless Finish with Taping and Sanding
With the plasterboard up, the next job is to make those joints disappear. This is the most artistic part of the whole process and definitely requires some patience, but it’s not as hard as it looks. You’ll need joint compound (often called “mud”) and either paper or fibreglass tape to cover all the seams and screw heads.
- First Coat: Slap a thin layer of joint compound over a seam, then press your tape firmly into it with a taping knife. Immediately glide another thin layer of mud right over the top of the tape.
- Fill Screw Holes: Use the same technique to fill every screw dimple, scraping the surface flat and smooth.
- Feathering: You’ll likely need two or three coats in total. With each new coat, use a slightly wider taping knife to “feather” the compound further out from the seam. This gradual blending is what creates that invisible transition.
Here’s the real secret to a flawless finish: light sanding between each coat of compound after it has completely dried. This knocks down any high spots or ridges, giving you an impeccably smooth surface that’s ready for primer and paint.
This detailed work is a lot less daunting when you start with a well-designed product. For example, our Vivid Skylights range is engineered with a clean interior frame to work from, which really simplifies the plastering process. Homeowners in places like Rowville with basic DIY skills can confidently get a professional result using our easy-to-follow guides.
Painting Tricks to Maximise Light
The paint you choose for the light shaft can make a huge difference in how bright the room feels. Of course, you can just paint it to match your ceiling, but here’s a pro tip: use a high-quality, brilliant white paint with a slight sheen, like a satin or semi-gloss finish.
Think of this surface as a mirror. The sheen helps bounce more of that precious natural light down into your living space, making the whole room feel brighter and more open. It’s a simple trick that really maximises the payoff from your new skylight.
Adding Polished Final Touches
Want to take the finish from good to great? Consider adding some decorative trim or moulding around the ceiling opening. This final touch frames the light shaft beautifully, almost like a picture frame for the sky.
You can go for a simple, modern trim for a clean look, or choose something more ornate if it matches your home’s style. Just cut the moulding to size with mitred corners, attach it with finishing nails, and then caulk and paint it to match the rest of your ceiling trim. It’s this last little detail that elevates the project and shows that this isn’t just any do it yourself skylight—it’s a thoughtfully executed upgrade to your home.
Common Questions About DIY Skylights
Kicking off a do it yourself skylight project is exciting, but it’s completely normal to have a few questions buzzing around. Getting these sorted out from the get-go is the best way to build your confidence and sidestep any rookie mistakes. Let’s clear up some of the most common things people wonder about.
First up is a big one: the legal stuff. Do you actually need to get the local council involved before you start cutting a hole in your roof? It’s a smart question, and the answer isn’t always a simple yes or no.
Do I Need Council Approval?
For a lot of simple, straightforward installations, you probably won’t need to bother the council. Think of a standard home in a suburb like Rowville where the skylight fits neatly between the existing roof trusses. If you aren’t touching the structure, you’re often in the clear.
But, the second your plans involve cutting into a roof truss or any other structural part of your home, you’ll almost certainly need to get approval. Australian regulations for skylight installation are all about keeping things safe and up to code. While a small job might fly under the radar, any structural work needs a proper sign-off. You can find more details about these Australian skylight regulations on skylightsaustralia.au.
My rule of thumb is this: always check with your local council before you even pick up a tool. This is non-negotiable if you’re in a bushfire-prone area with a specific Building Attack Level (BAL) rating, as you’ll have extra rules to follow.
What Are The Most Common Mistakes To Avoid?
Learning from where others have tripped up is one of the quickest ways to get your own project right. When it comes to DIY skylights, a few classic blunders tend to catch people out time and time again.
The single biggest mistake, and the one that causes the most headaches, is improper flashing installation. Honestly, this is the number one reason skylights leak, and a small drip can lead to serious water damage down the line.
Other common slip-ups include:
- Poor Sealing: Being lazy with the sealant around the frame is a recipe for annoying drafts and will undo all the good work for your home’s energy efficiency.
- Incorrect Measurements: Being off by just a few millimetres can turn the simple job of fitting the unit into a massive struggle. Measure twice, cut once!
- Ignoring the Weather: Deciding to work on your roof on a wet or windy day isn’t just slow going—it’s a massive safety risk. Don’t do it.
Just taking your time and really nailing these key steps is what separates a professional-looking job from a disaster waiting to happen.
Can I Install a Skylight On Any Roof Type?
This is another great question, especially with the huge variety of roofs on Australian homes. The good news is that most quality skylight kits are designed with this in mind.
Our Vivid Skylights kits, for instance, work with the most common Aussie roof types, from classic tiles to modern metal sheeting like Colorbond. The thing you absolutely have to know is that the installation process is completely different for each. Flashing a tile roof is a world away from flashing a metal one.
Because of this, it is crucial to confirm that the skylight kit you buy is specifically compatible with your roof profile before you hand over any money. Our installation guides have clear, separate instructions for different materials, so you’ll have the exact info you need for your home. Getting familiar with installation methods for different projects can be really useful.
Ready to transform your home with beautiful, natural light? The Vivid Skylights range is specifically designed for the DIY enthusiast, with everything you need for a successful installation. Explore our range of skylights today!