
Think about the windows in your home. They let in beautiful sunlight, but they’re also a massive source of energy loss. In fact, uninsulated windows can be responsible for up to 40% of a home’s heat loss in winter and a similar amount of heat gain in summer. This makes effective insulation a non-negotiable for comfort and keeping those energy bills in check.
Luckily, you don’t need a specialist contractor for every solution. A trip to your local hardware retailer can open up a world of accessible options, from simple DIY films and seals to more robust upgrades like thermal blinds.
Your Starting Point for Window Insulation
Welcome to your complete resource for making your home more thermally efficient. Think of your windows as gateways for energy; our goal is to help you install effective gatekeepers. If you’re battling high energy bills and rooms that are too hot or too cold, your windows are often the prime suspect. This guide dives into the practical, cost-effective insulation solutions you can find locally, empowering you to make the right call for your home.
It’s a trend that’s catching on. The Australian Bureau of Statistics noted that hardware retail sales grew by 5.3% in the 2021/22 financial year, partly driven by Aussies looking for energy-efficient home improvements as power costs rise. It’s clear homeowners are focusing more on making their homes comfortable and efficient.
What This Guide Covers
We’re going to break down everything you need to know, from the basic concepts to hands-on installation tips. We’re focused on practical strategies that any homeowner can get their head around and implement.
This guide will explore:
- Key Insulation Concepts: Getting a handle on terms like R-value and understanding how heat actually moves through your windows.
- Product Comparisons: A detailed look at films, seals, thermal blinds, and even secondary glazing.
- DIY Installation Steps: Clear instructions for some of the most popular and accessible projects you can tackle yourself.
- Budgeting and Sourcing: How to plan your project costs and find the right materials for the job.
Your windows are a critical part of your home’s thermal envelope. By tackling heat loss and gain right at the source, you take a massive step towards a more comfortable and energy-efficient living space.
To really double down on your home’s thermal comfort, it’s worth looking into other draught proofing tips to complement your window insulation. Sealing up pesky gaps around doors, floors, and skirting boards creates a complete barrier against unwanted air leaks, making sure you get the maximum benefit from your window upgrades. Now, let’s dive deep into turning your windows into high-performing assets.
How Window Insulation Really Works
If you want to pick the right window insulation from a place like Bunnings, it helps to get your head around why it actually works. At its heart, window insulation is all about controlling how heat moves. The mission is simple: keep warm air inside during winter and hot air out during summer. To win this battle, you need a strategy to fight three different types of heat transfer.
Think of it like getting dressed for a chilly Melbourne morning. You don’t just throw on a t-shirt; you layer up. Each layer you add creates more resistance to the cold, and the exact same idea applies to your windows. This thermal resistance is measured by something called an R-value.
What Are R-Values and How Does Heat Move?
A bigger R-value means better insulation—just like a thick puffer jacket will keep you warmer than a light windbreaker. A standard, single-pane window has a laughably low R-value, making it a massive weak spot in your home’s defence against the elements. When you add insulation, like a window film or a secondary glazing panel, you increase that R-value and slow the heat transfer down.
Heat is a slippery thing and moves in three main ways. Good insulation needs to tackle all of them:
- Conduction: This is heat moving through direct touch. It’s why a metal spoon gets scorching hot when you leave it in a cup of tea. With windows, heat conducts straight through the solid glass and the frame.
- Convection: This is heat travelling through the air. It’s the culprit behind those annoying draughts you feel near a cold window. Warm indoor air hits the cold glass, cools down, sinks, and starts a chilly circulation loop in your room.
- Radiation: This is heat moving in waves. It’s the warmth you feel from the sun on your face, which travels right through an uninsulated pane of glass.
By adding insulation, you’re essentially putting up roadblocks to disrupt these heat highways. A simple weather seal, for example, stops convective draughts in their tracks, while a low-emissivity (Low-E) window film acts like a mirror, reflecting radiant heat away.
Every single layer you add—whether it’s a clear film, a honeycomb blind, or a heavy curtain—bolsters your window’s ability to fight back against temperature changes. You’re effectively bumping up its total R-value and making your home a whole lot more comfortable all year round.
The Sneaky Role of Thermal Bridging
One part of the puzzle that often gets missed is the window frame itself. Metal frames, especially aluminium, are fantastic conductors of heat. This creates a superhighway for heat to completely bypass your insulated glass—a phenomenon called thermal bridging.
This “energy highway” can seriously undermine your insulation efforts. You could have the best-insulated glass in the world, but if the frame is a conductor, a surprising amount of heat will still escape or sneak in.
Understanding the basics of what thermal bridging is and how it impacts your home helps you see the whole picture. To get real results, you need to think about both the glass and the frame. By tackling both, you create a much stronger thermal barrier, making sure your investment in window insulation actually pays off. It’s this complete approach that really unlocks maximum comfort and energy savings.
Your Guide to Window Insulation Options at Bunnings
Pop down to your local Bunnings, and you’ll find a surprising number of ways to tackle those draughty, heat-leaking windows. Each product comes at the problem from a slightly different angle, offering its own unique mix of cost, effort, and real-world results. Getting your head around these options is the first step to picking the right fix for your home.
Over the last decade, you’ve probably noticed big retailers like Bunnings seriously expanding their energy-efficiency aisles. They’ve gone from just a few basic seals to a whole range of films, thermal curtains, and more. This isn’t by accident; it’s a direct response to homeowners and builders alike demanding smarter ways to make our homes more comfortable and cheaper to run. You can even see this strategy outlined in their public investor briefings.
To get the best results, you need to understand what you’re fighting against. Heat moves in three main ways, and every insulation product is designed to stop one or more of them.
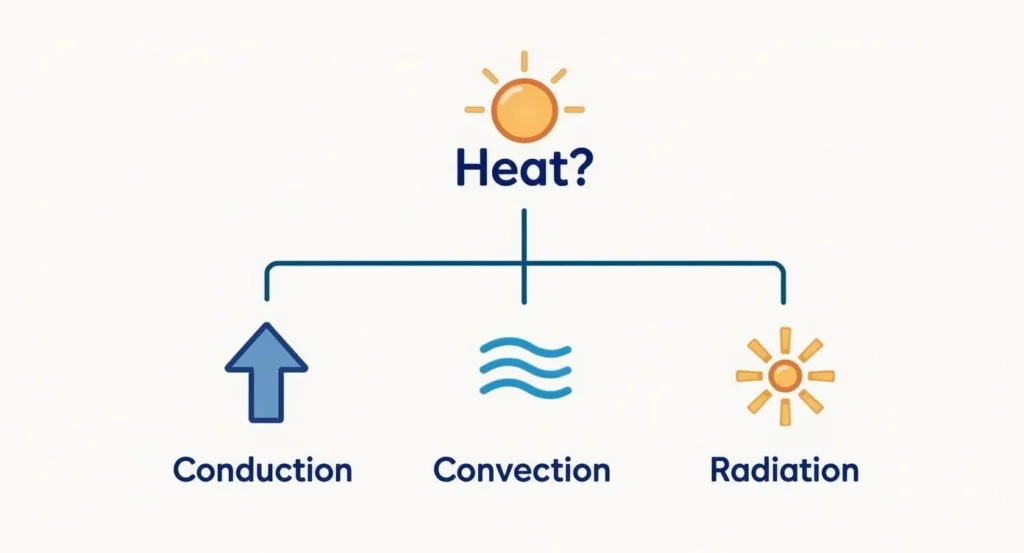
As you can see, the best solutions will tackle heat moving through the glass itself (conduction), through air currents (convection), and via invisible heat waves (radiation).
Comparing Common Window Insulation Methods
To make things easier, here’s a quick rundown of the most common DIY solutions you’ll find on the shelf.
| Insulation Type | Primary Benefit | Typical Cost | DIY Difficulty |
|---|---|---|---|
| Window Film | Creates an air gap to reduce conduction/convection. | Low | Medium |
| Weatherstripping | Stops draughts (convection). | Low | Easy |
| Thermal Curtains | Blocks radiation and convection. | Medium-High | Easy |
| Secondary Glazing | Creates a large, effective air gap for insulation. | Medium | Medium-Hard |
Each of these has its place, and sometimes the best approach is to combine a couple of them for maximum effect. Let’s dig into what makes each one tick.
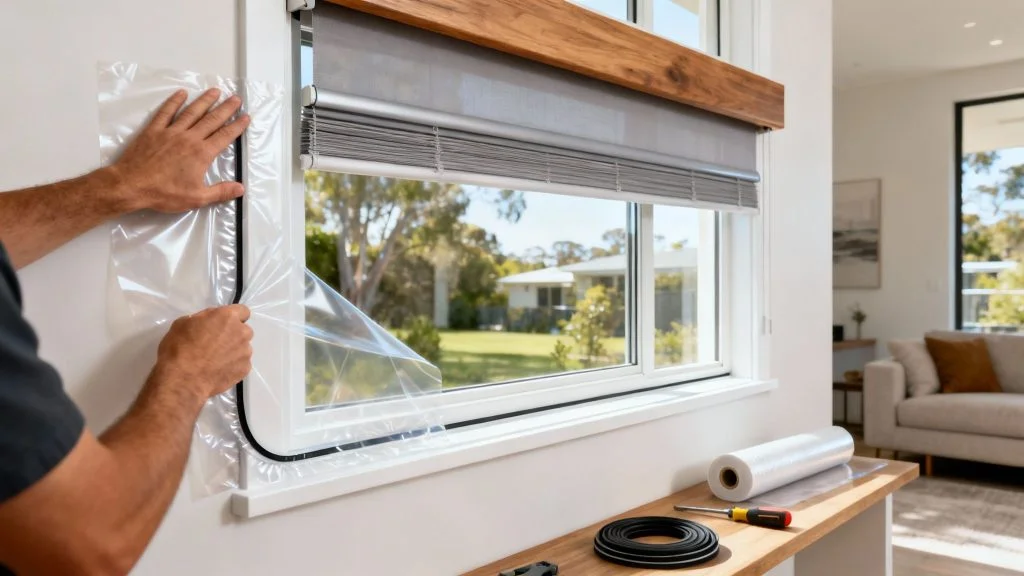
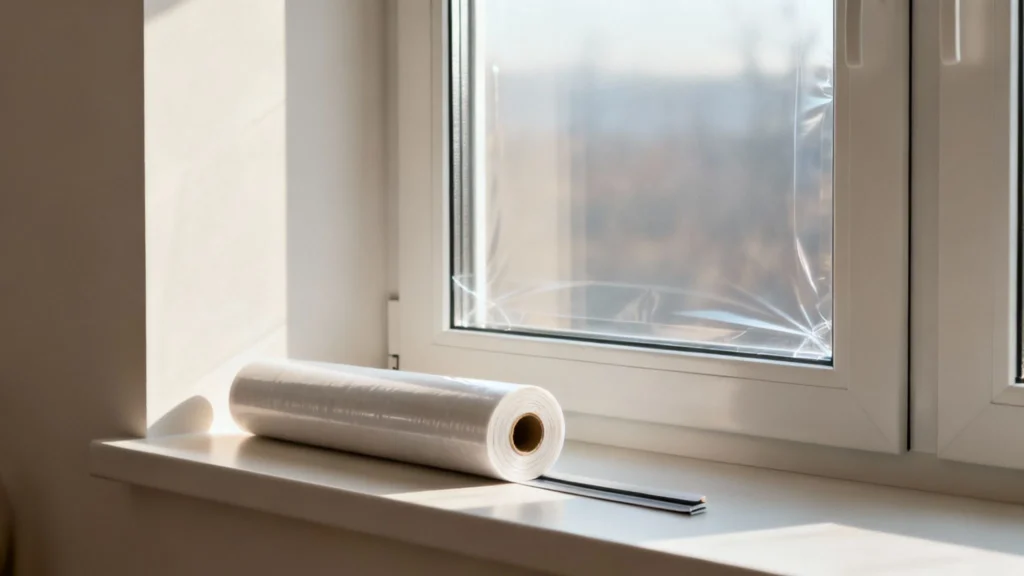
DIY Window Insulation Film
Think of window insulation film as a clear second skin for your window pane. It’s a thin sheet of plastic you apply to the inside of the window frame, which you then heat with a hairdryer to shrink it tight. This creates a small, sealed pocket of air between the film and the glass.
That trapped air is the secret ingredient. It’s a terrible conductor of heat, so it acts a lot like a makeshift double-glazed unit, slowing down both conductive and convective heat transfer.
- Pros: It’s incredibly cheap, almost invisible once it’s on properly, and you’ll definitely feel the difference. A great place to start if you’re on a tight budget.
- Cons: Getting it on without wrinkles takes a bit of patience and a steady hand. It’s also really a seasonal fix—you’ll likely need to replace it every winter.
Weatherstripping and Draught Seals
Can you feel a little breeze when you stand next to your closed windows? That’s money flying out the window. Convection is your enemy here, and weatherstripping is the perfect weapon.
You’ll find these in all sorts of materials, from simple self-adhesive foam tapes to more durable rubber EPDM seals. The aim is simple: plug every single gap around the moving parts of your window (the sash) and the frame. This creates an airtight seal, stopping chilly air from sneaking in and warm air from escaping. It’s a foundational step for any window insulation project.
Thermal Blinds and Curtains
Here’s where you get to combine function with style. Thermal curtains and blinds are a massive step up from standard window coverings because they’re built specifically to insulate. They usually have a thick, multi-layered design or a special thermal backing that’s great at trapping air.
When you draw them shut, they create a big air buffer between the fabric and the cold glass. This is brilliant at stopping radiant heat from escaping at night and blocking those cold convective currents from making the room feel chilly. Honeycomb or cellular blinds are particularly clever, as their structure is basically a series of air-trapping pockets.
You don’t have to pick just one. By layering different methods—like putting up window film and using heavy thermal curtains—you can stack the benefits. This multi-pronged attack creates a far more effective barrier against heat loss than any single product can manage on its own.
Secondary Glazing Kits
If you want performance that gets you much closer to proper double glazing without the cost and hassle of a full window replacement, secondary glazing kits are a fantastic middle ground. These systems let you add a second, clear pane—usually acrylic or polycarbonate—to the inside of your existing window frame.
This creates a much bigger and more effective air gap than film ever could, giving your window’s R-value a serious boost. They cost more than film, sure, but they’re also far more durable and deliver higher performance. It’s a semi-permanent solution for homeowners who are ready to move beyond temporary fixes but aren’t quite ready to invest in brand-new windows.
Of course, if you are approaching that point, it’s worth understanding the long-term performance benefits of fully energy-efficient double glazed windows to see what the next level of comfort and savings looks like.
A Step-by-Step Guide to DIY Installation
Ready to make your home more comfortable? Tackling a DIY window insulation project is one of the most rewarding and budget-friendly upgrades you can make. With a few basic tools from a local hardware store and a bit of patience, you can get a professional-looking finish that makes a real difference.
Let’s walk through how to install two of the most popular options: window insulation film and self-adhesive weatherstripping.
Installing Window Insulation Film
Applying window film is a clever way to mimic double glazing. You’re essentially creating a still layer of air between the film and the glass, which acts as an insulator. The secret to a crystal-clear, bubble-free finish is all in the prep work and a steady hand.
Tools You’ll Need:
- A window insulator kit (this usually includes the film and double-sided tape)
- Measuring tape
- Scissors or a utility knife
- Hairdryer
- Cleaning spray and a lint-free cloth
Installation Steps:
- Prepare the Surface: This is the most crucial part, so don’t skip it. Give the window glass and the interior frame a thorough clean. Any dust or grease will stop the tape from sticking properly, so make sure the surface is completely dry and spotless.
- Apply the Tape: Carefully stick the double-sided tape around the edge of the window frame. Press it down firmly to get a good bond, but leave the backing paper on for now.
- Attach the Film: Measure your window and cut the film, leaving about 5cm of extra material on all sides. Start at the top, peeling off the tape’s backing paper as you go, and press the film onto the sticky surface. Work your way down and around, pulling the film taut—but not so tight that it stretches.
- Shrink to Fit: Now for the magic. Grab a hairdryer and set it to medium or high heat, holding it about 10-15cm away from the film. As you move it back and forth, you’ll see the heat shrink the film, pulling it tight and making any wrinkles vanish.
- Trim the Excess: Once the film is tight and clear, take a sharp utility knife and carefully trim the excess film from around the frame. The result is a clean, barely-there finish.
Fitting Weatherstripping Seals
Draughts are one of the biggest culprits for heat loss, and weatherstripping is the perfect weekend fix. Installing these self-adhesive seals is a quick job that delivers instant results you can actually feel.
First, you need to find the gaps. Run your hand around the edges of opening sashes on sliding, casement, or double-hung windows to feel for air leaks. Choose a seal profile—like EPDM rubber—that’s just a little thicker than the gap you need to fill. This ensures it creates a snug, compressed fit when the window is closed.
Troubleshooting Tip: Trapped an air bubble in your window film? Don’t panic. You can often make a tiny pinprick in the centre of the bubble and gently smooth the air out towards the hole before applying more heat.
To install, just clean the frame surface where the seal will sit and make sure it’s dry. Cut the weatherstripping to the right length, peel off the adhesive backing, and press it firmly into place. The goal is to form a continuous barrier that stops air from leaking through, but without making the window difficult to open or close.
Insulating Skylights and Other Unique Windows
While sorting out your standard rectangular windows is one thing, what about the trickier spots? Think about skylights, elegant arched windows, or those sprawling bay windows. They’re fantastic for letting in light and adding character, but they can quickly become weak points for heat loss if you leave them uninsulated.
The standard insulation kits you find at the hardware store just aren’t designed for these custom shapes. This means you need to get a bit more creative with your approach. Skylights, in particular, cop the full force of the sun in summer and let precious warmth escape in winter. The real trick is insulating them effectively without blocking all that beautiful natural light.
Solutions for Skylights
Insulating a skylight presents a unique challenge. Because they sit right on the roof, they get blasted with more direct sunlight than any vertical window, making them a huge source of heat gain in summer. Your best bet here is to look at specialised films and blinds.
- High-Performance Window Film: Keep an eye out for films specifically made for skylights. These are engineered with a higher solar heat rejection rate, designed to block the harsh summer sun while still letting visible light pour in.
- Cellular or Honeycomb Blinds: Custom-fitted cellular blinds are one of the most effective options out there. Their honeycomb-like pockets trap air, creating a surprisingly powerful insulating barrier against heat and cold. Motorised versions are perfect for those high, hard-to-reach skylights.
The construction of the skylight itself is also a massive factor. Modern, high-quality units often come with excellent thermal performance built right in. If you’re planning a new installation or a replacement, taking the time to understand your options for effective skylight insulation from the start is a smart move for long-term comfort and energy savings.
Tackling Arched and Bay Windows
Forget trying to make a standard rectangular insulation kit work on a curved or angled window—it’s just not going to happen. But that doesn’t mean you can’t get fantastic results with a few clever strategies. It’s all about adapting the right materials to fit these unique shapes.
For arched windows, you can often use multiple, carefully cut pieces of window insulation film. By cutting sections to fit the curve and overlapping them slightly, you can create a complete seal. It takes a bit more patience than a standard window, but it’s a very effective DIY method.
Bay and bow windows have their own quirks with all those different angles. A layered approach works best here. Think custom-cut secondary glazing panels for the flat sections, paired with high-quality thermal blinds or curtains to cover the entire structure. This combination ensures every pane of glass is doing its part to keep your home comfortable.
Finding and Budgeting for Your Insulation Project
A successful project always starts with two things: the right materials and a realistic budget. For most Aussie homeowners, the journey to a better-insulated window usually begins at a major hardware store, and knowing what to look for makes the whole process a lot less overwhelming.
These days, finding what you need is easier than ever, especially online. The boom in DIY projects means retailers have seriously stepped up their game. It’s telling that Bunnings’ online store has seen its DIY category, which includes all these insulation goodies, grow to make up 68% of its total online sales. It just goes to show how many of us are keen to get on the tools ourselves.
Estimating Your Costs
Working out a budget is all about knowing the ballpark figures for different solutions. Here’s a rough guide to help you plan what you might spend per window:
- DIY Window Film: This is often your cheapest entry point, typically setting you back about $20 to $40 per window.
- Weatherstripping Seals: Another very budget-friendly fix, coming in at around $10 to $30 per window, depending on the length and type you need.
- Thermal Blinds or Curtains: The price here can vary wildly based on size, fabric, and quality, ranging anywhere from $80 to over $300 per window.
A classic bit of advice that always holds true: measure twice, buy once. It’s always smart to grab a little more material than your calculations suggest, just in case of a slip-up or a tricky corner.
While you’re focused on windows, it can be helpful to see the bigger picture. Insulating your windows is a fantastic step, but it’s just one piece of the puzzle. For a broader look at creating a more sustainable and cost-effective home, check out these Top 10 Energy Efficient Home Upgrades. It helps put your project into the context of a whole-home strategy.
Your Top Window Insulation Questions Answered
Starting any home improvement project brings up questions. It’s only natural. Getting the right answers upfront helps you pick the best products for the job and get it done with confidence. Here are a few of the most common things we hear homeowners ask about DIY window insulation.
How Long Does DIY Window Insulation Film Last?
Most of the DIY window insulation film you’ll find at the hardware store is really designed to be a seasonal fix, lasting for one winter. If you apply it perfectly to a spotless surface, you might squeeze a bit more time out of it. But eventually, you’ll notice it getting a bit cloudy or starting to lift at the edges.
For the best results and a crystal-clear view, the smart money is on removing the film come springtime and putting on a fresh kit when autumn rolls around. This way, you know you’ve got a tight, effective barrier right when you need it most.
Can I Use Weatherstripping on Any Type of Window?
Weatherstripping is incredibly handy, but it’s definitely not a one-size-fits-all solution. You have to match the type of seal to your specific window to get a draught-free result. For instance, those sturdy compression seals made from EPDM rubber are fantastic for sliding and double-hung windows, where the two parts press together nice and firm.
The real secret to success is picking a seal profile that completely fills the gap without making the window a nightmare to open and close. A seal that’s too thick can put a strain on the hinges and frame, while one that’s too thin won’t stop the cold air from sneaking in.
Are Thermal Curtains as Effective as Window Film?
They can be, but it’s important to understand they work in completely different ways. Window film is on the job 24/7, working to reduce heat transfer right through the glass itself. Thermal curtains, on the other hand, only do their thing when they are fully closed.
When you draw them shut, they trap a big pocket of still air between the fabric and the window pane. This is a brilliant way to stop heat loss, particularly overnight. In our experience, many homeowners get the best of both worlds by using both. The film gives you a constant, baseline level of insulation, and the curtains provide a serious thermal boost whenever they’re closed.
For skylights that combine brilliant natural light with top-tier thermal performance, explore the double-glazed range from Vivid Skylights. Our units are designed for Australian conditions, keeping your home comfortable all year round. Learn more at vividskylights.com.au.