

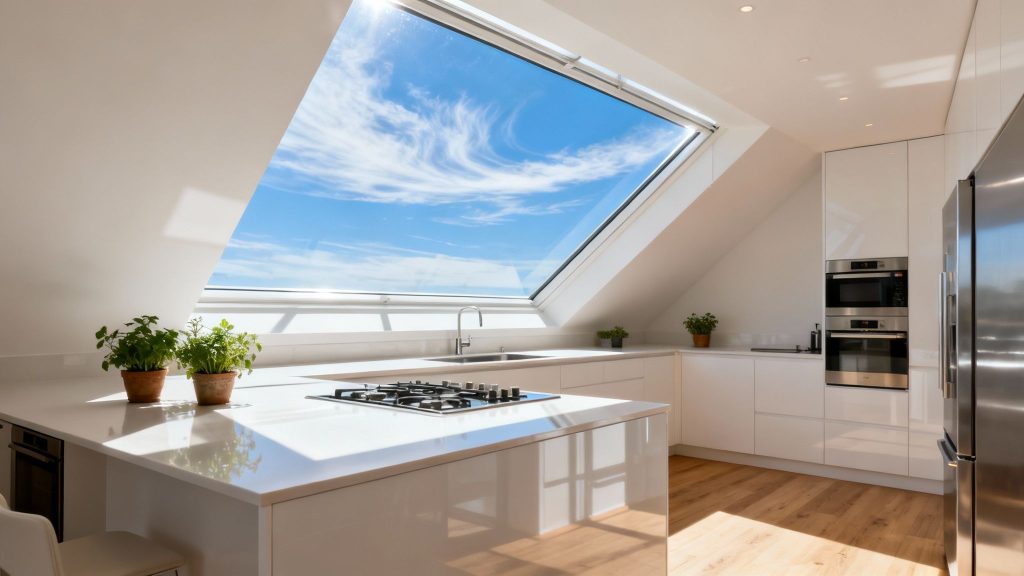
 A kitchen skylight transforms the space above your cooktop into a bright, welcoming hub. It floods the room with natural daylight and trims back your electricity bill.
Why Add A Skylight In Kitchen
Installing a skylight literally opens your kitchen ceiling to the sky, bringing in both light and fresh air. This guide breaks down five core areas, taking you step-by-step from basic benefits to practical installation tips.
- Daylight Benefits: Improved mood, less dependence on electric lighting, more even warmth.
- Types Overview: Fixed and opening units to suit different roof pitches.
- Sizing and Placement: Simple rules for balanced illumination.
- Installation and Maintenance: Best practices to keep your skylight performing for years.
To dive deeper into skylight advantages, check out our Benefits of Skylights guide.
Moreover, a skylight doesn’t just light up your kitchen. It becomes a striking focal point, adding character to the architecture.
In fact, a 60cm x 90cm skylight can supply up to 50% of your daily lighting needs in a typical 10m2 kitchen.
Key Advantages Of Kitchen Skylights
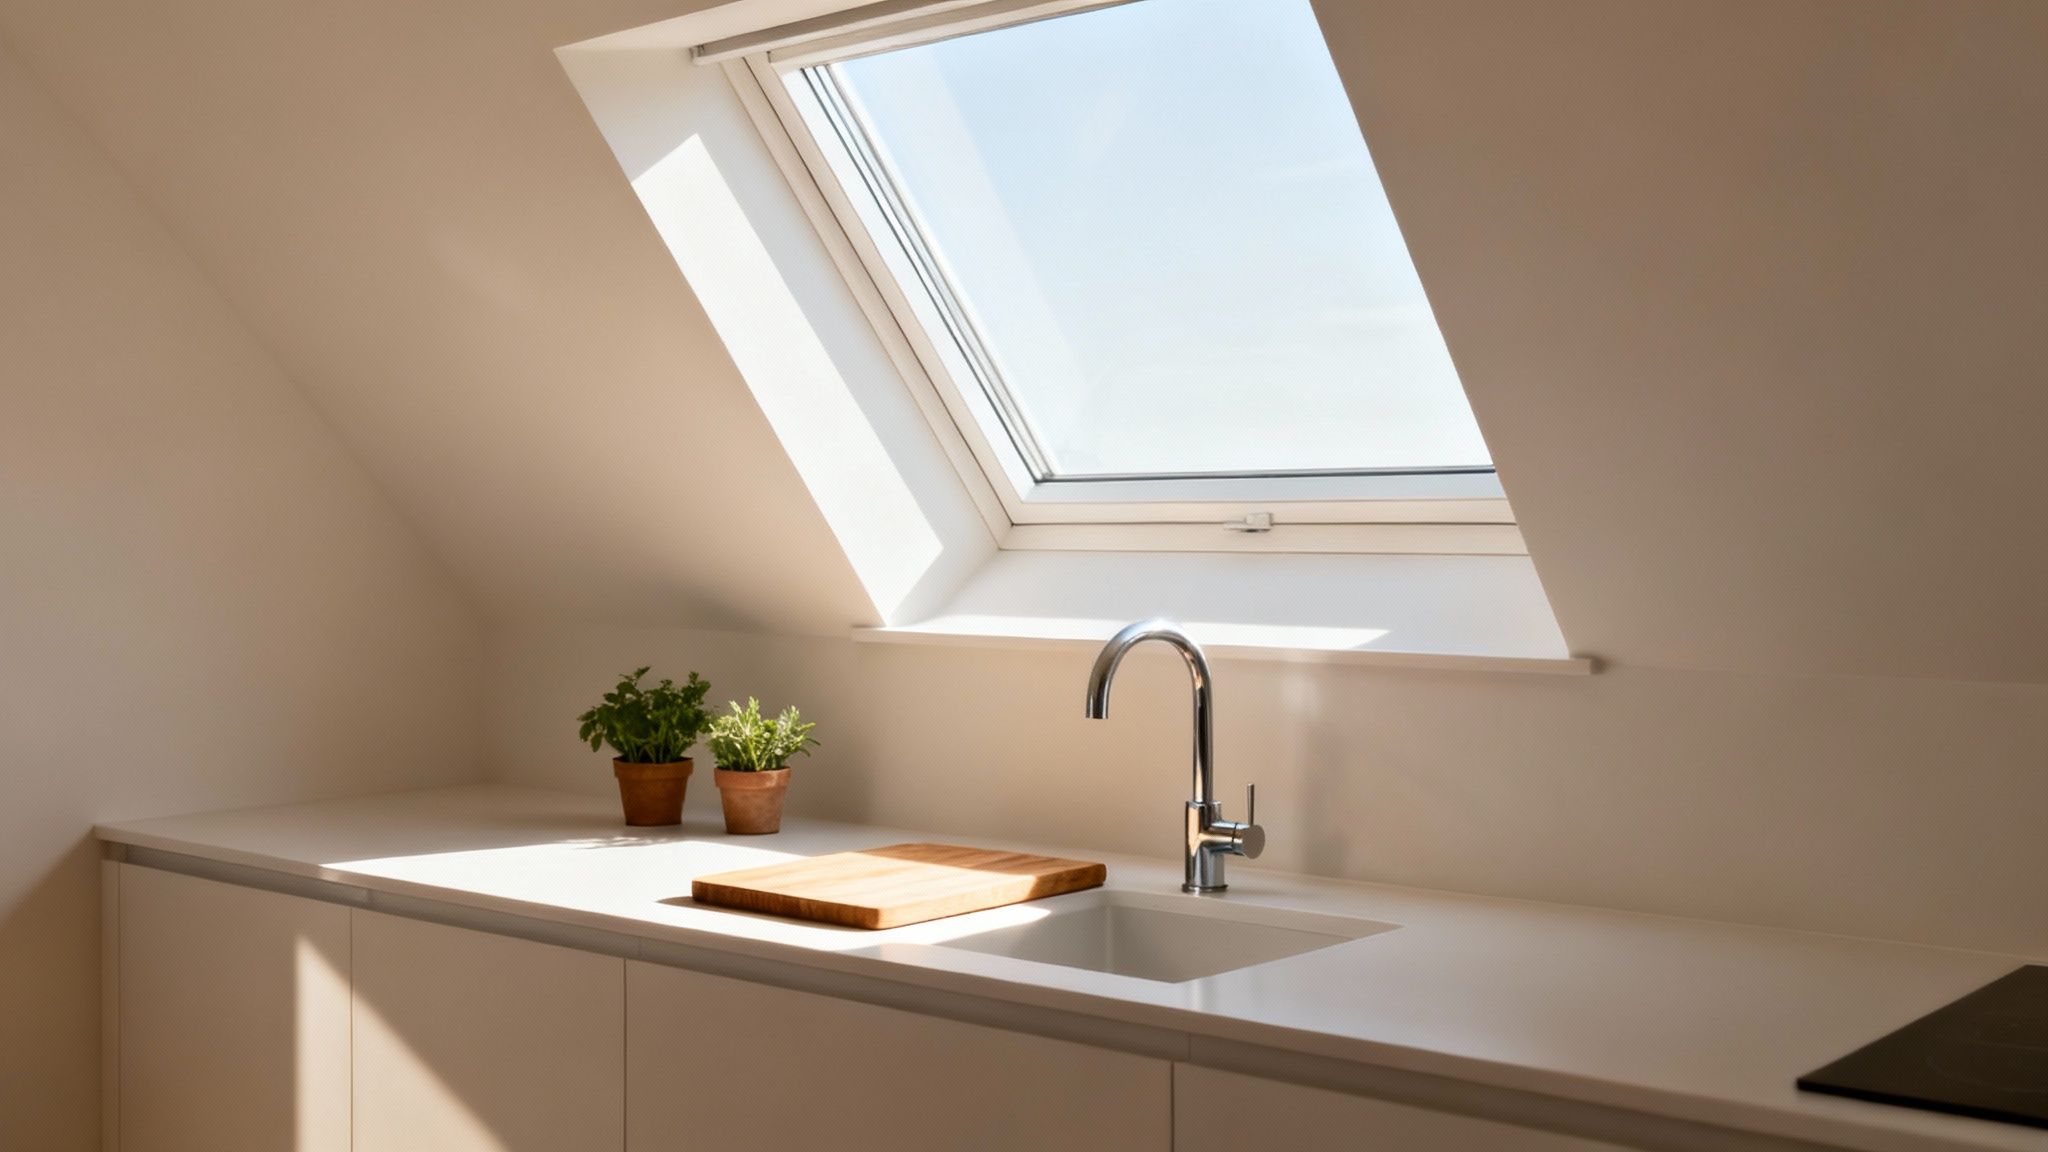
Soft daylight from above banishes the shadowy zones that wall lamps just can’t reach. Your worktops look sharper, and you’ll find it easier to measure, chop and cook.
Operable skylights double as roof vents—channelling steam, odours and hot air straight outside.
A kitchen skylight is like having a lamp powered straight by the sun—without the electricity bill.
Choosing between fixed or opening styles hinges on whether you prioritise pure light or added ventilation. Ahead, we’ll guide you through:
- Exploring skylight types to match your kitchen layout.
- Calculating the ideal size with easy daylight ratio formulas.
- Reviewing installation options and warranty details.
- Assessing costs, ROI forecasts and finance solutions.
Follow this roadmap, and you’ll turn a dim culinary corner into an airy, energy-smart centrepiece. Next up, we’ll dig into real-world benefits and performance metrics you’ll love.
Understanding Kitchen Skylight Benefits
A kitchen skylight channels full-spectrum daylight straight from your roof. It’s like having a solar-powered ceiling lamp, one that brightens even the darkest corners.
For instance, a 60 cm × 90 cm skylight can deliver up to 50% of a 10 m² kitchen’s daily light requirements. That translates to fewer switched-on bulbs during the day and a friendlier electricity bill.
Plus, overhead light softens shadows that wall lamps tend to cast. And if you choose an operable model, you’ll get a built-in vent—perfect for letting steam and cooking odours escape.
- Even illumination across benches, enhancing precision when chopping
- Lower energy consumption equals reduced utility costs
- Improved airflow helps prevent mould and humidity build-up
“Adding a skylight above the island felt like opening a window to the sky,” recalls Melbourne renovator Jenna Roberts.
How Daylight Elevates Kitchen Space
Natural light does more than just brighten work surfaces. It triggers physiological responses that set your body clock and lift your mood. Mornings feel sharper; afternoons more relaxed.
Imagine a crisp white benchtop under a stream of sunlight—textures pop, colours stay true. Without a skylight, you lose that level of clarity. In contrast:
- Enhanced Visual Clarity for slicing, dicing and plating
- A Sense of Spaciousness, even in compact kitchen layouts
- Improved Colour Rendering, making fresh ingredients look their best
Energy Savings Through Skylight Use
Bringing daylight into your kitchen can cover up to half your lighting needs. Over a year, that often adds up to $200–$350 saved on electricity.
Homeowners around Australia are tapping into this trend. Discover more insights about the Australian kitchen lighting boom in this market research. The broader Australian kitchen lighting market – which includes overhead daylighting solutions such as skylights – was valued at approximately USD 155.15 million in 2024 and is projected to reach about USD 282.2 million by 2033, implying a 6.79% CAGR for 2025–2033. Read the full research about market growth here.
Below is an overview of market size and projected growth for skylights in Australian kitchens:
Australian Kitchen Skylight Market Growth
| Year | Market Size (USD million) | CAGR (2025–2033) |
|---|---|---|
| 2024 | 155.15 | – |
| 2033 | 282.2 | 6.79% |
This data underscores the strong momentum behind daylight solutions in Australian kitchens—and why now is the time to consider a skylight upgrade.
Ventilation And Cooking Precision
A good kitchen skylight does double duty: light and fresh air. Operable models act like rooftop vents, whisks away lingering steam and heat so you stay comfortable throughout cooking marathons.
That airflow also helps keep indoor air quality high, flushing out grease particles and odours. Fewer headaches later on, since surfaces stay cleaner and you won’t battle mildew.
Check out our guide on Skylight Energy Efficiency to learn how glazing choices and ventilation options work together to boost thermal comfort and cut energy costs.
By pairing daylight with controlled venting, a kitchen skylight becomes more than just a window to the sky—it’s a genuine upgrade to your cooking environment.
Exploring Kitchen Skylight Types
A kitchen skylight is far more than a static window above your cooking space. It’s a thoughtful design choice that can transform how your kitchen feels—bringing in natural light, boosting airflow and lifting comfort.
Skylight Models And Ventilation
When you’re weighing options, you’ll find two clear contenders: fixed skylights and opening skylights. Fixed units pour in constant daylight without any moving parts. Opening skylights, by contrast, double as roof vents, whisking away steam and odours.
To see how each type lines up, take a look at this comparison:
Comparison Of Fixed And Opening Skylights
| Feature | Fixed Skylights | Opening Skylights |
|---|---|---|
| Maintenance | Low upkeep thanks to no moving parts | Needs occasional hinge and motor inspections |
| Ventilation | Pure daylight, no airflow | Fresh-air control, reduces kitchen humidity |
| Cost Range | $750–$1,000 | $1,600–$2,400 |
| Installation Complexity | DIY-friendly | Professional fitting recommended |
| Glazing Options | Standard double glazing | Double glazing or laminated glass available |
Having weighed these differences, you’ll know whether you need simple daylighting or that added ventilation boost.
Smart Features And Glazing Options
Glazing technology has come a long way. Modern skylights can now resist hail, clean themselves and even regulate indoor temperature.
- Laminated Glass: Stays intact on impact, offering extra safety when hail hits.
- Low-E Coatings: Reflects infrared heat while letting in plenty of natural light.
- Self-Cleaning Glass: Photocatalytic and hydrophilic coatings break down grime, so rain does the rest.
- Frameless Top Glazing: Keeps water from pooling on pitched roofs for a cleaner look.
Pair these with integrated blinds and rain sensors. You can dim the light for a cosy afternoon cook-up or let the skylight snap shut at the first drop of rain.
“A well-chosen skylight acts like a controllable sun dial, adjusting light as your cooking rhythm requires.”
Industry reports for 2024–2025 show Australian homeowners leaning into motorised, solar-powered skylights complete with remote controls, rain sensors and built-in blinds. For further reading, explore smart skylight trends on SkylightsAustralia.
- Identify your main goal: pure daylight or airflow.
- Match glazing to your climate: hail-prone areas favour laminated glass.
- Consider motorisation: remote opening adds convenience and safety.
- Add integrated blinds to manage glare and afternoon heat.
With these insights, you’re ready to choose the ideal kitchen skylight for light, ventilation and style.
Finding The Right Skylight Size And Placement
Proper sizing and placement can make your skylight feel like a bright beacon in your kitchen—rather than a tiny hole that barely admits light.
Start by sketching a layout that factors in roof pitch, ceiling height and the sun’s path. A clear diagram helps you dodge sudden glare and deep shadows.
- Roof pitch should sit between 15° and 35° for a sweet balance of daylight and rain runoff
- Aim for skylight area to reach roughly 10% of your kitchen’s floor space
- Align to sun angles to capture winter warmth and ease summer glare
Now, an example: use a simple daylight ratio formula to nail down the perfect skylight footprint.
Calculating Skylight Footprint
Follow the daylight factor guideline: you want about 1:10 skylight-to-floor area.
- Measure your kitchen’s total floor area
- Multiply by 0.1 to get the ideal skylight size
- Allow extra for framing and glazing thickness
If you plan more than one skylight, space them at least 1.5 metres apart. This avoids dark patches under the ceiling.
Choosing Orientation And Glare Control
Northern-facing openings deliver soft, even light in summer. South-facing skylights trap low winter rays, bringing cosy warmth.
- North-facing positions cut down direct glare between 10 am and 2 pm
- South-facing placements boost daylight in colder months
- East or west exposures often need shading to tame harsh morning or evening sun
Below is a concept map visualising different kitchen skylight types and features.
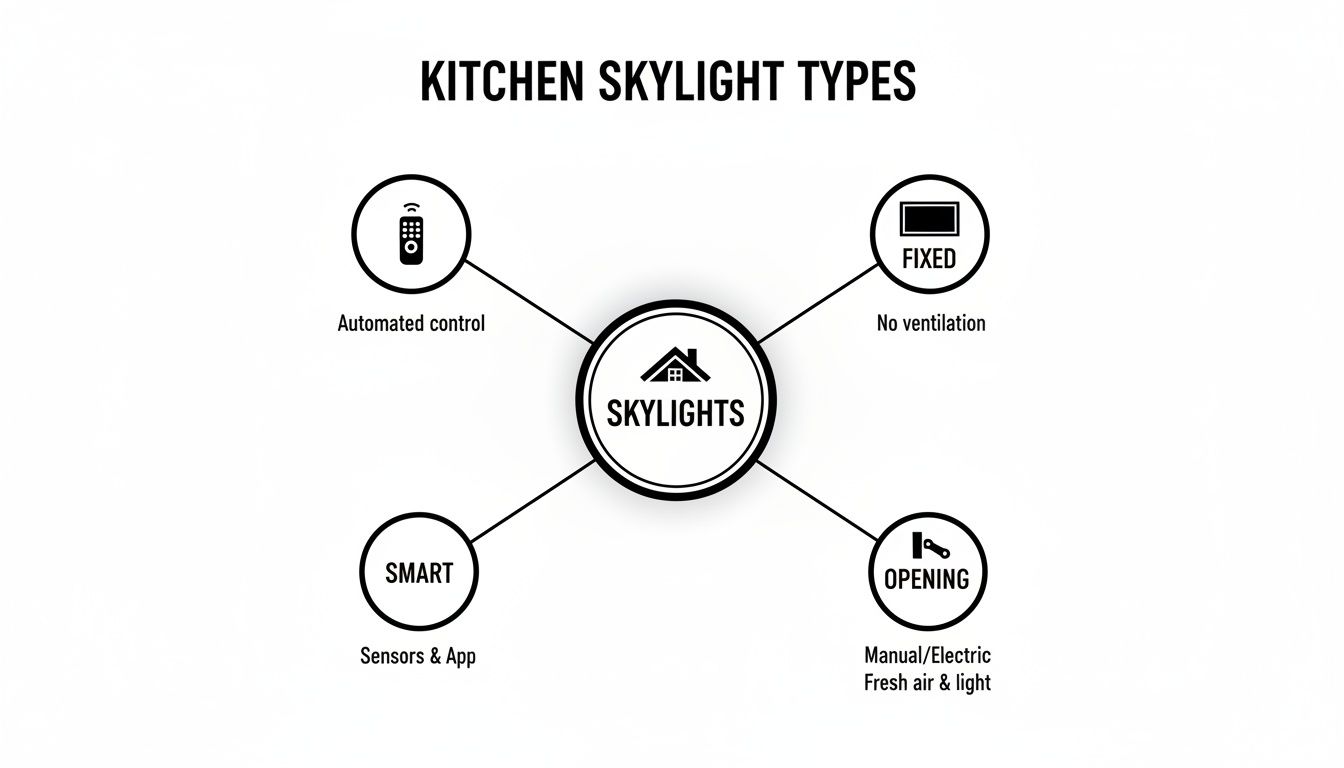
The concept map shows fixed, opening and smart skylights branching from a central node, underlining how each type offers unique daylight and ventilation options.
Tip: Always match your skylight style to the way you cook—ventilation makes all the difference when you’re simmering steamy curries.
| Orientation | Benefit | Consideration |
|---|---|---|
| North | Soft summer light | Higher winter heat loss |
| South | Warm winter daylight | Possible summer glare |
| East/West | Morning/evening glow | Needs shading |
Think of placement like painting with light—your ceiling becomes a canvas that shifts throughout the day. Next, let’s dive into installation and maintenance best practices to keep your skylight performing at its peak.
Managing Heat Gain
Low-emissivity (Low-E) glazing slashes unwanted heat on scorching days.
- Opt for double glazing with Low-E layers to block infrared rays
- Add external features like eaves or louvres to shield midday sun
- Install internal blinds to fine-tune brightness and temperature
For example, a 600 mm-wide eave extension above a south-facing skylight can reduce peak indoor heat by 15%.
Balancing Ventilation
Opening skylights can double as discreet vents, whisking steam and cooking odours up and away.
- Fit sensors to pop skylights open at 22 °C for natural cooling
- Keep vents clear of seating areas to prevent bothersome drafts
- Pair skylights with ceiling fans for easy cross-ventilation on balmy evenings
By spacing skylights wisely, tuning their orientation and controlling thermal gain, your kitchen can stay bright and fresh all year. A handy rule of thumb: keep skylights at least 1.5 metres apart, and avoid clustering them too closely.
Installation And Maintenance Best Practices
A kitchen skylight is like a rooftop window, ushering light and fresh air right above your stovetop. But if installation isn’t spot on, you could be chasing drips and drafts before long. In this guide, we’ll cover how to cut a precise opening, choose the ideal flashing kit and maintain your Vivid Skylights unit so it performs flawlessly for years.
Think of your roof structure as a giant jigsaw puzzle. Cut too large an aperture without reinforcing the rafters and you invite sagging or worse. Vivid Skylights’ ceramic-tile flashing kits slot neatly under each tile, creating a watertight barrier even in heavy downpours. Metal roofs, meanwhile, benefit from a flexible boot flashing that expands and contracts with the heat.
We’ll also break down waterproofing layers, highlight insulation essentials and share real-world install stories that illustrate why skipping a flashing step or using the wrong sealant can lead straight to leaks. Follow these best practices and your kitchen skylight will stay dry under the harshest Australian sun and storms alike.
Preparing Your Roof Safely
Before you grab a saw, double-check that your rafters can handle the new opening. Refer to your local building code tables for load capacities and span allowances.
Use a chalk line to sketch the exact dimensions on both the ceiling and the roof battens. When you remove tiles or metal panels, keep them intact—this makes refitting far easier and tidier.
Essential tools include:
- Circular Saw with Roofing Blade: For clean cuts through plywood sheathing.
- Reciprocating Saw: Ideal for trimming metal roof sheets.
- Spirit Level: Guarantees your skylight frame sits perfectly plumb.
- Chalk Line: Marks straight, accurate cuts on battens and rafters.
- Safety Gear: Hard hat, gloves and non-slip boots to prevent mishaps.
A clean, well-measured opening sets the stage for seamless flashing and long-lasting performance.
Waterproofing And Insulation Tips
Flashings seal the junction between skylight and roof, so water flows harmlessly past the frame. For tiled roofs, Vivid Skylights’ pre-formed collars lock under each tile and direct rainwater away. On corrugated metal, a flexible boot flashing moulds around ribs to prevent leaks.
After fitting the main flashing, use a self-adhesive underlay and integrate it with your head flashing—this double layer routes water downhill. Finally, insulate the skylight curb with rigid foam to maintain thermal efficiency and keep heat loss to a minimum.
| Roof Type | Flashing Style | Insulation Material | Code Note |
|---|---|---|---|
| Tile | Pre-formed collar | Rigid XPS foam | AS 4284 |
| Metal | Flexible boot flashing | Closed-cell PIR | NZBC B2 |
Remember, coastal or high-humidity zones often mandate corrosion-resistant components.
Maintenance Schedule And Cleaning
A simple upkeep routine keeps leaks at bay and light levels high. Inspect your skylight every six months for seal integrity and glass chips. Wipe the glass down with a soft cloth and mild detergent—abrasives can leave micro-scratches that trap dirt.
Clean out frame channels and gutters to clear debris that might hold moisture against the flashing. Book a professional check-up every two years, particularly after severe storms.
“A simple sealant refresh prevented leaks after our first wet season,” says builder Mark Evans.
Maintenance checklist:
- Monthly glass wipe-down to preserve clarity.
- Quarterly debris removal from drain channels.
- Annual hardware inspection for smooth-opening skylights.
- Sealant touch-up every 18 months to ensure watertight seams.
Stick to this timetable and your skylight will repay you with decades of hassle-free daylight.
When To DIY Or Hire A Pro
Tackling a skylight install yourself can save on labour—but only if you’re confident with roofing work. Fixed skylights on roofs with a moderate pitch are beginner-friendly, especially with Vivid Skylights’ step-by-step instructions.
However, electric openers, steep pitches or complex roof profiles usually demand a licensed installer to comply with Australian regulations. Consider these points:
- Assess Skill Level: Rate your DIY experience from roofing cuts to sealant application.
- Check Warranty Terms: A DIY install might void parts of Vivid Skylights’ warranty.
- Evaluate Roof Type: The flashing demands of tiles versus metal differ widely.
- Compare Quotes: Gather at least three professional estimates.
- Safety Considerations: Factor in height-work risks and any permit requirements.
If you’re unsure, a certified installer not only guarantees code compliance but also qualifies you for the 10-year leak-free warranty and flexible finance plans offered by Vivid Skylights.
Troubleshooting Common Issues
Even the best installs can face hiccups over time. Minor leaks often show up as damp patches around the curb or discoloured insulation above the ceiling. Condensation between panes and sticky openers are other frequent offenders.
To tackle leaks:
- Clean drainage channels beneath the flashing.
- Reseal joints with silicone or polyurethane sealant.
- Replace hardened gaskets in operable units.
- Lubricate hinges with a dab of silicone spray for smooth action.
“Regular checks saved my glass from cracks after a hailstorm,” notes roofer Sarah Li.
If condensation persists, boost ventilation or review your indoor humidity controls. Use a garden hose to simulate rain and pinpoint any water ingress. Keep a simple log of each inspection—note dates, faults and fixes to spot recurring issues.
Always follow manufacturer instructions when swapping parts to protect your warranty coverage. Armed with these troubleshooting tips, you’ll keep your kitchen skylight shining bright for years to come.
Calculating Costs, Value Impact and ROI
Installing a kitchen skylight isn’t just about letting sunshine in. There’s a financial story to tell. By mapping out the numbers—from unit price to installation—you’ll see where every dollar goes and how quickly you get it back.
We’ll unpack:
- Fixed vs opening models and their base prices
- Glazing upgrades for safety and efficiency
- Labour, access challenges and finishing details
Fixed skylights typically cost $350–$800, while operable units come in at $600–$1,200 each.
Upgrading your glass—think laminated panes—adds around $150–$300, and a Low-E coating tacks on roughly $100–$200.
Then there’s the install: $200–$500 per unit for labour, influenced by roof pitch and ease of access.
Finally, don’t forget trim, sealing kits and extra insulation, which can add $100–$300 to your outlay.
- Fixed Skylight Base Cost $350–$800 covering frame and basic glazing
- Opening Skylight Base Cost $600–$1,200 including vent and seal
- Glazing Enhancements $150–$300 for laminated, $100–$200 for Low-E
- Labour and Fitting $200–$500 depending on roof complexity
- Finishing Extras $100–$300 for insulation and trim
Local case studies show kitchens with a skylight sell up to 18% faster, and in some Victorian heritage homes, you can see a 12% uplift in sale price.
Learn more about how skylights boost property value
Return On Investment Breakdown
To figure out your payback window, simply link up your total costs with annual energy savings—and throw in that potential sale price bump.
Here’s how it works:
- Add up your upfront spend: skylight, glazing upgrades and installation.
- Estimate annual energy savings—most households save $200–$350 each year.
- Factor in property value uplift of 12–18% based on our case studies.
- Divide total investment by combined savings and increased sale value.
- Tally intangible benefits: better mood, brighter cooking space, curb appeal.
In one Melbourne kitchen, a homeowner fitted a 600 × 900 mm opening skylight for $2,100 in total.
They now save around $250 on lighting and heating bills each year—about a 15% cut in electricity costs.
Add a 15% resale premium and the skylight boosts the home’s value by $7,500, bringing the payback period to under 6 years.
A well-calculated skylight investment can pay for itself in under a decade.
By plotting costs, savings and market uplift, you can make a confident call on adding a skylight to your kitchen.
Use our Skylight Pricing Estimator on Vivid Skylights to get tailored quotes, flexible finance plans and warranty options.
| Skylight Type | Upfront Cost | Annual Savings | Payback Period |
|---|---|---|---|
| Fixed Basic | $1,200 | $200 | 6 years |
| Opening Standard | $2,100 | $250 | ~6 years |
| Premium Glazed Model | $2,500 | $300 | 8 years |
Before you decide, compare financing packages and check local permit requirements. Download our ROI worksheet to fine-tune these figures for your kitchen project.
Energy Savings Impact
Homes across Australia see average energy bill reductions of $250–$350 per year after installing a kitchen skylight.
Much of that comes down to daylight replacing up to half of your usual lighting load.
In one survey, households cut lighting costs by 45% once an operable skylight was installed over meal prep areas.
- Morning sun reduces reliance on under-cabinet LEDs
- Daylight coverage between 9 am and 3 pm slashes energy use
- Better thermal control trims HVAC runtime during peak seasons
Next Steps For ROI Planning
Gather quotes for the skylight models you like and ask about labour costs for your specific roof.
Track your kitchen’s typical daytime lighting hours to sharpen those savings estimates.
Explore tax incentives or green loans in your region—they can knock down your net spend and speed up payback.
Finally, review sale metrics in your suburb to see how a skylight could shape your resale timeline.
Kick off your ROI calculation now and watch how a kitchen skylight can become a smart financial move.
Frequently Asked Questions
What are the main benefits of a skylight in the kitchen?
A well-placed skylight brings in abundant natural light, cutting down on artificial lighting and lowering daytime energy use. If you opt for an opening model, you’ll also welcome fresh air and whisk away cooking steam and odours.
How do I choose between fixed and opening models?
Fixed skylights are virtually maintenance-free and ideal if your priority is maximum daylight. Opening units add another dimension—they work like roof vents, giving your kitchen a quick burst of airflow whenever you need it.
Quick Structural Checks
Before you dive in, run through these checks:
- Inspect rafters to confirm they can bear the new load.
- Select the correct flashing kit for tiled or metal roofs.
- Review local building codes for span limits and insulation rules.
What budget range should I expect?
When it comes to costs, entry-level fixed skylights start at around $350. If you’d like an opening version, plan on $600–$1,200 installed. Premium glazing can tack on another $100–$300.
How soon will I see a return on investment?
Most homeowners save $200–$350 on annual energy bills, which usually means you’ll break even in under ten years. Plus, adding a skylight can speed up resale by 15–18% when you eventually sell.
A well-placed skylight can transform cooking routines and boost home comfort.
Additional Tips For Success
Can I install a kitchen skylight myself?
DIY kits work well on moderate roof pitches and with fixed models. But if you’re tackling an opening skylight or a complex roofline, hiring a licensed installer is the safest bet—and it keeps your warranty intact.
What glazing should I choose for my kitchen climate?
Look for Low-E coatings to block summer heat while still flooding your space with daylight. Laminated glass adds hail resistance and an extra layer of safety over busy cooking zones.
How do I keep my skylight in peak condition?
Every six months, give the exterior glass a gentle clean with mild detergent. At the same time, check seals and gaskets—replace any that look worn to keep leaks at bay.
Ready to brighten your kitchen naturally?
Discover the perfect kitchen skylight at Vivid Skylights