
A proper roof ventilator installation is a surprisingly straightforward project, but it’s one that dramatically improves your home’s health by letting trapped heat and moisture escape from your roof cavity. The job involves cutting an opening in your roof, securing the ventilator, and then creating a watertight seal to shield your home from the weather.
Why Roof Ventilation Is a Non-Negotiable for Melbourne Homes
Living in Melbourne is fantastic for its vibrant lifestyle, but it also brings some unique climate challenges. That combination of intense summer sun and persistent humidity can turn your roof space into a super-heated, moisture-laden trap. Without an escape route, this stagnant air can kick off a whole cascade of problems for your home.
This is exactly why effective roof ventilation isn’t just a nice-to-have—it’s essential for keeping your home comfortable and structurally sound. A professional roof ventilator installation acts like a set of lungs for your house, constantly pushing out that hot, damp air and drawing in cooler, drier air from outside.
Protecting Your Home and Your Wallet
One of the first places you’ll feel the pain of poor roof ventilation is your energy bill. During a Melbourne summer, temperatures in an unventilated roof space can easily soar past 65°C. All that intense heat radiates straight down into your living areas, forcing your air conditioning to work overtime just to keep things bearable.
By installing a roof ventilator, you’re actively slashing the thermal load on your home. It’s a simple upgrade that can lead to a significant drop in cooling costs—often by as much as 30%. Your air-con unit no longer has to fight a losing battle against a ceiling that’s acting like a giant radiator.
A well-ventilated roof space stays much closer to the ambient outside temperature. This simple change not only lowers energy consumption but also extends the lifespan of your cooling systems and roofing materials by reducing extreme temperature fluctuations.
Combating Moisture and Mould Growth
Heat is only half the story. Melbourne’s humidity is another major threat. When warm, humid air gets trapped in the roof cavity, it condenses on cooler surfaces overnight. This leads to damp insulation, timber rot, and the perfect breeding ground for mould and mildew.
A continuous cycle of air movement stops this condensation from ever getting a foothold. Good ventilation ensures that moisture-heavy air is exhausted before it can do any damage, protecting your family’s health and your home’s structural integrity. It’s a proactive defence against costly repairs down the track.
Interestingly, many homeowners find that pairing roof vents with well-placed skylights can boost airflow even further. You can learn more about combining natural light with proper airflow and how skylight ventilation works in our detailed guide.
In short, a roof ventilator installation is one of the smartest investments a Melbourne homeowner can make. It delivers real, tangible returns through:
- Lower energy bills by taking the strain off your air conditioning.
- Increased home comfort by stopping heat from radiating into your living areas.
- Protection against mould and mildew by getting rid of trapped moisture.
- Extended lifespan of roofing materials by preventing damage from extreme heat and damp.
How to Choose the Right Ventilator for Your Roof
Picking the right ventilator is the most important decision you’ll make before you even think about getting up on the roof. You’ve got a few options, from classic wind-driven whirlybirds to modern solar-powered units, and the best choice for your Melbourne home really comes down to a few things. Your roof type, budget, and even the local look and feel all come into play.
Get this choice right, and your system will work efficiently from day one, tackling the heat and humidity we know all too well in our climate. It’s all about matching the ventilator’s strengths to what your home actually needs.
Matching Ventilators to Melbourne Homes
For many homes in Melbourne with traditional terracotta or concrete tile roofs, the classic wind-driven whirlybirds are often a solid, budget-friendly choice. They don’t need any electricity; they just use the wind to spin a turbine and pull hot air out of your roof space. Simple, reliable, and they do the job when there’s a good breeze.
But if you’ve got a modern home with a low-pitch Colorbond steel roof, you’ll probably need something with a bit more oomph. That’s where powered ventilators, especially the solar models, really come into their own.
- Static Vents: These are the most basic option, with no moving parts. They rely on hot air naturally rising to escape. They’re best for smaller roof spaces or when used with other vents.
- Whirlybirds (Wind-Driven Turbines): An affordable and very common sight. The catch is that their performance depends entirely on wind speed, which means they’re not much help on those still, scorching days when you need ventilation the most.
- Powered Ventilators (Solar or Mains): These units have a fan that actively pulls hot air out, giving you consistent performance no matter the weather. They are incredibly effective for large roof cavities or homes where airflow is a real problem.
Deciding how many vents you need is just as important as the type. In Australia, a good guideline is one vent for every 50 square metres of roof void. So, a typical 3-4 bedroom house, which is around 245 square metres on average for a new build, would need about three ventilators to get the airflow right.
Choosing the right type of ventilator is crucial for keeping your Melbourne home comfortable, especially during our hot summers. To help you weigh the options, here’s a quick comparison of the most common types.
Roof Ventilator Type Comparison for Melbourne Homes
| Ventilator Type | Power Source | Best For | Pros | Cons |
|---|---|---|---|---|
| Wind-Driven (Whirlybird) | Wind | Traditional pitched roofs, homes in breezy areas. | Low cost, no running expenses, simple installation. | Ineffective on still days, can be noisy, less powerful. |
| Static Vents | Natural Convection | Small roof spaces, sheds, or supplementing other systems. | Very cheap, silent, no moving parts to break. | Limited airflow, not suitable as a primary solution. |
| Solar-Powered Fan | Solar Panel | All roof types, especially low-pitch or large roofs. | Highly effective, zero running costs, works best on sunny days. | Higher initial cost than passive vents. |
| Mains-Powered Fan | Electricity | Homes with severe heat issues or complex roof designs. | Most powerful and consistent performance. | Professional installation needed, adds to electricity bills. |
Ultimately, the best choice depends on your specific needs and budget, but this table should give you a clear starting point for what might work best for your roof.
Making the Final Decision
Solar-powered models are quickly becoming the go-to for many Melbourne homeowners, and for good reason. You get the power of an electric fan without adding a cent to your energy bills, which makes them a smart long-term investment. These units work hardest on the hottest, sunniest days—exactly when your roof cavity is crying out for help. Our guide on https://vividskylights.com.au/solar-roof-ventilation-fans/ takes a deeper dive into how these systems can really benefit your home.
When you start looking at powered options, you’ll see fans with either AC (alternating current) or DC (direct current) motors. It’s worth understanding the differences between DC and AC fans as it can impact noise and efficiency. As a general rule, DC motors tend to be quieter and use less energy.
At the end of the day, think about your roof’s pitch, your budget, and the specific ventilation headaches your home has. A steep roof might do just fine with a simple whirlybird, but a flat or low-pitch roof will almost always need a powered solution to really move that stagnant, super-heated air out.
Assembling Your Tools and Safety Gear
Before you even think about leaning a ladder against your house, getting your gear in order is the first real step to a successful roof ventilator installation. A well-prepared workspace doesn’t just make the job quicker; it makes it a whole lot safer. The right tools mean clean cuts and a snug fit, while proper safety equipment is absolutely non-negotiable when you’re working off the ground.
This is about more than just grabbing a drill and ladder. You’ll need specific items to handle roofing materials properly and avoid causing any damage. For instance, a jigsaw with a fine-toothed blade is ideal for cutting through Colorbond without warping the metal, while a good caulking gun gives you the control you need for a perfectly clean, waterproof seal.
Your Essential Tool Checklist
Having everything you need within arm’s reach stops you from making endless trips up and down the ladder—which, believe me, is a fast track to fatigue and accidents. Here’s a rundown of what you should have laid out and ready to go:
- Power Drill and Bits: For securing the ventilator base and any other fittings.
- Jigsaw or Hole Saw: To cut the opening in your roof. Your choice here will depend on the shape of your ventilator.
- Caulking Gun: You absolutely cannot skip this. It’s essential for applying roofing sealant to create that all-important watertight seal.
- Pry Bar and Hammer: Necessary for gently lifting tiles or shingles without cracking them.
- Measuring Tape and Chalk Line: For marking your cutting lines with precision. You only get one shot at cutting that hole.
This simple infographic breaks down the pre-installation workflow into three crucial stages.
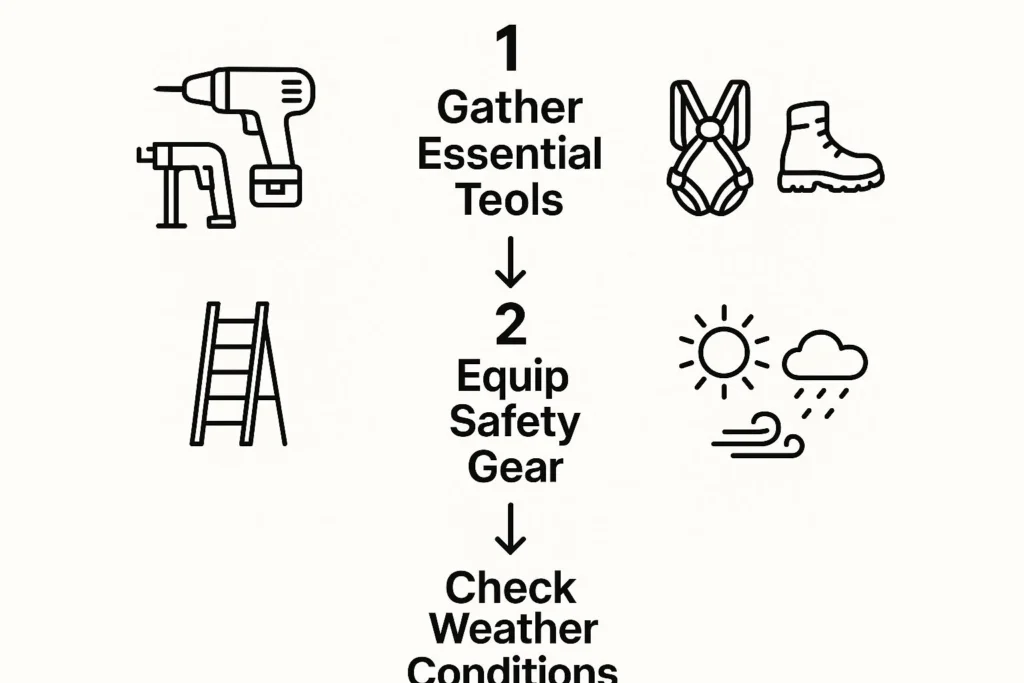
Following this sequence ensures both you and your equipment are properly set up for a safe and successful project.
Prioritising Your Safety
Working on any roof, no matter the height, carries inherent risks. From the moment you start to the moment you finish, safety has to be your number one thought. The right personal protective equipment (PPE) is what stands between a minor slip and a serious injury.
Never compromise on safety gear. High-grip footwear provides stability on angled surfaces, a properly fitted safety harness can be lifesaving in case of a slip, and sturdy gloves protect your hands from sharp roofing materials.
Beyond what you’re wearing, situational awareness is crucial. Always, always check the weather forecast before you head up. A calm morning can quickly turn into a dangerously windy or wet afternoon. When you’re getting ready for any roof work, it’s vital to understand the risks involved with elevated tasks. For a more detailed look, it’s worth consulting an overview of essential safety strategies for working at heights. By taking these precautions seriously, you can work methodically and confidently—just like a pro.
Getting the Installation Right From Start to Finish
Alright, you’ve got your tools laid out and your safety gear on. This is where the real work begins. A proper roof ventilator installation is all about precision. From picking the perfect spot to making that final cut, every step matters.
Don’t rush this part. Taking your time now means your new vent will perform better, last longer, and keep your home dry for years to come. Think of it less as one big job and more as a series of small, deliberate actions that build on each other.
Finding the Sweet Spot for Your Vent
First things first, you need to decide where this ventilator is going to live. The goal isn’t just to find an open space; it’s about finding the most effective one.
Hot air rises, so you want to place the ventilator as close to the roof’s ridge line as you can. This lets physics do the heavy lifting, giving that trapped, hot air the most direct escape route.
For most homes in Melbourne, this usually means positioning the vent on the rear side of the roof, high up near the peak. This keeps it effective while also being discreet from the street view.
But before you mark anything, you absolutely must check what’s underneath. Pop up into your attic with a torch and have a good look at the area you’ve chosen. Make sure you won’t be cutting through any of these showstoppers:
- Roof Trusses or Rafters: These are the bones of your roof. Cutting into one is a massive, structural mistake.
- Electrical Wiring: A hidden cable is a serious safety hazard just waiting to happen.
- Pipes or Ducting: Look out for any plumbing or HVAC lines that might be running through the space.
Once you’ve confirmed the coast is clear from inside, drive a long screw or nail straight up through the roof sheeting from the attic. This clever little trick gives you a perfect pilot marker on the outside, so there’s no guesswork involved when you’re back on the roof.
Marking and Making the Cut
With your pilot nail as the centre point, you can head back up on the roof to trace the opening. Most ventilator kits come with a handy template. If yours didn’t, just use the base of the unit itself. Centre it over the nail and draw your circle with a marker.
Now for the point of no return: cutting the hole. A jigsaw with the right blade for your roof material is usually your best bet here. Take it slow and steady.
Pro Tip: If you’re cutting into a Colorbond or other metal roof, run a bit of cutting oil along your marked line. It helps the blade glide smoothly and stops the metal from warping with the heat. A clean cut is vital for a watertight seal.
Working with a tiled roof is a different game. You’ll need to carefully remove the tiles in the designated area. It’s likely you’ll have to trim a tile to fit snugly around the vent’s throat, which is a job for an angle grinder fitted with a good diamond blade.
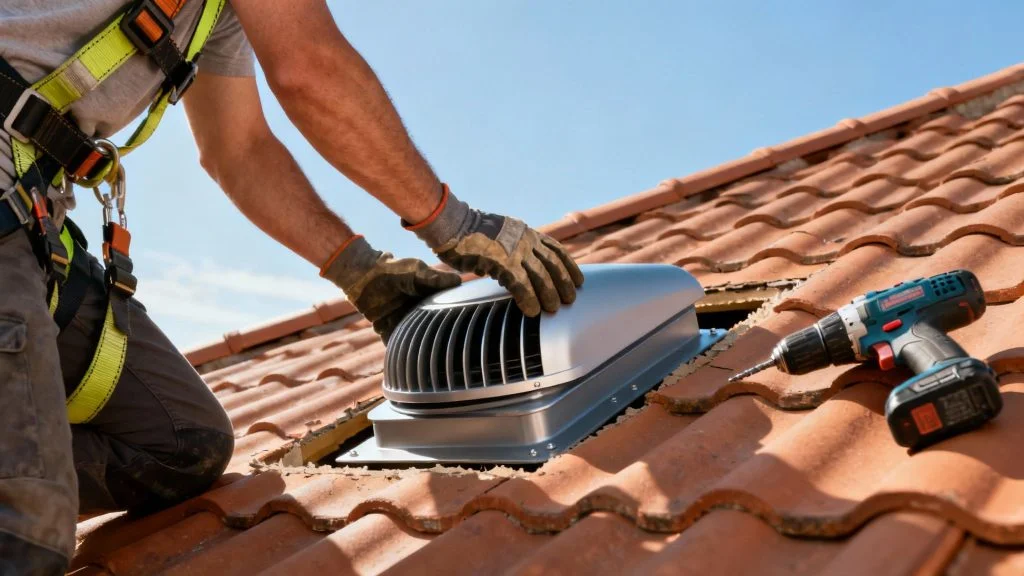
Securing the Ventilator Base
With the opening cut, it’s time to fit the vent. On a metal roof, start by applying a generous bead of high-quality, neutral-cure silicone sealant around the entire edge of the hole. This is your first line of defence against water.
Now, place the ventilator base over the hole. Pay close attention to the flashing—that’s the flat metal skirt around the base. The top edge of the flashing needs to slide under the roofing sheet above it, and the bottom edge must sit over the sheet below it. This is a non-negotiable roofing rule that forces water to flow down and away from the opening.
Secure the base to the roof with the galvanised or stainless steel screws provided. Drive them in so they’re firm, but don’t overtighten and risk buckling the flashing.
For good measure, add another bead of sealant over each screw head and around the entire perimeter of the flashing. This final touch makes it bombproof. On a tile roof, the flashing gets integrated with the surrounding tiles, and you’ll secure the base directly to the roof battens underneath.
Following these steps ensures you’ll have a professional-grade roof ventilator installation that can handle anything Melbourne’s weather throws at it.
Mastering the Watertight Seal and Final Touches
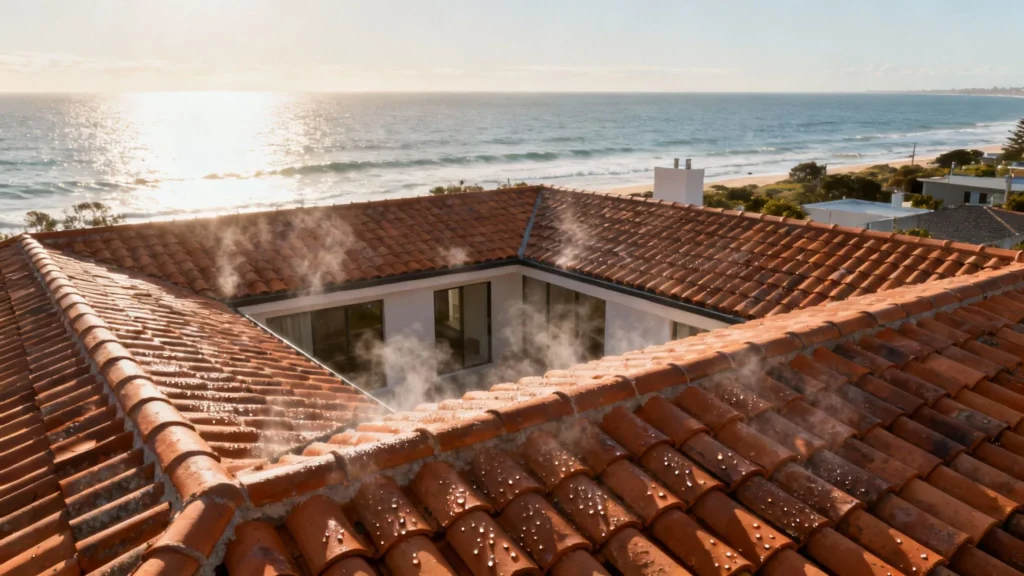
A successful roof ventilator installation comes down to one simple thing: it must never, ever leak. This is where the real craftsmanship comes in. The final steps of sealing and finishing are what turn a hole in your roof into a seamless, completely weatherproof feature. This is the moment that protects your home from unpredictable Melbourne weather and makes all your hard work worthwhile for years to come.
The whole process hinges on getting the ventilator’s flashing perfectly integrated with your roofing. This metal skirt is your first and best line of defence against water getting in. Think of it like layering tiles or shingles—you’re using gravity to your advantage, making sure water flows down and away from the opening you’ve just made.
Creating a Durable Weatherproof Bond
Choosing the right sealant isn’t just a suggestion; it’s non-negotiable for a seal that lasts. Down in a place like Melbourne, your roof gets hit with everything from intense UV rays to sideways rain. A standard, off-the-shelf silicone just isn’t going to hold up.
You need a top-quality, neutral-cure roofing sealant made specifically for the outdoors. It also has to be compatible with your roofing material, whether that’s Colorbond steel or old-school terracotta tiles. And when you apply it, don’t be stingy. A thick, continuous bead under the flashing and over every single screw head is what creates that bombproof barrier. For a deeper dive, check out our complete roof flashing installation guide.
The goal here is to create multiple layers of protection. The flashing acts as the mechanical barrier, while the sealant gets into any tiny gaps, creating a flexible, tough seal that can handle the constant expansion and contraction from temperature swings.
It’s also worth noting that your work needs to align with local building standards. Following Australian regulations is crucial for any roof ventilator installation. Standards like AS 4254 and AS 3959 cover specific requirements for ventilation, hitting on key points like fire safety and wind resistance—both vital in Australia’s varied climate zones. Sticking to these guidelines ensures your vent doesn’t just work well, but is structurally sound.
Securing the Dome and Final Checks
With the base sealed up tight, the last piece of the puzzle is securing the ventilator dome or cap. This part is usually pretty straightforward, often just clicking or screwing into place. Don’t rush it, though. This is what will stand up to the strong winds that can really whip through Melbourne.
Make sure every fastener is tightened down properly, following the manufacturer’s instructions to the letter. A loose dome won’t just rattle; it can get damaged or even ripped clean off in a serious storm. Once it’s on, give it a gentle but firm tug to confirm it’s absolutely solid.
Before you call it a day, do one last visual inspection from a few different angles. You’re looking for a few key things:
- Is the flashing sitting perfectly flat against the roof?
- Are there any visible gaps around the base? Zero is the only acceptable answer.
- Has the sealant been applied neatly and completely, with no breaks in the bead?
- Is the dome securely attached and sitting level?
By taking your time and nailing these finishing touches, you’ll have complete peace of mind knowing your new roof ventilator is installed correctly and built to last.
Got Questions About Your Roof Ventilator Install?
Even the most detailed guide can’t cover every single scenario you might run into on the roof. Let’s tackle some of the most common questions we hear from homeowners in Melbourne, so you can get on with your project without a hitch.
A big one is always, “Can I really do this myself?” Honestly, for a straightforward job on a single-storey home with a gentle pitch, a confident DIYer with the right gear and a healthy respect for heights can definitely pull it off. But if you’re looking at a steep roof, a complicated roofline, or just don’t love the idea of working up there, calling in a pro is always the smartest, safest bet.
What If My Roof Has Sarking?
It’s a great question, as sarking is pretty standard in Australian homes for that extra layer of moisture and thermal protection. When you’re fitting a ventilator, you’ll need to cut through both your roofing material and the sarking underneath.
The trick is to make a clean, precise cut through the sarking that matches your roof opening. From there, you install the ventilator base just like you normally would, making sure the flashing sits correctly over the top. Your goal is to keep that protective sarking layer as intact as possible around the new opening.
Remember, getting the ventilation system size right isn’t just about performance—it’s about compliance. Building regulations exist to make sure your system properly manages airflow and prevents moisture issues down the track.
For example, Australian building codes have specific minimums for vent openings. The National Construction Code requires at least 7,000 mm² per metre at the eaves and 5,000 mm² per metre near the ridge. This isn’t just a random number; it’s calculated to guarantee proper circulation and stop condensation from building up. You can dig into the specifics by reviewing the official guidance on ventilation in steel roofing.
Can I Install a Ventilator in Any Weather?
That’s a hard no. You should absolutely avoid installing a roof ventilator in wet, windy, or scorching hot conditions. A damp roof is a slip-and-slide waiting to happen, and strong gusts can turn your tools—or the ventilator itself—into dangerous projectiles.
Your best bet is to pick a cool, calm, and even overcast day. It makes for a much safer and more comfortable work environment, letting you focus on the important details without fighting the elements.
Ready to bring more natural light and fresh air into your home? Vivid Skylights offers premium roof windows and skylights that perfectly complement any ventilation project, enhancing your living space with beautiful, natural daylight. Explore our range and get a fast quote today at https://vividskylights.com.au.