
Why Roof Tile Flashing Is Your Home’s Secret Bodyguard
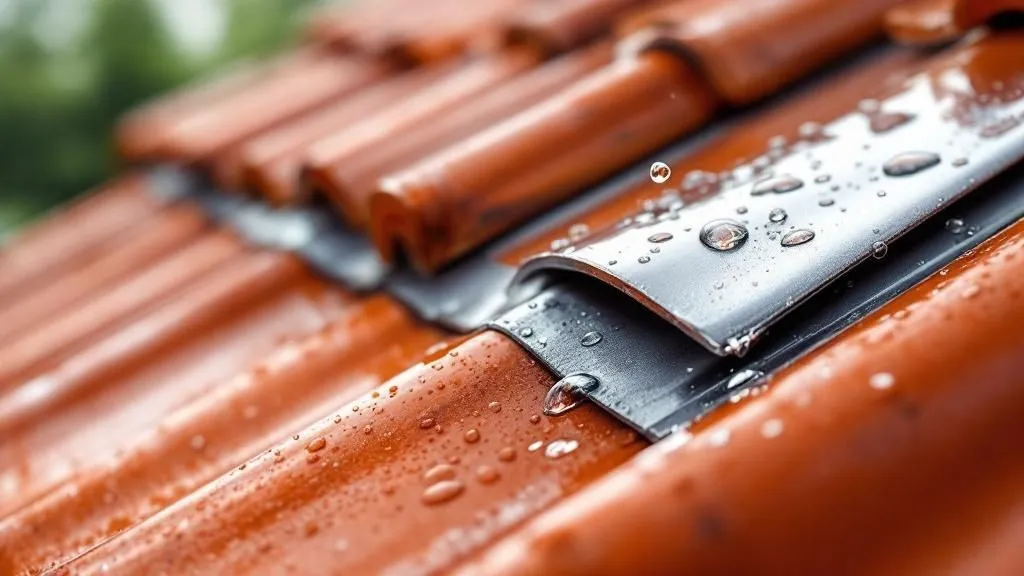
Think of your roof as a knight’s armor, bravely defending your home against the relentless onslaught of wind and rain. The tiles are like overlapping plates, providing a strong barrier. Yet, even the finest armor has its weak points – the gaps between the plates. That’s where roof tile flashing comes in, acting like the essential chainmail underneath, sealing those vulnerable joints and directing water away from your home’s interior.
Flashing is the unsung hero of your roofing system, working tirelessly behind the scenes to prevent leaks and the costly damage they bring. Imagine a torrential downpour in Melbourne. Water rushes down your roof, seeking any crack or crevice to exploit. Properly installed flashing acts like a carefully engineered drainage system, channeling that flow safely into your gutters and away from your walls and ceilings.
Flashing: More Than Just Metal
This isn’t simply about sticking some metal onto your roof. It’s about understanding how water behaves, how it flows and searches for weaknesses. Experienced roofers approach flashing like skilled plumbers, anticipating the path of water under various conditions, from wind-driven rain to the expansion and contraction of materials under Australia’s ever-changing climate. They design flashing systems that stand up to the test, no matter the weather.
For instance, the flashing around a skylight is absolutely crucial. A skylight, while beautiful, inherently creates a potential weak spot in your roof. If the flashing isn’t installed perfectly, leaks are almost inevitable, potentially leading to major interior damage. Interested in learning more? Check out this resource: Tile Roof Flashing.
This attention to detail is vital because flashing problems often remain hidden until significant damage has already occurred. It’s like a slow leak behind a wall – you don’t see it until the plaster starts to bubble and the timber begins to rot. By then, the repair bill can be a nasty shock.
Materials Matter
The type of roofing material also plays a key role in how effective your flashing will be. In Australia, we have a diverse range of roofing materials. According to the 2020 Australian Roofing Survey, 58% of roofs are Colorbond/metal, while 33% are tile (terracotta, ceramic, and concrete). This variety underscores the importance of choosing compatible flashing and using the right installation techniques to prevent leaks in our varied weather conditions. Discover more insights.
The Price of Protection: Flashing and Insurance
Insurance companies are increasingly recognizing the vital role flashing plays in preventing water damage. When assessing claims, they now carefully examine the quality of the flashing, often denying coverage if they find faulty installation contributed to the problem. This highlights the long-term financial impact of your flashing choices. Investing in quality flashing and professional installation upfront can save you a lot of money and stress down the road.
Beyond the Metal Strips: A System Approach
It’s important to understand that roof tile flashing is more than just “metal strips.” It’s a complete water management system, a carefully designed and installed network of components working together to protect your home from water intrusion. By understanding the science and strategy behind flashing, you’ll be better prepared to make smart decisions that safeguard your investment and avoid costly surprises. This knowledge also empowers you to ask the right questions during roof inspections or renovations, ensuring your contractor gives this often-overlooked but crucial element the attention it deserves.
Skylight Roof Tile Flashing: Where Dreams Meet Reality
Skylights. They promise bright, airy rooms, transforming a regular space into something special. But they also poke a hole in your roof’s armor, its main defense against the elements. That’s where skylight roof tile flashing steps in – the specialized protection for this vulnerable spot.
The Bathtub Effect: A Hidden Danger
Imagine your bathtub with a leaky seal. Water sneaks in, hiding and causing damage before you even notice. This “bathtub effect” is what can happen with poorly installed skylight flashing. Water pools on the roof deck, silently rotting the timber and leading to costly, hidden damage. This can go undetected for years. Australia’s frequent roof leaks underscore the need for strong flashing. Products like Wakaflex flashing tape offer a flexible, long-lasting solution. Discover more insights.
The Art of Layering: A Critical Sequence
Think of effective flashing as a waterproof sandwich. Each layer plays a crucial role in diverting water. The underlayment is your first line of defense. Then comes the step flashing, guiding water down the skylight’s sides. The head flashing protects the top, and the apron flashing covers the bottom. Getting this sequence right makes the difference between a professional installation and a future disaster.
Recognizing the Red Flags: Early Detection Saves Thousands
Spotting flashing problems early can save you a fortune. Check inside and outside for dampness or discoloration around the skylight. Look for cracks or gaps in the sealant. These small issues can be warnings of bigger problems lurking beneath the surface. Catching them early means smaller, less costly repairs.
The Cost of Cutting Corners: Short-Term Savings, Long-Term Pain
Skipping on quality flashing to save money upfront? It’s like buying cheap shoes – they wear out fast, costing you more in the long run. Investing in quality flashing and professional installation pays off. It’s peace of mind, knowing your skylight will keep enhancing your home for years to come. Don’t risk the consequences of neglecting proper flashing – they’re just too significant.
Decoding The Different Players In Your Flashing Team
Think of your roof like a well-oiled machine. Every part has a specific job, and if one component fails, the whole system can be compromised. Roof tile flashing is a crucial part of that machine, acting as a specialized defense against water intrusion. Just like a sports team needs different players for different positions, your roof needs different flashing types for different areas.
Flashing Types: Specialized Tools for Specific Jobs
- Step flashing: Imagine these as little overlapping shields guarding the vulnerable spots where your roof meets a wall, like around a chimney or dormer. Each piece overlaps the one below, channeling water down the wall like a cascading waterfall. This prevents water from sneaking in behind the siding.
- Valley flashing: This is the heavy-duty, W-shaped flashing installed in the valleys of your roof, where two slopes converge. Think of it as a riverbed, directing the flow of water (often a large volume) down towards your gutters.
- Ridge flashing: Crowning the peak of your roof, ridge flashing protects the highest and most exposed point from wind-driven rain and debris. It’s like a protective cap, sealing off this vulnerable area from the elements.
- Penetration flashing: Anything that pokes through your roof, like vents, pipes, or skylights, needs its own custom-fitted flashing. This type of flashing seals around these penetrations, creating a watertight barrier and preventing leaks around these critical points.
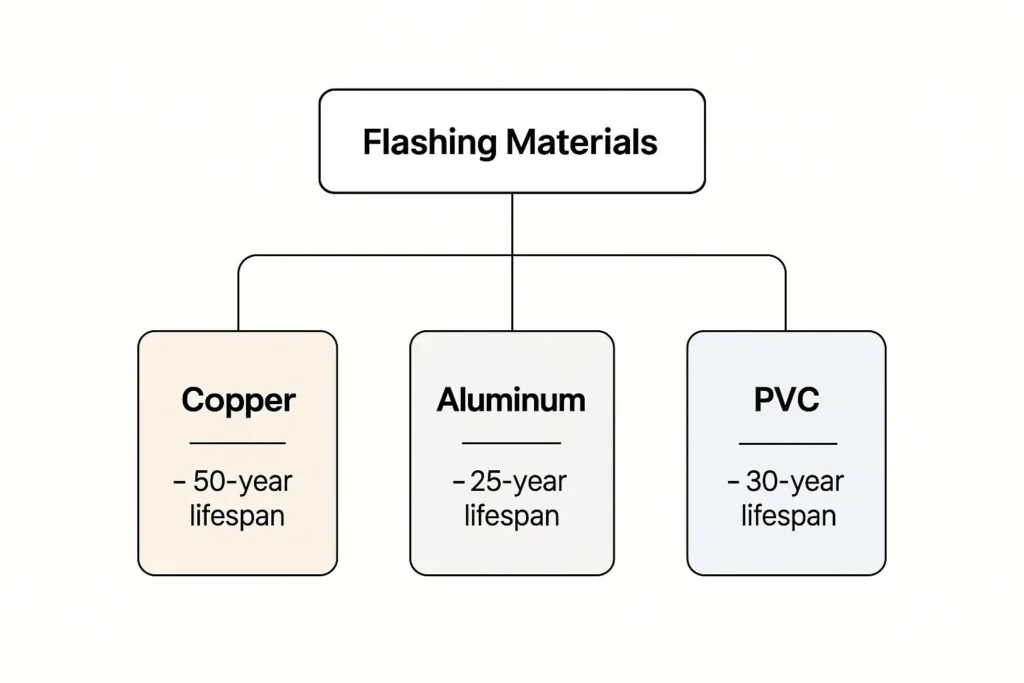
The infographic above provides a snapshot of the expected lifespans of three common flashing materials: copper, aluminum, and PVC. Copper stands out for its remarkable longevity, while PVC and aluminum offer solid performance, albeit with shorter lifespans. Choosing the best material involves balancing factors like budget, local climate conditions, and the type of tile on your roof.
Skylight Flashing: A Special Case
Skylights, while beautiful, are particularly prone to leaks if the flashing isn’t installed with precision. They are essentially intentional openings in your roof, requiring meticulous flashing to keep the weather out. Improperly installed skylight flashing can lead to the dreaded “bathtub effect,” where water pools around the skylight, causing hidden damage to your roof deck.
The Tile-Flashing Partnership
Different tile materials, like terracotta, concrete, and slate, each have unique properties that influence flashing choices and installation. For instance, heavier concrete tiles require more robust flashing support, while the brittle nature of terracotta tiles demands extra care during installation. A seasoned roofer understands these nuances and will select the right flashing and installation method for your specific tile type.
To help you choose the right flashing for your roof, here’s a handy table summarizing the key features of each type:
Roof Tile Flashing Types And Their Superpowers
Understanding which flashing type works best for different roof situations and tile materials
| Flashing Type | Primary Mission | Best Tile Partners | Installation Challenge | Longevity Rating |
|---|---|---|---|---|
| Step Flashing | Protecting wall-roof intersections | Most tile types | Ensuring proper overlap and sealant | Moderate to High (depending on material) |
| Valley Flashing | Channeling water in roof valleys | All tile types, especially in areas with heavy rainfall | Achieving correct W-shape and secure fastening | Moderate to High (depending on material) |
| Ridge Flashing | Shielding the roof peak from wind and rain | All tile types | Securing against strong winds | Moderate to High (depending on material) |
| Penetration Flashing | Sealing around roof penetrations (vents, pipes, skylights) | All tile types | Creating a watertight seal around irregular shapes | Moderate to High (depending on material) |
This table offers a quick reference to help understand the roles and challenges associated with each type of flashing. Remember, the specific requirements for your roof will depend on a variety of factors.
Recognizing Quality Flashing Work
You can usually spot a good flashing job by looking for clean, overlapping joints, securely fastened with the correct nails or sealant. There shouldn’t be any visible gaps or exposed nail heads. Signs of poor workmanship include uneven lines, loose flashing, and excessive sealant – all potential red flags for future leaks.
By understanding the different types of roof tile flashing and their specific roles, you’re better equipped to protect your home from water damage and make informed decisions when hiring a roofing contractor. You’ll also know the right questions to ask, ensuring they develop the best flashing strategy for your roof and climate.
Choosing Materials That Survive Australia’s Mood Swings
Australia’s climate is a real rollercoaster for roofs. Think scorching summers, sudden downpours, and that relentless coastal salt spray – it’s a constant test. And one of the most vulnerable parts of your roof? The roof tile flashing. Choosing the right flashing material isn’t just about looks; it’s about ensuring your roof lasts for decades, not just a few years.
From Lead to Modern Marvels
Back in the day, lead was the go-to for flashing. But we’ve learned a lot since then about its environmental impact. Now, lead’s been phased out in Australia, and we’ve moved on to safer, more durable alternatives. This shift highlights just how important it is to choose modern, effective flashing to prevent leaks. Read more about common roofing issues in Australia. These days, materials like aluminium, copper, zinc, and various synthetic options are leading the charge. Each material has its own pros and cons, especially when facing Australia’s unique climate challenges.
Let’s take a closer look at how these materials perform in the real world:
To help you visualize the performance of these materials, check out this table:
How Flashing Materials Handle Australia’s Climate Extremes
This table shows real-world performance data for different flashing materials across Australian climate zones. It helps you understand which material is best suited for your specific location.
| Material | Tropical Performance | Temperate Durability | Arid Resistance | Coastal Survival | Expected Lifespan | Investment Level |
|---|---|---|---|---|---|---|
| Aluminium | Good | Excellent | Excellent | Fair (with proper coating) | 20-40 years | Moderate |
| Copper | Excellent | Excellent | Excellent | Excellent | 50+ years | High |
| Zinc | Excellent | Excellent | Excellent | Good | 40-80 years | High |
| PVC | Good | Good | Good | Fair | 15-30 years | Low |
| EPDM | Good | Good | Excellent | Fair | 20-30 years | Moderate |
As you can see, copper and zinc offer exceptional longevity, while aluminum provides a good balance of performance and cost. Synthetics like PVC and EPDM are more budget-friendly but may need replacing sooner.
Aluminium: Lightweight Champion
Aluminium is a popular choice because it’s lightweight and resists corrosion. But, in coastal areas, that salty air can still cause problems. High-quality coatings are essential to help it last longer in these harsh conditions. For inland areas, it’s a great option, offering a good balance of affordability and durability.
Copper: The Timeless Classic
Copper, with its beautiful green patina, is a premium choice known for its exceptional lifespan. It’s highly resistant to corrosion and can handle almost anything the Australian climate throws at it, from coastal salt spray to intense UV radiation. It’s a fantastic option for coastal homes, but keep in mind, the initial cost is higher.
Synthetics: The Rising Stars
Synthetic flashing materials, like PVC and EPDM (ethylene propylene diene monomer), offer great UV resistance and flexibility, making them ideal for sunny locations. They’re also lightweight and easy to install, but they might not last as long as metal options. These materials are becoming more and more popular in Australia because they handle those extreme temperature swings so well.
Thermal Cycling and Material Fatigue
Imagine bending a metal ruler back and forth. Eventually, it weakens and snaps. The same thing happens to flashing. The constant expansion and contraction caused by temperature changes can lead to thermal fatigue, especially in materials like aluminium. Choosing materials with high thermal stability is essential for ensuring they last.
Chemical Reactions: Tile Compatibility
It’s important to remember that not all flashing materials get along with all tile types. For example, copper can react with certain concrete tiles, causing staining or corrosion. Understanding these potential chemical reactions is key to avoiding costly and unsightly issues down the line. Your roofer should be aware of these compatibilities to ensure the best combination for your roof.
Choosing Wisely: Beyond the Price Tag
When choosing flashing, it often comes down to balancing the upfront cost with long-term value. Some materials might seem cheaper initially, but their shorter lifespan and potential for problems can end up costing you more in the long run. Investing in high-quality flashing, particularly in vulnerable areas like skylights, is a wise decision that protects both your home and your wallet. Correctly installed skylight roof tile flashing is absolutely essential. A poorly flashed skylight is just asking for leaks, and in Australia’s climate, that can be a disaster.
By considering these factors, you can choose roof tile flashing materials that not only stand up to Australia’s tough climate but also protect your home for years to come. Remember, your roof is your first line of defense against the elements. Investing in quality flashing is an investment in the long-term health and value of your home.
Installation Secrets That Separate Pros From Pretenders

Roof tile flashing that stands the test of time, lasting decades instead of just a few years, often hinges on the finer points. These seemingly minor details, however, become crucial in the long run. Think of it like a well-oiled machine – every cog and gear, no matter how small, plays a vital role in its smooth operation. Similarly, overlooking small but important steps during flashing installation can set the stage for costly repairs down the line.
The Right Tools for the Job: No Shortcuts Allowed
Professional roofers know the value of using the right tools. They invest in specialized equipment built for precision and longevity. They’re like skilled surgeons – the right instruments are crucial for a successful operation. For example, they use specialized tin snips for crisp, clean cuts, avoiding jagged edges that invite rust and compromise the flashing. An amateur, on the other hand, might reach for a utility knife, creating weak points vulnerable to the elements.
The Sequence of Success: Order Matters
Just like following a recipe, the order in which flashing is installed matters significantly. Consider skylight roof tile flashings. These require a precise layering process. The underlayment acts as the foundation, followed by the step flashing, then the head flashing, and finally, the apron flashing. Each layer overlaps the one below, like shingles on a roof, creating a waterproof barrier. Disrupting this order, even slightly, can leave gaps where water can sneak in. Vivid Skylights provides details on their specialized skylight flashing kit if you’re interested in learning more about the specifics.
Quality Checkpoints: The Pro’s Eye
Experienced contractors have a trained eye for detail. They’re constantly checking their work, ensuring proper overlap, secure fastenings, and no exposed nails. They are meticulous in their process because it saves on potential issues later. They aren’t just installing flashing; they’re building a shield against the weather.
Red Flags: What to Watch Out For
You, too, can spot signs of trouble. Uneven lines, loose flashing, and excessive sealant are red flags indicating potential problems. It’s like noticing a crack in a building’s foundation – a small sign that could indicate larger structural issues. Similarly, these visual cues on your roof warrant immediate attention.
DIY vs. Professional: Knowing Your Limits
While small flashing repairs might be a DIY project, complex installations around skylights and chimneys are best left to the experts. It’s like trying to fix your car’s engine after watching a few online tutorials – you might do more harm than good. Professional roofers have the knowledge, experience, and tools to ensure proper installation, giving you lasting protection and peace of mind.
The Cost of Mistakes: A Stitch in Time Saves Nine
Ignoring flashing problems, no matter how minor, is like ignoring a small cavity – it will only get worse and more expensive to fix. A tiny leak can lead to extensive damage to your roof deck, insulation, and even your interior. Addressing the issue early is far more economical than dealing with major water damage later.
By understanding these installation secrets, you can ensure your roof tile flashing provides the protection your home deserves. It’s about more than keeping the rain out; it’s about safeguarding your investment for years to come.
Reading Your Roof Like A Professional Inspector
Think about how you hang Christmas lights – carefully considering placement and securing each bulb. Installing roof tiles and flashing is similar. It’s a detailed process, and understanding those practices is key to reading your roof like a pro. The best roof inspectors have a knack for spotting potential issues long before they turn into visible leaks. They’re like detectives, deciphering subtle clues that predict future failures. Let’s explore how they do it.
Spotting the Subtle Clues
Picture a detective at a crime scene, meticulously searching for the tiniest details. A roof inspector operates in much the same way. Rust stains, cracked sealant, or a slightly lifted nail head – these seemingly insignificant issues can be early warning signs. They’re like whispers of bigger problems brewing, such as water damage to your roof deck or insulation. Catching these early allows for simpler, less expensive repairs, preventing small issues from ballooning into major emergencies.
The Seasonal Check-Up: Your Roof’s Health Routine
Just like your car needs regular maintenance, your roof thrives on seasonal check-ups. Professional property managers understand this, adhering to strict schedules for their commercial buildings. Borrow this strategy for your own home with spring and autumn inspections. Spring reveals any damage from winter storms, while autumn preps your roof for the impending rain. This routine can dramatically extend the lifespan of your roof and its flashing. For example, clearing your gutters and downpipes prevents water from accumulating, which in turn reduces stress on the flashing and minimizes the risk of leaks.
Weathering vs. Deterioration: Knowing the Difference
There’s a difference between normal wear and tear and actual damage. Think of it like wrinkles – some are just signs of aging, others might signal a deeper issue. Similarly, a bit of fading on your flashing is normal aging, but cracks, rust, or loose sections are red flags. Understanding this distinction helps you prioritize repairs and avoid spending money unnecessarily. In Australia, roof leaks are a common problem, often caused by damaged tiles, cracked flashing, or improperly sealed penetrations. The Australian climate, with its heavy rainfall, intense sun, and occasional storms, can exacerbate these problems. Find out more about common roof problems.
The Bigger Picture: How Surrounding Elements Affect Flashing
Your roof isn’t isolated. Things like overhanging trees, nearby buildings, and even the direction your house faces can impact your flashing. Overhanging branches can scrape against it, causing damage and creating openings for water. Tall buildings can create wind tunnels, intensifying the force of rain against your roof and stressing the flashing. Considering these factors gives you a more complete picture of your roof’s vulnerabilities.
Skylight Flashing: Extra Vigilance Required
Skylight roof tile flashing demands special attention. Because skylights create an opening in your roof, their flashing needs to be perfectly installed to prevent leaks. Regularly check the flashing around your skylights, looking for any signs of damage or wear. Pay close attention to the sealant. Catching small problems early can save you from major water damage to your ceiling and interior. Knowing what to look for empowers you to address issues before they become costly repairs.
Your Complete Action Plan For Flashing Success
Think of your roof’s flashing like the waterproof seals on a boat. It’s crucial for keeping the elements out and protecting your investment. This action plan is your navigation chart, guiding you through building, renovating, or simply keeping your current roof in top shape.
Proactive Maintenance: Small Steps, Big Impact
Just like regular car maintenance prevents breakdowns, consistent roof checks keep small issues from becoming costly repairs. Here’s your simple maintenance checklist:
- Biannual Inspections: Inspect your roof twice a year, in spring and autumn. Look for anything out of the ordinary: cracked sealant, rust, loose flashing, or piled-up debris.
- Gutter Cleaning: Clean gutters and downpipes regularly. Clogged gutters can cause water backups, putting extra stress on your flashing. Think of them as your roof’s drainage system – keep them clear for optimal performance.
- Trim Overhanging Branches: Overhanging branches can scratch and damage your flashing. Regular trimming prevents this wear and tear.
- Sealant Check: Check the sealant around your flashing every year. If it’s cracked or worn, reapply to maintain a watertight seal. This is like caulking around your bathtub – a small effort that makes a big difference.
Professional Consultation: When to Call in the Experts
Sometimes, you need a specialist. Just as you’d see a doctor for a persistent cough, certain roof issues require a professional roofer:
- Visible Leaks: Any water inside your house signals a problem. Don’t wait – address it immediately.
- Extensive Rust or Corrosion: Significant rust or corrosion means it’s time for professional repair or replacement.
- Loose or Damaged Flashing: Loose, damaged, or missing flashing needs a professional’s touch to prevent further damage.
- Skylight Issues: Skylight flashing is complex. Any leaks or damage around a skylight should be handled by a qualified installer. For more on skylight installation: Understanding Skylight Installation Costs
Building and Renovations: Planning for Long-Term Success
Building or renovating? Think of flashing as a key investment in your home’s future. Consider these factors:
- Material Selection: Choose durable, high-quality flashing materials that suit your roof tiles and local weather.
- Professional Installation: Professional installation ensures a proper, watertight seal. Correctly installed skylight roof tile flashings are especially important for preventing leaks.
- Warranty: A good warranty offers peace of mind and protects your investment.
Budget Planning: Protecting Your Investment
Include flashing maintenance and potential replacement in your home maintenance budget. Regular checks and small repairs are much cheaper than fixing major water damage later. Think of it as an investment in preventing future headaches. Consider setting aside a small amount each year for potential flashing work.
By following this action plan, you’re taking proactive steps to protect your home from water damage and extend the life of your roof. Remember, a little preventative maintenance can save you significant money and stress down the road.
Ready to bring more natural light into your home? Explore high-quality skylights and flashing solutions at Vivid Skylights.