
Planning Your Roof Window Project Like a Pro
Installing a roof window, much like the elegant designs offered by Vivid Skylights, can dramatically brighten and transform any room. However, jumping into the project without careful planning can lead to unnecessary expenses and frustration. A well-defined plan is the key to a successful roof window installation.
Assessing Your Roof’s Structure
Before considering window placement, it’s vital to assess your roof’s structural integrity. This involves inspecting the condition of your rafters, insulation, and roofing material. Look for any signs of damage, rot, or weakness. This initial check confirms your roof can support the added weight and structural adjustments. Addressing potential problems early avoids unexpected issues during the project.
Choosing the Perfect Spot for Your Roof Window
Placement is crucial for maximizing a roof window’s effectiveness. Consider your roof’s orientation to optimize sunlight. North-facing roofs typically receive consistent light throughout the day. East-facing roofs are perfect for catching the morning sun. Also, factor in the room’s layout and furniture arrangement to ensure optimal light distribution and minimize glare.
Navigating Building Regulations and Technical Considerations
Technical aspects are essential for roof window installations in Australia. For windows installed 3 meters or more above the floor, laminated glass is generally required. This ensures safety and compliance with local building codes. When installing multiple units, maintain a minimum spacing of 100 mm between them, whether side-by-side or above and below. This spacing ensures proper sealing and prevents water leakage. For roofs with a pitch below 15°, roof windows should be raised to 15° with custom flashing for correct installation and leak prevention. Learn more about these regulations and recommendations here. These guidelines ensure safety and long-term performance, protecting your investment.
Creating a Realistic Timeline and Budget
Finally, create a realistic timeline and budget. Include the time required for permits, ordering materials, and the installation itself. Consider your skill level and whether you’ll need professional help for certain tasks. A detailed timeline keeps the project on schedule. Accurate budgeting prevents overspending and allows for unexpected costs. Careful planning ensures your roof window project is a smooth, successful experience.
Understanding True Costs and Smart Budgeting

Nobody wants budget surprises, especially with home renovations like installing a roof window. Knowing the full cost upfront is key to avoiding financial stress and ensuring a smooth project. This means looking beyond the sticker price of the window itself.
Factoring In The Variables
Several factors influence the final cost. Your roof’s complexity, the material it’s made of (like tiles or metal), and the window’s size and type all contribute. Difficult access or necessary structural modifications can also add to the expense. These hidden costs often catch homeowners by surprise.
The price of installing roof windows in Australia varies significantly. Standard Vivid Skylights can range from $1,200 to $3,500, while complex installations can easily top $5,000. This variability emphasizes the importance of getting project-specific quotes.
Budgeting For The Unexpected
Beyond the window and installation, budget for flashing materials for a watertight seal. Structural work, like reinforcing rafters, might be necessary. Include tool rental (for DIY projects) or contractor fees for professional installation. Even weather delays can impact your budget.
To help you estimate potential costs, we’ve compiled the following table:
Roof Window Cost Comparison by Type and Complexity
A detailed breakdown of costs for different roof window types, sizes, and installation scenarios to help with accurate budgeting
| Window Type | Size Range (mm) | Material Cost | Installation Complexity | Total Estimate |
|---|---|---|---|---|
| Fixed Skylight | 650 x 900 | $600 – $800 | Basic | $1,200 – $1,800 |
| Fixed Skylight | 950 x 1200 | $700 – $1,200 | Basic | $1,700 – $2,500 |
| Operable Skylight | 650 x 900 | $800 – $1,500 | Moderate | $2,000 – $3,500 |
| Operable Skylight | 950 x 1200 | $1,200 – $2,000 | Moderate | $2,800 – $4,500 |
| Roof Window with Blinds | 750 x 1900 | $1,500 – $3,000 | Complex | $4,000 – $6,000+ |
As you can see, the total cost depends heavily on the type and size of the window, as well as the complexity of the installation. Remember that these are estimates, and your final cost may vary.
Making Smart Choices
You can manage costs strategically. Sourcing quality materials at competitive prices makes a difference. While budget-friendly options are tempting, investing in premium materials can prevent future problems. Creating a budget buffer for unexpected expenses is also wise, allowing you to handle surprises without derailing your project. Careful planning and research allow you to control costs and ensure a professional, high-quality installation. This gives you peace of mind and a beautiful new roof window to enjoy for years to come.
Essential Tools and Materials That Make the Difference

Having the right tools and materials is key for a successful roof window installation. This guide outlines everything you need, from essential power tools to the correct sealant, helping you achieve professional results.
Must-Have Tools
These tools are absolutely essential for fitting a roof window:
- Reciprocating Saw: This is vital for cutting through existing roofing materials.
- Circular Saw: A circular saw is essential for making clean, straight cuts in timber.
- Drill/Driver: Use this for securing the window frame and flashing.
- Measuring Tape: Precise measurements are critical for a proper fit.
- Spirit Level: A spirit level ensures your window is perfectly level.
- Safety Glasses and Gloves: Protect yourself from debris and sharp edges.
- Ladder and Scaffolding (if needed): Safe access to the roof is paramount.
Material Checklist
The right materials are just as crucial as the tools. Here’s what you need:
- Roof Window Unit: Choose the correct size and style for your roof. Vivid Skylights offers a range of options for Australian homes.
- Flashing: Use flashing designed for your specific roofing material (tiles, metal, etc.) to ensure a watertight seal.
- Sealant: High-quality sealant adds extra protection against leaks.
- Fasteners: Use corrosion-resistant screws designed for roofing.
- Insulation: Proper insulation around the window maximizes energy efficiency.
Smart Sourcing and Substitutions
While specialized tools are often preferred, some alternatives can suffice. A standard drill can sometimes replace an impact driver, for example.
However, for flashing and sealant, invest in high-quality, purpose-built products. This will prevent leaks and avoid costly repairs later.
Researching and comparing prices is essential. Consider borrowing or renting expensive tools you won’t use often. Maintaining your tools properly extends their lifespan and improves performance.
Keep spare materials on hand. Having backups for essential items can prevent project delays and frustration if something breaks or runs out.
Safety Protocols That Actually Work

Working on a roof, particularly when installing a roof window, can be dangerous. Overlooking seemingly minor details can lead to significant problems. This section delves into the important safety measures experienced roofers follow, going beyond the basics of ladder safety.
Risk Assessment and Planning
Before you even think about climbing onto your roof, a comprehensive risk assessment is essential. Identify potential hazards such as power lines, weak spots in the roof structure, and areas that might be slippery. Careful planning of your movements and having the necessary tools at hand minimizes unnecessary risks.
Essential Safety Equipment
Investing in the right safety equipment is crucial. This includes a secure safety harness attached to a dependable anchor point, non-slip roofing boots, and sturdy scaffolding to provide a stable work platform. Durable gloves offer essential hand protection when handling materials and tools. Don’t forget safety glasses or other eye protection to shield your eyes from debris.
Weather Considerations
Working in bad weather significantly increases the danger. High winds, rain, or excessive heat can create unsafe conditions. It’s always best to postpone your installation if the weather is unfavorable. While this might be inconvenient, it’s the safest course of action. For more information about weatherproofing, check out this helpful guide: How to master skylight flashing.
The Buddy System
Having a capable helper is invaluable for roof work. They can assist with lifting and positioning the roof window, offer a second set of eyes for safety checks, and be there to help in case of an emergency. Clear communication between you and your partner is vital for a smooth and safe installation.
Emergency Procedures
Knowing what to do in an emergency is paramount. Keep a well-stocked first-aid kit easily accessible and make sure everyone knows where it is. Establish clear communication methods in case someone needs to call for assistance. Preparation for unforeseen events is key to minimizing potential injuries. Finally, knowing when to call in the professionals is crucial. If you encounter unexpected structural issues or feel uncomfortable with any aspect of the process, don’t hesitate to seek professional help. This can save you time, money, and stress in the long run.
Step-by-Step Installation That Works Every Time
Now for the main event – installing your new roof window. This guide provides clear, manageable steps to help you through the process. We’ll cover everything, from the initial measurements to achieving a weathertight seal, giving you confidence every step of the way.
Preparing the Roof Opening
Accurate measurements are essential. Double-check your measurements against the window frame’s dimensions before marking the opening on your roof. Before you begin, remember safety first. Review general construction safety guidelines, much like these drone safety tips. Consider the manufacturer’s recommended clearances. For instance, Vivid Skylights usually recommends a specific clearance around the frame to accommodate the flashing and allow for expansion and contraction due to temperature changes. Carefully cut along your marked lines, using the appropriate saw for your roofing material. A reciprocating saw works well for most, while a circular saw might be better for timber. Clean any debris from the opening for a flush fit.
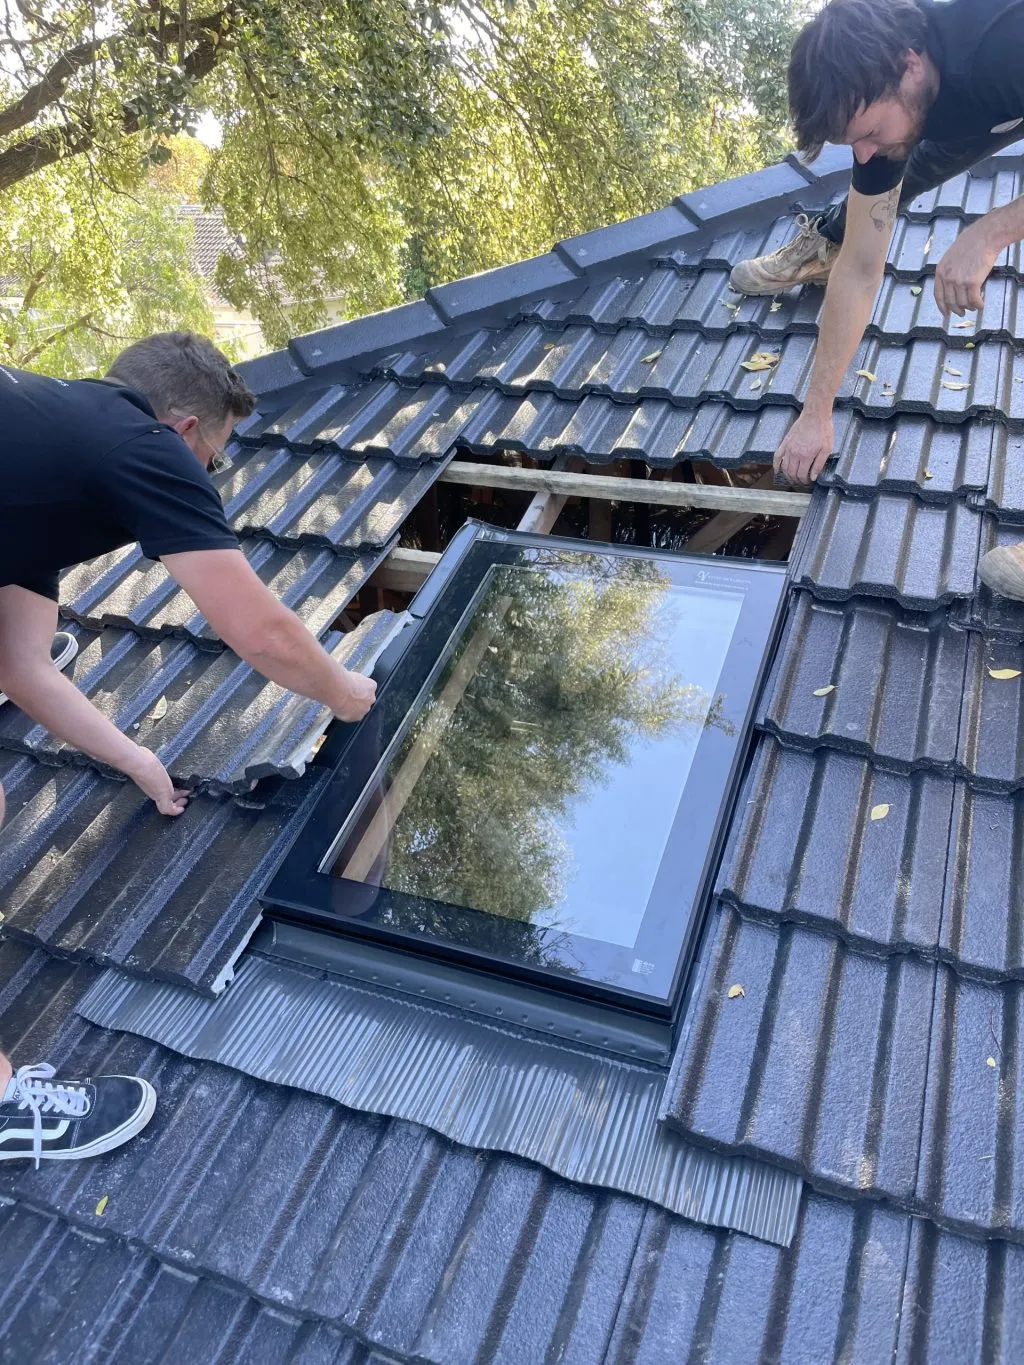
Positioning and Securing the Frame
This infographic demonstrates the key steps involved in fitting the frame:
The infographic emphasizes precise alignment and even screw spacing for a secure and stable installation, while maintaining the important expansion gap. Once the frame is aligned, secure it with 12 evenly spaced screws, as shown. Maintain the recommended 5mm expansion gap around the frame. This gap allows the window to expand and contract with temperature changes, preventing stress and potential leaks. You might find this helpful: How to master skylight installation.
Installing the Window and Flashing
Carefully lift the window unit into the frame. You may need help depending on its size and weight. Secure the window as per the manufacturer’s instructions, ensuring a snug fit. Install the flashing next. This creates a weathertight seal between the window and the roof. Ensure the flashing is compatible with your roofing material (tiles, metal, etc.) and is installed correctly to prevent leaks. Vivid Skylights offers flashing kits designed for tiled roofs, simplifying this step. Apply a high-quality sealant around the flashing edges for additional weather protection.
Insulation and Interior Finishing
Proper insulation is crucial for preventing heat loss and condensation. Install insulation around the window frame, ensuring a complete seal to maximize energy efficiency. For the interior finish, fit any provided trim or finishing pieces. This adds a polished look and completes the installation.
The following table outlines the installation process, providing estimated timelines, key tasks, quality checks, and common issues that may arise:
Installation Timeline and Key Milestones
A practical schedule showing typical timeframes for each installation phase and critical checkpoints for quality assurance
| Installation Phase | Estimated Time | Key Tasks | Quality Checks | Common Issues |
|---|---|---|---|---|
| Preparing the Roof Opening | 1-2 hours | Measuring, marking, cutting the opening, cleaning debris | Verify measurements, ensure clean opening | Incorrect measurements, damage to roofing material |
| Positioning and Securing the Frame | 1-2 hours | Aligning and securing the frame, maintaining expansion gap | Check frame stability, verify expansion gap | Uneven frame, incorrect screw placement |
| Installing the Window and Flashing | 2-3 hours | Lifting and securing the window, installing flashing, applying sealant | Check window fit, ensure flashing is sealed correctly | Damaged window, incorrect flashing installation |
| Insulation and Interior Finishing | 1-2 hours | Installing insulation, fitting trim and finishing pieces | Check insulation coverage, ensure trim is fitted correctly | Insufficient insulation, gaps in trim |
This table helps you stay organized and ensures a successful installation. Remember to consult the manufacturer’s instructions for specific details related to your window model.
Finally, check for gaps or leaks. Pour water over the installed window to simulate rain and check for any water entry. Address any leaks immediately to prevent damage. These steps will ensure a long-lasting, professional-quality installation that enhances your home.
Weatherproofing and Maintenance That Lasts
Proper weatherproofing is the key to a long-lasting roof window. A shoddy DIY job might leak after a few months, but a well-executed installation can last for decades. This longevity comes from meticulous attention to detail, especially when it comes to flashing and sealant. These crucial components ensure your roof window stands strong against Australia’s often harsh weather.
Flashing Fundamentals For a Watertight Seal
Flashing, the material installed around your window frame, is essential for directing water away from the opening. Because different flashing types are designed for different roofing materials (tiles, metal sheeting, etc.), it’s important to choose the right one for your roof. Vivid Skylights offers flashing kits specifically designed for tiled roofs, making the selection process much easier. Correct installation is also vital. Ensure the flashing overlaps properly and is securely fastened to prevent leaks.
Sealant Strategies for Long-Term Protection
Sealant adds another layer of defense against the elements. Applying a high-quality, flexible sealant around the flashing’s edges creates a watertight barrier. Look for a sealant formulated specifically for roofing. It should be able to withstand temperature changes and UV exposure to maintain its effectiveness over time.
Integrating with Your Roof’s Drainage
When installing your roof window, consider your roof’s existing drainage system. Avoid placing the window in a spot where water tends to pool. Instead, integrate the window seamlessly into the roofline, allowing water to flow around it without obstruction. If your roof has a shallower pitch, raising the window can create the necessary slope for proper drainage.
Maintaining Your Investment Through Regular Care
Like any part of your home, your roof window needs regular maintenance. Seasonal inspections are crucial. Look for signs of wear and tear, such as cracked sealant, damaged flashing, or loose screws. Addressing these minor issues promptly can prevent bigger, more costly problems down the line.
Cleaning and Lubrication Best Practices
Regular cleaning keeps your roof window looking its best and maximizes light transmission. It also prevents the buildup of dirt and grime that can damage the glass. Use gentle cleaning solutions and avoid abrasive materials that might scratch the surface. Don’t forget to lubricate moving parts, such as hinges and opening mechanisms, to ensure smooth operation.
By following these maintenance tips, you can significantly extend the life of your roof window. Enjoy the benefits of natural light and ventilation for years to come. Always consult your manufacturer’s guidelines for specific maintenance instructions and warranty information.
Maximizing Performance and Energy Benefits
Your new roof window is more than just a window; it’s an investment in your home’s comfort, light, and energy efficiency. Getting the most out of its performance and energy-saving potential is essential. Let’s explore how to optimize your roof window for maximum benefit year-round. For more insights, check out this helpful resource: How to master skylight energy efficiency.
Optimizing Natural Light and Ventilation
Positioning is crucial for maximizing natural light. Consider your room’s layout and roof direction. A north-facing roof receives consistent light throughout the day, while east-facing roofs are ideal for capturing the morning sun. For rooms needing more light, a larger roof window or multiple units can be strategically placed.
A roof window in a hallway can brighten a dimly lit space, while one in a living room can reduce the need for electric lights during the day. Operable roof windows provide excellent ventilation, bringing in fresh air and regulating temperature. This airflow can lessen reliance on air conditioning, particularly during milder months.
The Impact of Glazing Options on Energy Efficiency
Your roof window’s glazing significantly impacts its energy performance. Double-glazing, standard in Vivid Skylights, provides excellent insulation, keeping your home warmer in winter and cooler in summer. This reduces reliance on heating and cooling systems, leading to energy savings and lower bills.
Some roof windows offer specialized coatings for enhanced energy efficiency. Low-E coatings reflect heat back into the room during winter and prevent heat from entering during summer, optimizing energy usage. Adding blinds or shades provides further control over light and heat.
Integration With Smart Home Technology
Modern roof windows can integrate with smart home systems for optimal control. Automated opening and closing based on weather or time of day maximizes ventilation and energy efficiency. You could program your roof window to open in the morning for fresh air and close during peak sun to reduce heat gain.
Some systems include rain sensors that automatically close the window when it rains, protecting your home. This smart home integration simplifies roof window management and boosts energy savings.
Measuring the Real-World Benefits
Roof window installations are becoming increasingly popular in Australia for their natural light and energy efficiency benefits. Over 4.9 million Australian households have air conditioners, impacting energy consumption and carbon footprints. Roof windows can help reduce these costs.
Vivid Skylights for example, can reduce the need for electric lights, lowering energy bills and carbon emissions. Learn more about the benefits of roof windows. Track your energy usage before and after installation to see the difference.
Upgrading for Enhanced Performance
Consider upgrading your roof window for even better performance. Upgraded glazing, automated blinds, and smart home integration enhance energy efficiency, comfort, and convenience. While upgrades have upfront costs, the long-term return on investment through lower energy bills and increased home value makes them worthwhile.
Ready to transform your home with natural light and superior ventilation? Explore the range of high-quality roof windows from Vivid Skylights today!