

A back tray flashing is one of those unsung heroes of a leak-proof roof. Put simply, it’s a custom-made channel designed to steer water safely around a roof penetration, like a skylight. When you’re installing a skylight on a metal roof, using a back tray flashing is the most secure way to prevent any leaks because it actively manages where the water goes.
This clever design stops water from damming up on the high side of the skylight, which is exactly where simpler flashing setups tend to fail.
Why Back Tray Flashing Is Your Roof’s Best Defence
Picture a big rock sitting in the middle of a flowing creek. As the water hits the front of the rock, it has no choice but to split and go around it. If that creek turns into a raging river, water can start to build up behind the rock, eventually spilling over and carving away at the creek bed. A skylight on your roof presents a very similar challenge for rainwater.
Without a smart diversion system in place, water can pool along the top edge of the skylight frame, probing for any tiny gap or imperfection to sneak through. This is where a back tray flashing really earns its keep. Instead of just slapping on some sealant and hoping for the best, it acts as a purpose-built diversion channel.
Solving the Water Pooling Problem
Think of a back tray as a small, specialised gutter installed at the top side (or “back”) of the skylight. Its entire job is to catch the rainwater running down the roof before it even gets a chance to hit the skylight itself.
From there, the captured water is guided safely into the pans of the adjacent roof sheets, continuing its journey down to your gutters without causing any trouble. This physical redirection is worlds more reliable than relying only on sealants, which can crack, shrink, and fail over time under Australia’s harsh sun and wild weather.
By physically managing water flow, a back tray flashing offers a permanent, engineered solution to leak prevention, rather than a temporary chemical fix. It turns a potential weak point into a fortified part of your roofing system.
A Critical Component for Metal Roofs
This method is absolutely essential for the profiled metal roofs you see all across Australia. Water getting in at roof penetrations is a leading cause of leaks in buildings, and back tray flashings are the frontline defence.
For example, if a skylight or vent blocks more than 50% of a roof sheet pan, building code requires a back tray with dry pans on either side. This setup creates relief channels for water to escape during a massive downpour, preventing the system from getting overwhelmed. You can explore more on the importance of back tray flashings for building integrity to see the full picture. It’s what makes the back tray flashing a non-negotiable part of a durable, leak-free skylight installation.
How a Back Tray Flashing Protects Your Skylight
To really get your head around how effective it is, don’t think of a back tray flashing as just a single piece of metal. It’s more like the heart of a complete waterproofing system. It works hand-in-glove with the side and apron flashings to build an impenetrable barrier around your skylight, something that’s absolutely critical on a metal roof. The whole system is engineered for one specific purpose: to manage water with physical precision.
The back tray itself has a vital job. It completely replaces a section of the roof sheet right behind the skylight. This isn’t just a simple cover; it’s a structural replacement designed to intercept every single drop of rain that would otherwise slam into the skylight’s top edge.
By acting as a purpose-built catchment area, it collects all this runoff and cleverly channels it away from the skylight and down into the deep pans of the neighbouring roof sheets. This proactive redirection is the single most secure way to stop leaks because it gets rid of the risk of water pooling—the number one enemy of any roof penetration.
The Mechanism of Water Diversion
Without a back tray, rainwater running down your roof hits the skylight frame and just stops. This creates a dam effect, letting water build up and put constant pressure on the seals until it eventually forces its way inside. A back tray flashing completely changes this dynamic by creating a path of least resistance for the water to follow. It’s simple physics.
This concept map breaks down the problem of roof leaks and shows how the back tray flashing provides a properly engineered solution.
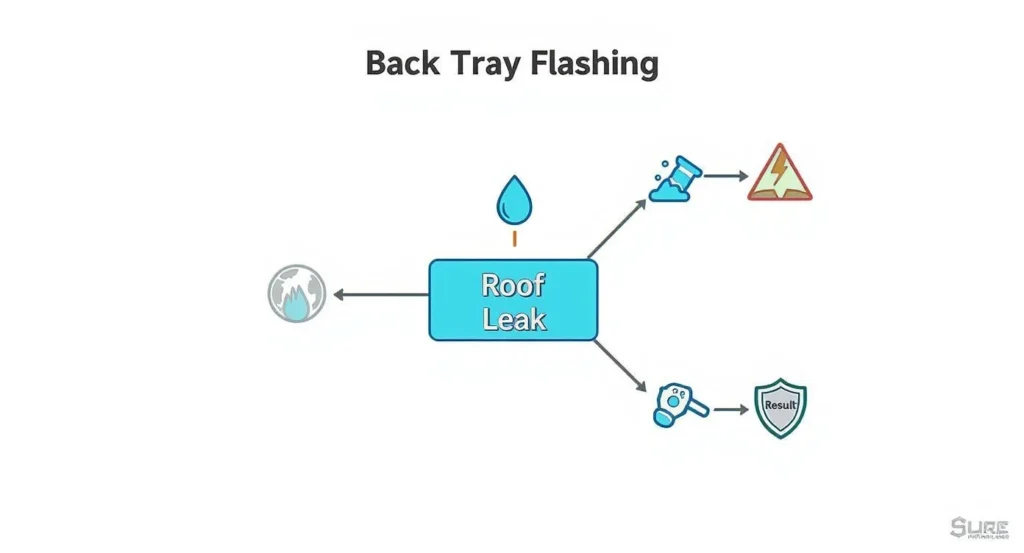
As you can see, the flashing shifts the situation from a potential problem point (pooling) to a secure solution (diversion), giving you lasting protection for your home.
A Standardised Solution for Australian Roofs
This method is so effective that it’s become the gold standard for quality roofing, especially with popular materials like Colorbond. In places like the Sydney Metro area, back tray flashings are a standardised product made specifically for Colorbond roofs. The flashing covers the section behind the skylight, removing the original roof sheet in that spot to guarantee rainwater flows straight into the adjoining pans. This drastically cuts down the risk of pooling. You can discover more insights about these standardised flashing products online.
The core principle is simple but powerful: water is guided by a physical channel, not blocked by a temporary seal. This is exactly why high-quality kits, like those from Vivid Skylights, are designed around this superior, leak-proof method.
This engineered approach means that even during a torrential downpour, water is managed effectively and flows harmlessly down your roof just as it’s meant to. It’s this kind of thoughtful design that gives homeowners real peace of mind.
Choosing the Right Materials for Lasting Protection
A back tray flashing is only as good as the stuff it’s made from. It’s that simple. Picking the right metal isn’t just a minor detail; it’s absolutely critical for long-term performance, especially under the harsh Australian sun and our unpredictable weather. The wrong choice can lead to a world of pain with premature failure and costly repairs down the track.
For the modern metal roofs we see everywhere in Australia, two materials really stand out for their strength and reliability: Colorbond steel and Zincalume. They aren’t popular just by chance. These materials are properly engineered to handle extreme conditions, fight off corrosion, and provide decades of solid protection. This makes them the go-to choice for a component as crucial as a back tray flashing.
The Danger of Galvanic Corrosion
Now, here’s a lesson that too many people learn the hard way: material compatibility is non-negotiable. You absolutely must match the metal of your flashing to the metal of your roof. Mixing the wrong metals—like slapping a galvanised flashing onto a Zincalume or Colorbond roof—is asking for trouble. It kicks off a destructive chemical reaction called galvanic corrosion.
Think of it like creating a tiny, unwanted battery on your roof. When two different metals touch in the presence of moisture (like rain or morning dew), an electrical current is generated. This current rapidly eats away at the “less noble” metal. This process can literally chew holes in your flashing or your roof sheets, causing them to fail years before they should.
The rule couldn’t be simpler: match your materials. Colorbond flashing for a Colorbond roof. Zincalume flashing for a Zincalume roof. Sticking to this one rule is one of the most effective things you can do to prevent your roof from degrading prematurely and to keep it watertight.
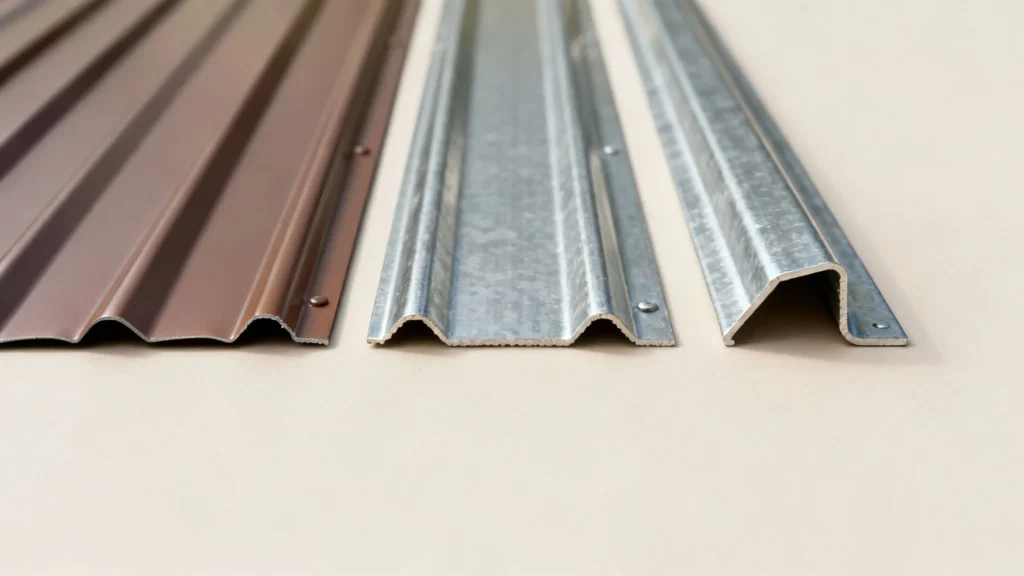
Comparison of Back Tray Flashing Materials
To make the choice clearer, it helps to see how the common materials stack up against each other. Each has its place, but for modern Aussie roofs, there are clear winners.
This table breaks down the pros and cons of the most common materials used for back tray flashings in Australia, helping you choose the best option for durability and compatibility with your roof.
| Material | Pros | Cons | Best For |
|---|---|---|---|
| Colorbond Steel | Superior UV and corrosion resistance, wide colour range to match. | Mid-range cost. | Matching seamlessly with Colorbond roofing for looks and longevity. |
| Zincalume Steel | Exceptional corrosion resistance, very durable. | Lower cost but lacks the colour coating of Colorbond. | Zincalume roofs where a plain metal finish is suitable. |
| Galvanised Steel | Lowest cost. | Prone to galvanic corrosion with Zincalume/Colorbond. | Older, galvanised roofs only. Not for modern metal roofs. |
| Aluminium | Lightweight and naturally corrosion-resistant. | Higher cost and can be less robust than steel options. | Coastal areas or specialised architectural applications. |
Ultimately, for the vast majority of Australian homes with metal roofing, the choice boils down to Colorbond or Zincalume. They provide the right balance of performance, durability, and value, ensuring your skylight installation remains trouble-free for years.
Pre-Fabricated vs. Custom Trays
The final piece of the puzzle is deciding between a pre-made or a custom-fabricated tray.
Pre-fabricated kits, like those that come with a complete skylight flashing kit, are a fantastic option for most standard installations. They’re designed for common roof profiles and skylight sizes, meaning they are cost-effective and engineered to precise specifications for a reliable, watertight fit.
On the other hand, you have custom trays. These are made-to-measure by a sheet metal fabricator or a roofer right on site. This is the way to go for unusual roof profiles, unique skylight dimensions, or complex architectural designs where an off-the-shelf solution just won’t cut it. While a custom tray will cost more, it guarantees a absolutely perfect fit for any tricky situation.
Professional Installation and Australian Standards
Even the most well-crafted back tray flashing is only as good as the hands that install it. When it comes to fitting a skylight on a metal roof, using a back tray is undoubtedly the most secure method for preventing leaks—but only if it’s done right by a seasoned professional. Think of this not as a DIY guide, but as the essential knowledge you need to make sure your roofer is delivering top-tier work.
A truly high-quality, compliant installation is built on sound engineering principles, not temporary fixes like slapping on a tube of silicone. Taking shortcuts, such as just smearing sealant around a roof penetration, is a recipe for disaster down the track. Sealants eventually break down under our harsh Aussie sun and the constant expansion and contraction of roofing materials, basically starting a countdown to your next leak. A professional job relies on mechanical overlaps and precise fastening to create a genuine physical barrier against water.
Non-Negotiable Installation Principles
To guarantee a watertight seal that lasts, installers must stick to the strict guidelines laid out by Australian building authorities. These aren’t just friendly suggestions; they’re the minimum requirements for a safe, durable installation that can handle our nation’s often extreme weather.
A few key elements of a professional job include correct overlaps, sufficient upstand heights, and the clever integration of anti-capillary breaks. An anti-capillary break is a small, folded gap in the flashing that stops water from using surface tension to defy gravity and creep sideways into your roof cavity. It’s a tiny detail that makes a massive difference.
The Victorian Building Authority’s technical guidance is clear: flashings must be securely fastened at intervals not exceeding 500mm and must incorporate anti-capillary breaks. Wall and step flashings need a minimum upstand height of 100mm and have to be chased into the wall by at least 25mm to ensure a truly secure, watertight seal.
Recognising Quality Workmanship
When you’re giving the finished work a once-over, look for clean, crisp lines and a secure, snug fit. The flashing should sit flush against the roof profile and the skylight frame with no visible gaps. All fasteners should be the correct type for the roofing material and installed properly to avoid creating new weak spots for water to get in.
When you’re lining up a pro for roofing work, it helps to understand the full range of comprehensive building services that reputable builders offer. For a more detailed walkthrough of the steps involved in a skylight flashing job, have a look at our complete back tray flashing roof flashing installation guide. It’ll give you a much clearer picture of what a professional, leak-proof installation looks like from start to finish.
Identifying a Failing Flashing Before It’s Too Late
A professionally installed back tray flashing is built to last, but like anything exposed to the Aussie elements, it won’t last forever without a little attention. Catching a small problem early can save you from the massive headache of widespread water damage, mould, and expensive structural repairs down the track.
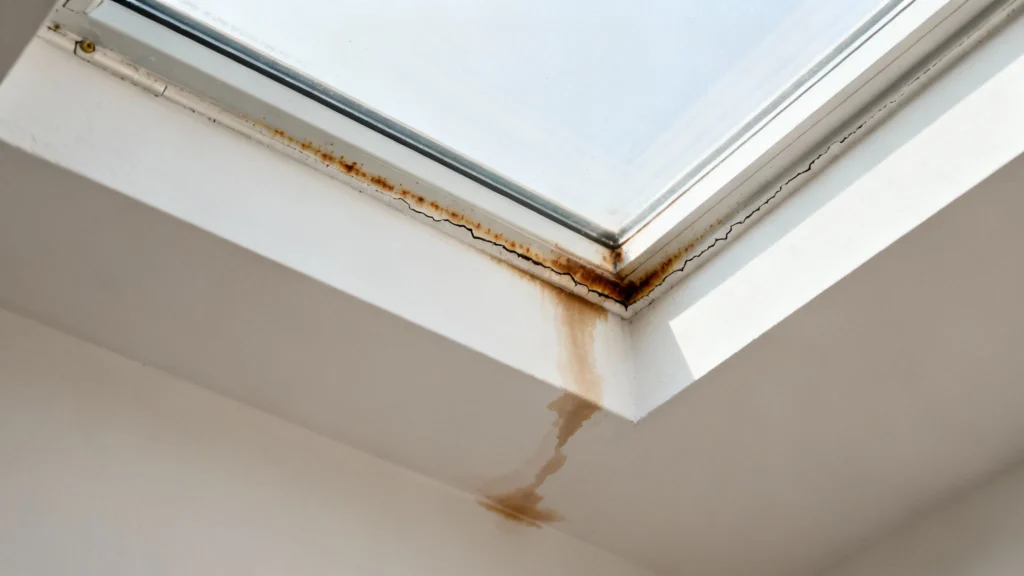
The trick is knowing what to look for, because the first signs are often easy to miss. The most obvious clue will be inside your home. Keep an eye out for any discolouration or water stains on the ceiling and walls around your skylight.
These might start as faint yellow or brown patches that get darker or bigger, especially after a heavy downpour. Don’t just write these off as a paint job issue; they’re the classic red flag that water has found a way past your roof’s defences.
External Warning Signs to Watch For
You can learn a lot from a quick visual check from the ground (binoculars are your friend here for safety) or a closer inspection if you’re confident and safe on your roof. You’ll want to focus on the flashing itself and the area right around the skylight.
Here are the tell-tale signs that your flashing system is in trouble:
- Visible Rust or Corrosion: Any hint of rust on metal flashing is a dead giveaway. It means the protective coating has worn away, and the metal itself is breaking down.
- Cracked or Peeling Sealant: While a proper installation uses minimal sealant, any that is there needs to be in good shape. If you see it cracking, peeling, or pulling away from the flashing or roof, it’s no longer doing its job.
- Lifted or Bent Flashing: Every piece of flashing should sit perfectly flat and tight against the roof. If you spot sections that are bent, lifted, or loose, they’re basically an open invitation for wind to get underneath and drive rain straight into your roof cavity.
- Debris Build-Up: When leaves, twigs, and dirt pile up in the back tray, they can form a dam. This stops water from draining away as it should, causing it to pool and eventually overflow where you don’t want it to.
A compromised flashing doesn’t just cause a simple drip; it actively channels water into your roof cavity, silently rotting timber frames, soaking insulation, and destroying plasterboard. Acting on the first sign of trouble is the best way to protect your home’s integrity.
When to Call a Professional
While spotting the problem is something most homeowners can do, fixing it is another ball game entirely. Repairing and replacing flashing is a technical job that demands the right skills, specialised tools, and—most importantly—the proper safety gear for working at heights.
A DIY attempt without the right know-how can easily make the problem much worse, not to mention the risk of serious injury.
If you’ve spotted any of the warning signs we’ve covered, it’s time to call in a professional roofer or a skylight specialist. They have the experience to accurately pinpoint the source of the leak and carry out a safe, watertight repair. For a deeper dive into what that involves, check out our guide to skylight leak repair.
Getting an expert on the job ensures it’s done right the first time, giving you peace of mind that your roof is secure once again.
Simple Maintenance to Maximise Flashing Lifespan
A professionally installed back tray flashing is a seriously tough line of defence against leaks, but even the best systems need a bit of TLC. Think of it like servicing your car—a quick, regular check-up keeps everything running smoothly and helps you spot little problems before they spiral into big, expensive repairs.
This simple maintenance routine can really stretch the life of your flashing, making sure it performs at its best, season after season. By setting aside time for this check-up twice a year, especially before the wet season hits, you’re protecting your investment and keeping your roof’s leak-proof integrity intact for the long haul.
Your Biannual Flashing Health Check
Running through this check is pretty straightforward. It’s all about making sure water can flow freely and that the flashing’s structure is still solid. The goal is to keep the system working exactly as intended, without any annoying blockages or weak spots.
Here’s an easy checklist to follow for your maintenance routine:
- Clear Debris Build-Up: Leaves, twigs, and dirt are the number one cause of blockages. Carefully clean out any gunk that’s collected inside the back tray so water has a clear path to drain away. A blocked tray can cause water to pool and overflow, completely defeating the purpose of the flashing.
- Do a Visual Inspection: Have a good look at the flashing for any signs of trouble. You’re searching for rust spots, peeling paint, or any physical damage like dents or bends that could mess with its performance.
- Check Surrounding Seals: While a back tray flashing doesn’t rely heavily on sealants, any that were used around screws or joints need a once-over. Look for any cracking, shrinking, or peeling silicone that might need to be carefully scraped off and reapplied.
Regular maintenance is the most cost-effective way to guarantee longevity. A 15-minute inspection twice a year can prevent thousands of dollars in water damage repairs down the line.
By making this simple routine a part of your regular home maintenance, you’re taking control and protecting your home. It’s a small effort that pays off big time in peace of mind and the lasting performance of your skylight installation.
Answering Your Questions About Back Tray Flashing
When you start digging into the details of roofing, it’s natural for questions to pop up. Let’s tackle some of the most common queries we hear about back tray flashing to clear things up and show why it’s a non-negotiable for a truly leak-proof roof.
Can a Back Tray Flashing Be Retrofitted?
Yes, absolutely. If you have an existing skylight that’s giving you grief with leaks, or if you’ve discovered it was installed without a back tray, a professional roofer can definitely retrofit one.
This usually means carefully removing the skylight and some of the surrounding roof sheets to get the new tray installed correctly. Everything is then put back together to create that crucial, watertight seal. It’s a very common fix for those frustrating, persistent leaks.
Is This Flashing Necessary for Every Single Roof Type?
While all roofs need some form of flashing, the back tray design is specifically for profiled metal roofs. On these roofs, a skylight acts like a dam, and the back tray is essential for managing the water that pools behind it, especially on low-slope roofs where it’s a must-have.
Other roof materials, like tiles or flat membrane roofing, use different flashing systems designed for their unique profiles. The principle is always the same, though: divert the water away. A good roofer will know exactly what your specific roof needs.
For any skylight installed on a metal roof, using a back tray flashing isn’t just an option—it’s the most secure way to guarantee a leak-free installation. Its design physically channels water away, a far more reliable method than just slapping on some sealant and hoping for the best.
Does a Back Tray Flashing Mean I Can Ditch the Sealant?
Pretty much. A well-installed back tray creates a mechanical seal that does the heavy lifting, making sealant redundant as your main line of defence.
The only time sealant should come into play is as a secondary backup, maybe on a few fastener heads or tiny joints. If you see a skylight installation that’s loaded up with silicone, it’s often a red flag for a shoddy job. That sealant will eventually break down under the Aussie sun and lead straight to leaks.
Ready to bring beautiful, natural light into your home without the worry of leaks? The flashing kits from Vivid Skylights are engineered for the ultimate protection and peace of mind. Check out our range of high-quality skylights and see the difference for yourself at https://vividskylights.com.au.