
Picture your home flooded with the kind of warm, natural light that makes every room feel more alive. This guide is your complete roadmap to installing Velux-style skylights, giving you the confidence to achieve a professional result and join the growing trend of creating healthier, more sustainable homes across Australia.
Why Natural Light Is a Game-Changer for Aussie Homes
Adding a skylight isn’t just a renovation—it’s a fundamental shift in how a room feels. I’ve seen it time and again: bringing daylight into a previously dark corner can be transformative, making a space feel larger, more open, and unbelievably more inviting. It goes far beyond simple aesthetics; it’s about crafting a better atmosphere to live in.
While this guide often refers to the popular Velux brand, it’s important to know that the core installation principles are almost identical for high-quality alternatives, like our own Vivid Skylights products. Our goal here is to arm you with the practical know-how for a flawless project, no matter which quality brand you choose.
The Soaring Demand for Skylights
If you’re thinking about this upgrade, you’re in good company. Velux skylight installations have seen huge growth in Australia, largely fuelled by a national focus on energy-efficient home improvements.
The global skylight market, valued at around USD 3.1 billion in 2022, is on a steady upward climb. This trend is mirrored right here at home, with sustainable building incentives helping to push it along. If you’re interested in the numbers, you can get more details about the global skylight market growth.
This surge in popularity really highlights a key change in mindset. Homeowners are no longer passive about their living spaces; they’re actively looking for ways to boost their home’s energy performance and their own wellbeing.
A successful skylight project hinges on much more than just the product itself—it’s all about the installation. A properly installed unit doesn’t just let in light; it enhances your home’s thermal efficiency and adds real value for years to come.
What This Guide Covers
We’re going to walk you through every critical stage of the process, from the first measurement to the last coat of paint. You’ll get the real-world insights needed for a leak-free, professional-looking installation that you can be proud of.
We’ll be breaking down:
- Project Planning: How to pick the perfect spot and the right skylight model for your needs.
- Creating the Opening: The right techniques for cutting through your ceiling and roof without causing a headache.
- Installation and Flashing: The crucial steps for securing the unit and creating a completely watertight seal.
- Interior Finishing: How to build the light shaft and make the final result look seamless and integrated.
Planning Your Skylight Installation Project
A flawless skylight installation starts long before you even think about picking up a tool. In my experience, the success of the entire project hinges on the groundwork you lay right at the beginning. Get the planning right, and you’re setting yourself up for a beautiful, structurally sound result that you’ll love for years.
This first phase is all about thinking through the details. Where will the skylight make the biggest difference? Which direction will give you that beautiful, usable light instead of harsh glare? A poorly placed skylight is a missed opportunity, so let’s get it right from the outset.
Finding the Perfect Skylight Location
Deciding where to cut a hole in your roof is, understandably, a big decision. Your main goal is to flood the room with useful daylight, but you need to balance that with both the look of the room inside and the structure of your roof outside.
Start by standing in the room. Imagine where that shaft of light will fall throughout the day. You need to consider the sun’s path across your home—in Australia, a south-facing roof gets that intense, direct sun, while a north-facing roof offers a softer, more consistent glow.
Once you’ve got a rough spot in mind, it’s time to play detective. Grab a stud finder and locate the roof rafters in your ceiling. The most straightforward installation is one that fits neatly between two existing rafters, which are usually spaced 450mm, 600mm or 900mm apart. Trust me, planning around these structural bones from the get-go will save you a world of headaches and complex framing work later on.
Gathering Your Tools and Materials
Before you even think about climbing that ladder, it’s crucial to have every tool and piece of material ready to go. A well-organised worksite is a safe and efficient one. There’s nothing worse than being halfway through a job only to realise you’re missing a critical item.
To make sure you’re fully prepared, we’ve put together a comprehensive checklist. This covers everything from the big power tools down to the essential sealants that will guarantee a leak-proof finish.
Essential Tools and Materials Checklist
| Category | Item | Pro Tip/Specification |
|---|---|---|
| Safety Gear | Safety Glasses, Gloves, Earmuffs | Non-negotiable. Always protect yourself. |
| Safety Gear | Sturdy Ladder & Roof Harness | Ensure your ladder is stable and use a harness on steep roofs. |
| Cutting Tools | Circular Saw & Reciprocating Saw | A circular saw for straight cuts; a reciprocating saw for tight spots. |
| Cutting Tools | Utility Knife | For trimming sarking and underlayment. |
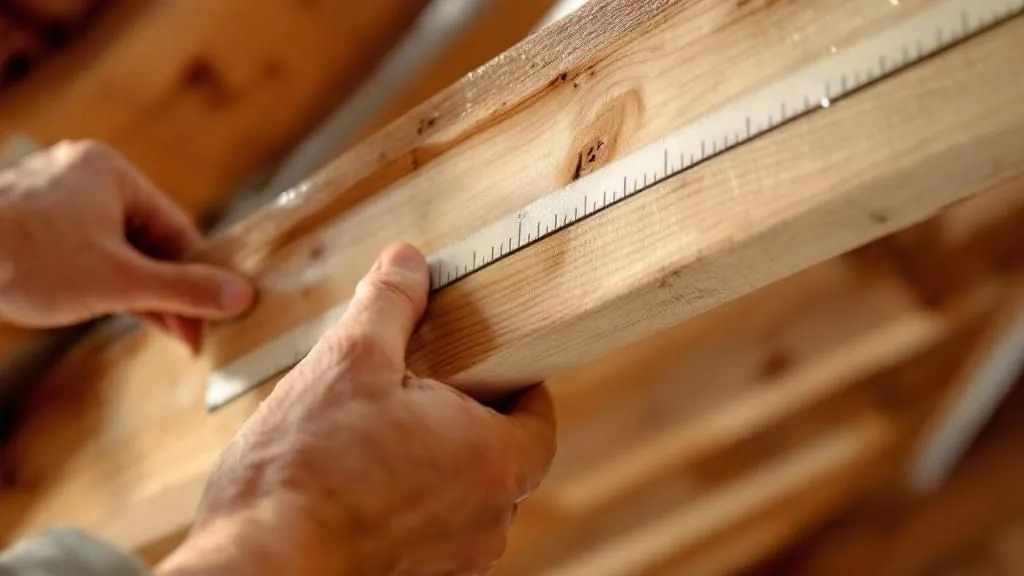
| Measuring & Marking | Tape Measure & Carpenter’s Pencil | Measure twice, cut once. It’s a cliché for a reason. |
| Measuring & Marking | Chalk Line | Essential for snapping straight lines on the roof and ceiling. |
| Fastening & Fixing | Drill/Driver with Bits | For securing the skylight frame and flashing. |
| Fastening & Fixing | Hammer & Pry Bar | For demolition and adjustments. |
| Sealing & Flashing | Caulking Gun & Sealant | Use a high-quality, weatherproof silicone sealant. |
| Sealing & Flashing | Flashing Kit (suited to your roof) | Crucial: Match the flashing to your specific roof type (tile or metal). |
| Skylight Components | Vivid Skylights Unit | The star of the show! |
| Skylight Components | Interior Trim & Plasterboard | For finishing the internal light shaft. |
Having all these items laid out and within reach will make the installation process smoother and much less stressful. It’s all about preparation.
Choosing the Right Vivid Skylights Model
Not all skylights are created equal, and the right one for you depends on the room’s purpose and your budget. Vivid Skylights has a fantastic range designed specifically for Australian homes.
- Fixed Skylights: These are your go-to for bringing in maximum light at a great price point. They’re perfect for living areas, hallways, or any space where extra ventilation isn’t the main goal.
- Electric Opening Skylights: An absolute game-changer for kitchens and bathrooms. These units let you vent steam and improve air quality at the touch of a button. The built-in rain sensors are brilliant—they close automatically when it starts to rain.
- Blockout Blinds: If you’re installing a skylight in a bedroom or a media room, adding a blockout blind is a must. It gives you total control, letting you plunge the room into darkness whenever you need it.
Selecting the correct flashing kit is just as crucial as choosing the skylight itself. Vivid Skylights provides custom-designed kits for all common Australian roof types, whether you’ve got corrugated metal or classic tiles. This is your number one defence against leaks.
Checking Council Requirements
Before you start cutting, a quick check with your local council is always a smart move. Some installations, especially if they involve altering roof trusses, might need a permit. A simple phone call can save you from big fines and frustrating delays down the line. It’s a small step that provides huge peace of mind.
Think of your skylight project as one part of a bigger home improvement plan. If you’re tackling multiple jobs, broader advice on managing renovations can be incredibly helpful. For example, some resources like The Secret Weapon For Home Renovations And Remodelling Projects offer great perspectives on project management. Taking these prep steps seriously ensures your skylight installation goes off without a hitch.
Cutting the Openings for a Perfect Fit
With your location chosen and your tools laid out, we’ve reached the most crucial part of the job: cutting the openings for your new skylight. This is where precision is everything. The old carpenter’s rule, “measure twice, cut once,” has never been more true than when you’re about to put a hole in your own roof.
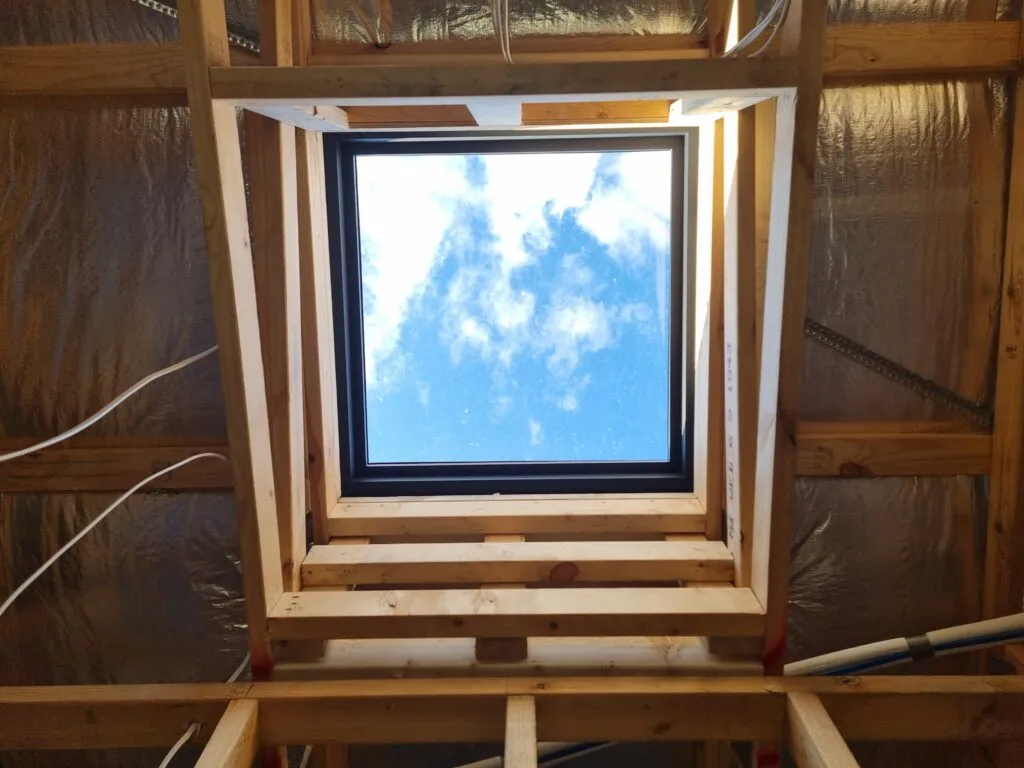
Think of this as two separate but connected jobs. First, you’ll cut the opening inside your home through the plasterboard ceiling. Then, you’ll transfer those measurements perfectly to the outside to cut through the roof itself. Getting this spot-on is the key to a snug fit and a professional, leak-free result for years to come.
Creating the Interior Opening
Let’s start from the inside. Your Vivid Skylights unit will have a specific “rough opening” size listed in the instructions. This is the exact dimension of the hole you need to create in your ceiling.
Grab your tape measure and a pencil, and carefully mark out this rectangle on the plasterboard, making sure it’s perfectly square and sits neatly between the rafters you located earlier. A quick pro tip: check the diagonals. Measure from corner to corner; if both diagonal measurements are identical, you know you’ve got a perfect rectangle.
Before you even think about picking up a saw, prep the room. Throw drop sheets over all your furniture and the floor. I’ve found that sealing the doorway with a plastic sheet and some tape does wonders for containing plaster dust—that stuff gets absolutely everywhere.
Once you’re prepped, use a utility knife to score the lines you’ve marked. A deep score will give you a much cleaner edge when you cut through with a handsaw or a reciprocating saw. Go slow and steady, following your lines precisely. A clean cut here will make the finishing and plastering work a whole lot easier down the track.
Transferring Measurements to the Roof
Now that the interior hole is cut, it’s time to pinpoint its location on the roof above. This step is all about accuracy—the external and internal openings have to line up perfectly.
From inside your attic space, drive a long screw or nail straight up through each of the four corners of the opening you just cut. These will poke through the roof sarking, giving you four perfect reference points on the outside.
Time to head up onto the roof (with all your safety gear, of course). You should be able to see the four screw tips clearly. Use a chalk line to snap straight, crisp lines between these points, creating a perfect outline of the opening on your roofing material. This is your guide.
Cutting Through Different Roofing Materials
Australian homes have all sorts of roofing, and each one needs a slightly different touch. This isn’t a one-size-fits-all task, so using the right tool for your specific roof is non-negotiable for a clean, safe cut.
- Corrugated Metal (Colorbond): Your best friend here is an angle grinder with a metal-cutting disc. Work slowly and methodically along your chalk lines. Just be mindful of the sparks and keep a fire extinguisher handy as a safety precaution.
- Roof Tiles (Terracotta or Concrete): First, you’ll need to remove the tiles that fall within your marked-out area. A pry bar will help you gently lift and slide them out. For any tiles that need to be cut to fit, an angle grinder with a diamond blade will give you the cleanest, most professional edge.
Whatever your roofing material, always wear your safety glasses and gloves. Cutting roofs creates sharp edges and flying debris. Taking your time here will save you from costly mistakes and ensure your Vivid Skylights unit has a perfect frame to call home.
How to Install the Skylight and Flashing
With the openings cut and ready, it’s time for the most satisfying part of the job: getting the skylight in and making it completely weathertight. All that careful prep work is about to pay off. The goal here isn’t just to drop a window into a hole; it’s to make it a seamless, leak-free part of your roof for good.
You’ll be lowering your Vivid Skylights unit into place, securing it with the brackets provided, and then methodically installing the flashing kit. This flashing is the absolute key to a successful Velux skylights installation, creating a layered barrier that directs water away from the opening.
This graphic gives you a quick overview of the main sequence for installing and sealing the frame.
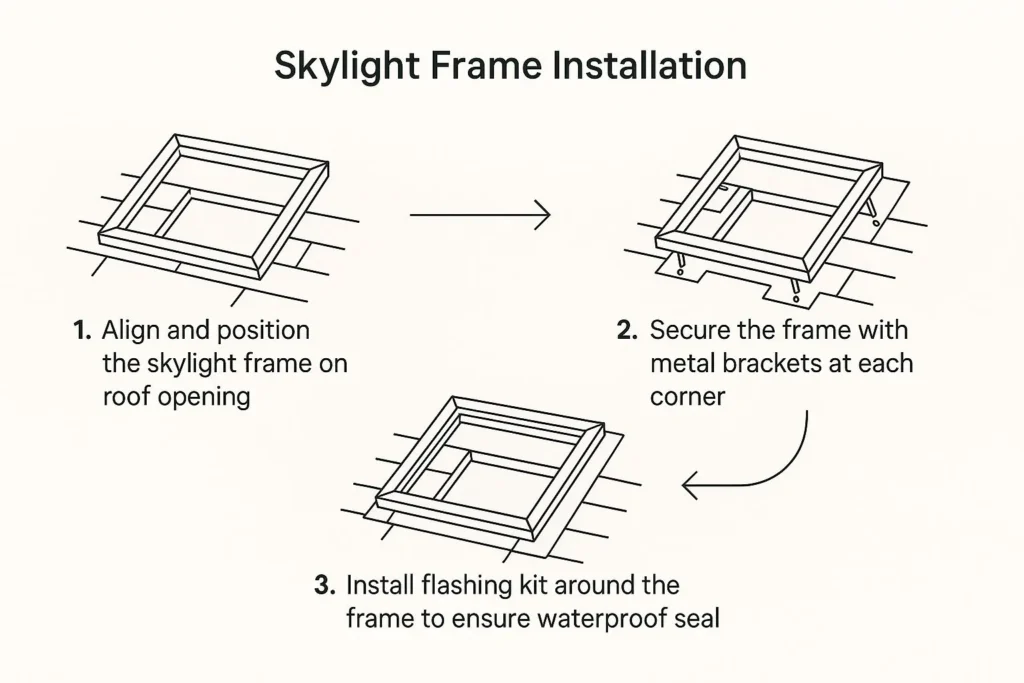
As you can see, the process flows from positioning the frame to the crucial flashing step. Getting the flashing right is your number one defence against water getting in.
Positioning and Securing the Skylight Frame
First up, carefully lift your skylight and lower it into the rough opening you’ve already cut. It should sit flush and snug on the roof decking or your battens. Before you do anything else, grab your tape measure. Check the diagonals of the frame to make sure it’s perfectly square in the opening.
Once you’re happy with the placement, it’s time to lock it down. Your kit will come with several L-shaped metal brackets. You’ll need to attach one to each corner of the skylight frame, screwing them firmly into the roof structure itself. This is what stops the unit from shifting or moving over time.
The Art of Flashing Installation
Pay close attention here, because this is the most critical part of the entire job. A poorly installed flashing kit is the number one reason skylights leak. Don’t rush it. The whole system works on a simple principle: layering each piece so water sheds over the top of the piece below it, just like the tiles on your roof.
You always, always start from the bottom and work your way up.
- The Sill Flashing: This is your starting point. It’s the bottom piece that sits just below the skylight. Slide it into position, making sure it sits over the top of your existing roof tiles or metal sheets below the opening.
- The Side Flashings: Next come the two side pieces. They need to overlap the sill flashing at the bottom corners. Critically, they must also slide underneath the roofing material on both sides of the skylight.
- The Head Flashing: The final piece is the head flashing, which goes at the top of the unit. This part must overlap both of the side flashings and slide underneath the row of roofing material above the skylight.
This overlapping sequence is non-negotiable. Think of it like dressing for a downpour—you’d never tuck your raincoat into your pants. The same logic applies here. Every piece is designed to channel water down and away, leaving no gaps for it to find its way in.
Sealing the Deal Against Australian Weather
With the flashing in place, you can now refit the roofing materials you removed or cut earlier. Carefully place any cut tiles back into position, ensuring they fit tightly against the new flashing. For metal roofs, the flashing is designed to integrate perfectly with the profiles of the sheeting.
While the flashing system does the heavy lifting, a bead of high-quality, neutral-cure silicone adds that final belt-and-braces layer of security. Use it to seal any tiny gaps where the flashing meets the skylight frame. Using the right components is everything, and you can see what goes into a purpose-built skylight flashing kit designed specifically for Australian conditions.
The push for professional-grade installations is bigger than ever. In fact, commercial projects now make up almost 79% of the skylight market in regions with strong sustainability targets, largely driven by green building codes. This trend, backed by Australian regulations that favour daylighting solutions, really highlights why high-quality installation matters—even on residential jobs. By focusing on a meticulous, leak-free seal, you’re not just installing a window; you’re making a smart, long-term upgrade to your home.
Interior Finishing For A Seamless Look
Getting your skylight weathertight is a huge milestone, but the job isn’t quite done. The real magic happens inside, where you transform what’s essentially a hole in the ceiling into a beautifully integrated architectural feature. This is where the project goes from a construction job to a design statement.
This final stage is all about creating a flawless transition from your ceiling to the skylight itself. The centrepiece of this is the light shaft—the tunnel that connects the roof opening to your room. How you shape this shaft has a massive impact on the quality of light. A straight, vertical shaft is fine, but if you really want to elevate the space, consider a splayed or flared shaft. By making the opening at the ceiling wider than the skylight, you diffuse the light, bathing the room in a softer, more expansive glow.
Building And Insulating The Light Shaft
After framing the light shaft with timber, the next critical step is insulation. Honestly, this is a detail that gets overlooked far too often, and it can undermine the entire installation. An uninsulated light shaft is like an open chimney for heat, wreaking havoc on your home’s energy efficiency during a hot Aussie summer or a chilly winter night.
Proper insulation is non-negotiable if you want your Velux skylights installation to actually improve your home’s thermal performance. Without it, you’re just creating a new source of heat loss or gain.
A well-insulated light shaft is the key to a high-performance skylight system. It prevents condensation, stops heat transfer, and delivers the comfort you’d expect from a premium product. Don’t skip it.
By getting this detail right, you’ll give your home’s thermal stability a serious boost. For a deeper dive, you can learn more about the energy efficiency of skylights in our detailed guide.
Plastering For A Flawless Finish
With the framing and insulation sorted, it’s time to line the light shaft with plasterboard. Cut your pieces to size and screw them securely into the timber frame. The aim here is to create a perfectly smooth, paint-ready surface that blends seamlessly with the rest of your ceiling.
Achieving that pro finish comes down to careful taping and plastering.
- Tape Every Joint: Use paper or fibreglass tape to cover every seam where the plasterboard sheets meet. Don’t forget the corners where the shaft joins the ceiling—these are the most important.
- Apply and Feather: Grab a broad knife and apply your first thin coat of plaster over the tape, feathering the edges out smoothly.
- Sand and Recoat: Once it’s dry, give it a light sand. Then apply a second, wider coat to completely hide the tape. A final top coat and one last gentle sand should leave you with a surface that’s ready for primer and paint.
After the skylight is installed and framed, you’ll almost certainly need to do some plaster repairs to get that perfectly smooth, integrated look around the new opening. Taking your time here is what separates an average DIY job from a finish that looks like it was always meant to be there.
Got Questions About Skylight Installation? We’ve Got Answers.
Even with the best-laid plans, a project like installing a new skylight is bound to bring up a few questions. That’s completely normal. Let’s walk through some of the most common queries we get from homeowners, so you can feel confident before you even pick up a tool.
A big one is always about the timeline. For a seasoned DIYer, a standard installation usually takes about one to two full days. Day one is all about the heavy lifting: cutting the openings in your roof and ceiling, then setting the skylight and its flashing in place. The second day is typically for the inside work—framing the light shaft and getting the plastering done.
Of course, things like a really complex roofline, a sudden downpour, or just your own comfort level can stretch that timeline out a bit.
Can I Install a Skylight on Any Australian Roof?
The short answer is yes, most Aussie roofs are perfect for a skylight. But—and this is a big but—the how changes dramatically depending on what your roof is made of. Quality brands provide custom-designed flashing kits for all the common materials, whether it’s corrugated metal like Colorbond, concrete tiles, or classic terracotta.
Using the right flashing kit isn’t just a suggestion; it’s the most critical part of creating a permanent, watertight seal. Trying to make the wrong kit work is basically asking for leaks and headaches down the track.
What if you have a very low-pitched or totally flat roof? That’s a special case. These roofs need a custom-built curb to be constructed first. This little platform raises the skylight, giving it the angle it needs for water to drain away properly instead of pooling and causing damage.
What Are the Most Common DIY Installation Mistakes?
Hands down, the biggest and most frequent mistake we see is getting the flashing installation wrong. It’s a tempting place to cut corners, but it almost always leads to a leak later on. Always, always follow the manufacturer’s instructions to the letter here.
Other classic trip-ups include:
- Dodgy Measurements: A few millimetres off on the rough opening can mean a poor fit, which compromises the seal.
- Forgetting to Check Structure: You absolutely have to know what’s under the roof before you cut. Hitting a structural beam or rafter can seriously weaken your roof’s integrity.
- Skimping on Sealant: Not using a high-quality sealant at every single potential entry point is leaving your home vulnerable to water.
And above all else, don’t ever compromise on safety. You’re working at height, which is risky business. A proper safety harness, a sturdy ladder, and all the right protective gear are non-negotiable for a project that ends well.
Ready to let that beautiful, natural light into your home? Vivid Skylights offers a premium range of fixed and electric opening skylights, all designed specifically for Australian conditions. Take a look at our products and find the perfect fit for your space at https://vividskylights.com.au.