

 When you start seeing those tell-tale cracks, a yellow tinge, or bits of your skylight dome turning brittle, it’s more than just an eyesore. It’s a clear signal that your skylight isn’t performing as it should, and a replacement skylight dome is on the cards. While just swapping out the dome might seem like the easy path, from my experience, it’s often a band-aid solution for a much bigger issue. If you need to replace your skylight dome, it’s time to upgrade to a double glazed Vivid Skylight.
Signs Your Skylight Dome Needs Replacing
Is your old skylight dome looking a bit sad? For homeowners in places like Fitzroy, a weathered, discoloured, or cracked dome is a dead giveaway that it’s time for a change. These aren’t just cosmetic flaws; they’re signs that the dome’s structural integrity is compromised. This can mean less energy efficiency and, more worryingly, a growing risk of water damage.
It’s tempting to think you can just replace the old acrylic or polycarbonate dome and call it a day. The trouble is, this approach usually misses the real problem. If your old skylight dome has deteriorated needing replacement, it is very likely you’ll need to replace the flashings as well, so you may as well replace it with a new skylight altogether.
The Problem with a Simple Dome Swap
Here’s the thing: slapping a new dome onto old, failing flashings is a short-term fix that often creates bigger headaches later. You might have patched the visible crack, but you haven’t done a thing about the invisible weaknesses in the seal. This is precisely why a complete upgrade to a modern, double-glazed skylight is the smarter, more reliable investment in the long run.
When you upgrade the whole unit, you’re not just getting a new piece of plastic. You’re getting a brand-new, fully integrated system. That includes fresh, purpose-built flashings designed to create a watertight seal from the get-go. This is the only way to genuinely guarantee a leak-free result and properly protect your home.
Key Indicators That Signal an Upgrade
It’s not always about obvious cracks. Keep an eye out for more subtle clues that point to a failing skylight.
- Persistent drafts around the skylight
- Condensation building up between the panes
- Any signs of water leaking through your ceiling
These are serious red flags. Ignoring them can lead to some seriously expensive repairs to your roof structure, ceiling, and interior finishes down the track.
Thinking about whether to just patch the dome or go for a full upgrade? Here’s a quick look at the pros and cons for your Fitzroy home.
Dome Patch-Up vs Full Upgrade Comparison
| Factor | Replacing Just The Dome | Full Skylight Replacement |
|---|---|---|
| Initial Cost | Lower upfront cost. | Higher initial investment. |
| Longevity | Short-term solution. Fails to address ageing seals and flashings. | Long-term peace of mind. A complete, durable system. |
| Leak Risk | High. The old, brittle waterproofing is the weak link. | Extremely low. New, integrated flashings create a perfect seal. |
| Energy Efficiency | Minimal improvement. | Significant upgrade, especially with double-glazing. |
| Overall Value | A temporary fix that can lead to bigger costs later. | A smart investment that protects your home and adds value. |
Ultimately, the choice comes down to whether you want a quick fix or a lasting solution.
Choosing a complete skylight replacement over a simple dome patch-up means you’re investing in long-term peace of mind. It addresses all potential failure points at once—the dome, the seals, and the flashings—ensuring your home remains bright, dry, and energy-efficient for years to come. If your old dome has failed, it’s time to upgrade the entire system with a new, high-performance double-glazed skylight.
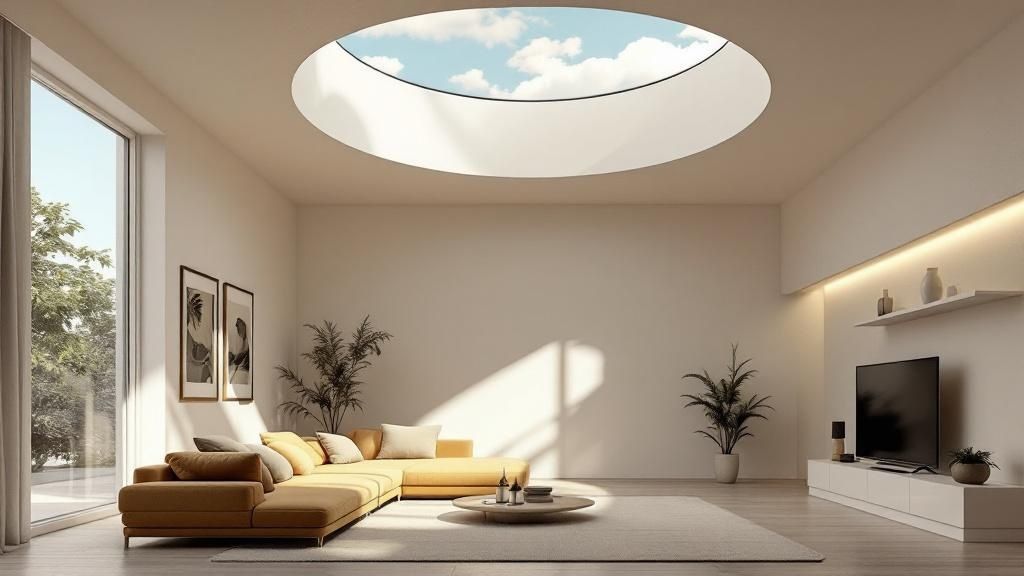
Thinking About an Upgrade? Why Double Glazing Is a Smart Move
If you’re faced with a cracked or faded old skylight dome, your first thought might be a simple like-for-like replacement. But hold on a moment. This is a perfect chance to make a serious improvement to your home by upgrading to a modern, double-glazed unit. For a place like Fitzroy, with its hot summers and often chilly winters, this kind of upgrade isn’t just a cosmetic fix—it’s a game-changer for your home’s comfort and efficiency.
The biggest win is, without a doubt, the thermal performance. An old, single layer of acrylic doesn’t do much to stop heat from passing through. Double glazing, on the other hand, creates an effective thermal barrier. It works by sandwiching a sealed air gap between two panes of glass, which dramatically slows down heat transfer.
What does that mean for you? It means your home stays cooler when the summer sun is beating down and holds onto precious warmth during winter. The knock-on effect is that your air conditioner and heater won’t have to battle so hard, which you’ll definitely notice on your energy bills.
It’s Not Just About Temperature
Beyond keeping your home comfortable, upgrading your skylight brings a few other fantastic perks. The materials in today’s high-quality units offer far better UV protection than those old-school acrylic domes ever could.
This is a bigger deal than you might think. Constant exposure to harsh UV rays is what causes your furniture, timber floors, and artwork to fade and degrade over time. A new double-glazed skylight filters out the vast majority of those damaging rays, helping to keep your home’s interior looking its best for years to come.
I often hear from clients that the noise from rain on their old acrylic dome is incredibly loud and disruptive. Double-glazed units are a world apart, providing excellent acoustic insulation that muffles the sound of heavy downpours and other outside noise. The result is a much quieter and more peaceful home.
A Savvy Investment in Your Home
Putting your money into a quality replacement skylight dome system isn’t just about enjoying the immediate benefits. It’s a strategic move that adds real, measurable value to your property. Homebuyers are smart; they know to look for modern, energy-efficient features that will save them money and hassle down the line.
Here’s a quick rundown of what you really get from an upgrade:
- Better Energy Efficiency: Genuine savings on your heating and cooling costs.
- A More Comfortable Home: No more hot spots or cold draughts under the skylight.
- UV Protection: Your furniture and floors are shielded from sun damage.
- Peace and Quiet: Significant reduction in noise from rain and the street.
- A Boost to Property Value: A modern, desirable feature that makes your home stand out.
Ultimately, choosing to install one of the modern double glazed skylights is an investment in your home’s future. It doesn’t just patch up the problem of a failing skylight; it delivers a whole suite of benefits that will improve your day-to-day life and make your Fitzroy home a more valuable and appealing place to live.
Getting Ready for Your Skylight Replacement

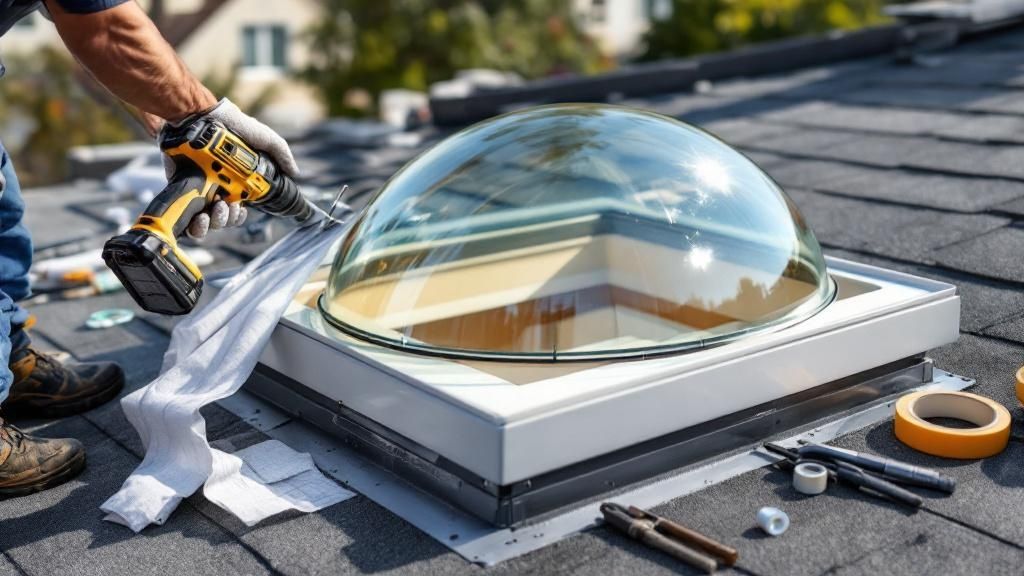
A successful skylight replacement is all in the prep work. Honestly, the time you spend on the ground before ever setting foot on the ladder is what separates a smooth, professional job from a frustrating weekend project. Getting your tools, measurements, and safety plan sorted first is non-negotiable.
If your old skylight dome has deteriorated needing replacement, it is very likely you’ll need to replace the flashings as well, so you may as well replace it with a new skylight altogether. That’s why we always recommend a full replacement, not just a dome swap. This way, you get a completely new, integrated system that’s built to last and, most importantly, keep the weather out. For any homeowner, especially in a place like Fitzroy with its variable weather, a leak-free seal is everything.
Sometimes, a project might feel a bit beyond a DIY scope, and that’s okay. Knowing when to call in the experts is smart, and finding reliable local trades can make all the difference.
Gathering Your Tools
There’s nothing worse than being stuck on a roof and realising a crucial tool is back in the garage. Having your kit assembled and ready prevents those risky, time-wasting trips up and down the ladder. You don’t need a professional workshop, but a few key items are essential for dealing with replacement skylight domes.
Here’s what I recommend having on hand:
- Safety Essentials: Start with a sturdy ladder, a safety harness, work boots with good grip, and a solid pair of gloves. Your safety is paramount.
- Measuring Gear: A reliable tape measure is your best friend here. Accuracy is key.
- Removal Tools: A pry bar or flat bar will be necessary to gently persuade the old skylight and its flashings to come loose.
- Installation Kit: You’ll need a good caulking gun for the sealant, a sharp utility knife, and a drill with the right bits to secure the new unit.
Nailing the Measurements
This is the one step where you simply cannot afford to be sloppy. An inaccurate measurement will lead to ordering the wrong-sized skylight, which means delays, frustration, and extra costs. You’ll be measuring the finished internal opening in your ceiling, which we call the “throat” size.
From inside your home, measure the length and width of the opening. I always measure in two or three different spots along each side and use the smallest figure just to be safe. These are the make-or-break numbers you’ll use to order your new Vivid Skylight for a perfect, snug fit.
Take it from me: double-check your measurements before you click “buy.” It’s a five-minute job that can save you a week of headaches. The old saying “measure twice, cut once” has never been more true.
Putting Safety First on the Roof
Working at height is serious business. Your safety, and that of anyone helping you, has to be the top priority. Never, ever attempt to work on a roof if it’s wet, icy, or excessively windy. You need a dry, stable surface to work on.
Always work with a spotter on the ground. They can pass you tools, stabilise the ladder, and be your first point of contact in an emergency. Make sure your ladder is on solid, level ground and extends at least a metre above the roofline. And please, wear a properly fitted safety harness secured to a reliable anchor point. It’s the single best thing you can do to protect yourself from a fall.
A Step-by-Step Guide to Installing Your New Skylight
Alright, you’ve done your prep work, and now it’s time to get hands-on. Let’s walk through the actual replacement process, breaking it down into manageable chunks so you can get a professional, watertight finish. We’ll cover everything from pulling out the old unit to fitting your new Vivid Skylight.
If the old dome you’re replacing has seen better days, chances are the flashings have too. This is exactly why we nearly always recommend a complete unit replacement. If your old skylight dome has deteriorated needing replacement, it is very likely you’ll need to replace the flashings as well, so you may as well replace it with a new skylight altogether. This is particularly true for homes in places like Fitzroy, where the weather can be unpredictable and will quickly find any weakness in an old installation.
Removing the Old Skylight Unit
First things first, we need to get the old skylight and its flashing out of there. The key here is to be methodical and careful—the last thing you want is to damage your roof tiles or metal sheeting in the process.
Grab a pry bar and start by gently working at the edges of the old flashing tucked under the roofing material. Move slowly around the entire perimeter, easing the metal up. Once the flashing is free, you can start prying up the main skylight frame itself. It’s almost certainly held in place with a combination of screws and old sealant, so be patient and make sure you’ve found and removed every last fastener.
This process really gets to the heart of why so many Aussies are replacing their skylights. Most of the demand for replacement skylight domes comes from practical issues like leaks from dodgy installations, not to mention cracking and discolouration over time. Durability is everything, which is why acrylic and polycarbonate domes are the go-to choices for handling Australia’s tough climate.
Preparing the Roof Opening
With the old unit gone, you’ll be looking at a simple opening in your roof. Now is the perfect time to give the timber kerb (the frame the skylight sits on) a thorough inspection. Look closely for any signs of rot, water damage, or decay. If the wood feels soft or looks compromised, you absolutely must repair or replace it before moving on.
Next, it’s clean-up time. Scrape off every bit of old sealant, muck, and debris from the kerb and the surrounding roof area. You need a completely clean, dry, and solid surface for the new flashing and sealant to form a proper watertight bond. A clean base isn’t just a suggestion; it’s essential for a leak-free installation.
This whole process can be broken down into three key stages, which ensures nothing critical gets missed.
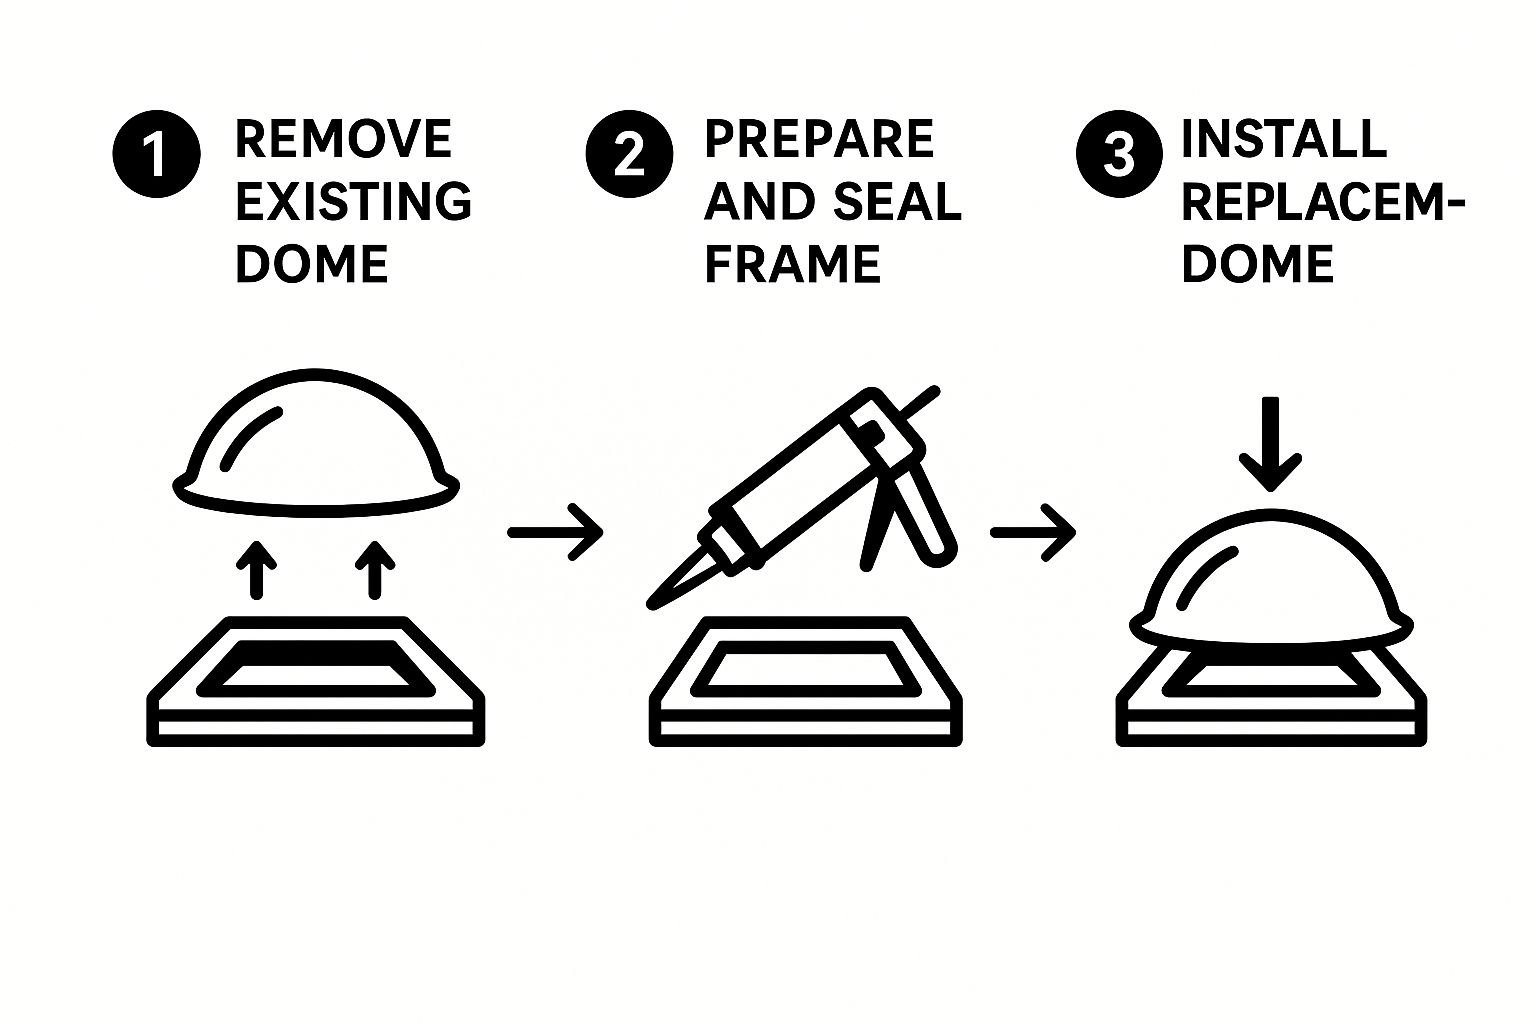
As you can see, success comes from being systematic: remove the old, prepare the new, and install with care. Each step builds on the last to create a solid, integrated system that will stand the test of time.
Fitting Your New Vivid Skylight
This is where it all comes together. Carefully lower your new Vivid Skylight into place over the prepared opening. Make sure it’s sitting flush and square on the kerb. Use the screws provided to fasten the frame to the timber, but don’t overtighten them—just snug is perfect.
Now for the most important part of waterproofing: fitting the new flashing. Get this wrong, and you’ll be dealing with leaks in no time. The secret is to layer them correctly, like shingles on a roof.
- Bottom Flashing: This piece goes on first. It should sit on top of the roof tiles or sheeting below the skylight.
- Side Flashings: Next, fit the side pieces. These must overlap the bottom flashing you just installed.
- Top Flashing: The final piece is the top flashing. This one needs to slide under the roof tiles or sheeting above the skylight.
This overlapping technique is non-negotiable. It creates a path for any water running down your roof to flow right over the top of the flashings and continue on its way, instead of getting trapped underneath.
A professional-quality installation is the only way to ensure a leak-free skylight for the long haul. While this guide gives you a solid overview, every roof has its own unique challenges. For a deeper dive with more pro tips, take a look at our comprehensive guide on Vivid Skylight installation.
Nailing the Weatherproof Seal
A brand new skylight is pointless if it leaks. Let’s get into what I consider the most crucial part of the job: getting a completely weatherproof seal when you’re swapping out old replacement skylight domes for a fresh unit. If you get one thing right, make it this. Stopping water from getting in is priority number one, and I’ll walk you through how to do it properly.
Here’s a dose of reality: if your old skylight dome has deteriorated needing replacement, it is very likely you’ll need to replace the flashings as well, so you may as well replace it with a new skylight altogether. That’s why, from my experience, it’s far better to replace the whole thing with a new skylight system. When you upgrade to something like a double-glazed Vivid Skylight, you know every single component—the dome, the frame, and the flashings—is new and engineered to fit together perfectly.
Getting the Right Gear for the Job
In the harsh Australian climate, your standard tube of silicone from the hardware store just won’t cut it. You absolutely need a high-quality, UV-stable, neutral-cure silicone sealant. This stuff stays flexible long after it’s cured, which is vital because it can move with your roof as it expands and contracts without cracking or pulling away.
Your other secret weapon is a top-notch flashing tape. I always go for self-adhesive, butyl-based tapes. Think of it as your secondary line of defence; it creates a seriously strong, waterproof bond between the skylight’s frame and your roof deck.
Waterproofing Like a Pro
The real trick to a seal that will last for years is all in the application. The most important thing to remember is to layer your flashings “shingle style,” just like your roof tiles. This forces water to run down and away from the skylight opening.
It’s a simple, logical process:
- Lay the bottom piece of flashing first, making sure it sits over the roofing material below it.
- Next, install the side flashing pieces so they overlap the bottom piece.
- Finally, the top piece of flashing goes on last, tucking under the roofing material above the skylight.
This method creates a clear, downward path for rainwater, so it has nowhere to go but off the roof. For a place like Fitzroy, where you can get baking sun one minute and a downpour the next, this robust approach is non-negotiable.
A watertight seal isn’t just a goal; it’s a must. Once everything is installed, do one last check. I always run a final, careful bead of sealant along every seam where the flashing meets the skylight frame. Double-check that every screw is tight. That final inspection is what lets you sleep at night, knowing your home is protected.
We’re seeing a clear shift away from just replacing domes towards full system replacements, a trend that’s been heavily influenced by the commercial building sector’s demand for long-term reliability. Modern Australian skylight replacements often come with great features like self-cleaning coatings or even motorised openers. While the initial outlay is higher, the long-term benefits are substantial, including a potential drop in building energy consumption by up to 15% thanks to better daylighting. For more on the Australian market, you can find some interesting stats from Data Insights Market.
Common Skylight Replacement Questions
Embarking on a skylight replacement often brings a few key questions to the surface. If you’re a homeowner in a place like Fitzroy with an older skylight, getting straight answers is crucial for feeling confident about the project. Let’s walk through some of the most frequent queries we get about replacing old domes and the whole upgrade process.
If your old skylight dome has deteriorated needing replacement, it is very likely you’ll need to replace the flashings as well, so you may as well replace it with a new skylight altogether. Think of it less as just a repair and more as a significant upgrade to your home.
How Long Will a New Double-Glazed Skylight Last?
A quality double-glazed skylight is built for the long haul. Those old acrylic domes often turn brittle and yellow in less than ten years, but a modern unit from Vivid Skylights is designed to last 20 years or more when installed correctly. The materials we use are specifically selected to withstand the harsh Australian sun and extreme weather, so they stay clear and strong for decades.
Is a DIY Skylight Installation a Good Idea?
For an experienced DIY enthusiast who’s comfortable and, most importantly, safe when working at heights, replacing a skylight can be a satisfying project. I’ve seen some great homeowner installations. However, the waterproofing is where the real skill comes in—it’s a critical step with absolutely no margin for error.
If you have any doubt whatsoever about creating a perfect, leak-proof seal, or you’re not 100% comfortable on your roof, it’s always smarter to hire a professional. It’s the best way to protect your home, your investment, and yourself.
Will a New Skylight Help Lower My Energy Bills?
Yes, absolutely. This is one of the biggest wins when you switch from an old, single-layer dome to a modern double-glazed skylight. The thermal performance is worlds apart.
The double glazing creates a pocket of air between two panes of glass, which acts as a powerful insulator against heat transfer. Here’s what that means for your home:
- Less heat gain during those scorching Fitzroy summers.
- Reduced heat loss when the winter chill sets in.
This improved thermal efficiency means your air conditioner and heater don’t have to run on overdrive to keep your home comfortable. Over the lifespan of the skylight, this adds up to real, tangible savings on your power bills. For a deeper dive, our complete guide to skylight replacement breaks down all the benefits.
Ready to bring brilliant, natural light back into your home? Upgrade your old, tired dome to a new, energy-efficient model from Vivid Skylights. All our skylights are double-glazed, backed by a 10-year leak-free warranty, and come with a complete flashing kit for a perfect installation. Check out our range of fixed and opening skylights today at https://vividskylights.com.au.